Tag Archives: tech

Home Automation Update

2017.

As with all things that change, much remains the same.  The past several years have seen an explosion of new products in the “Smart Home” market, yet no clear winner has emerged, resulting in a landscape that is even more fragmented and beset by compatibility issues than ever before.  Whereas 5 years ago one was faced with a choice of several protocols (Z-wave, X10, ZigBee) and control software options (HomeSeer or Vera) or expensive, bundled turn-key solutions like Control4 or Savant, the product offerings are now much more diverse.  Almost every large tech company (Google, Apple, Samsung) and many home appliance stores (Home Depot, Lowe’s) have their own brand-name devices, home automation hubs, and cloud subscription services.  Nothing as ambitious as Google Home (the platform, not the smart speaker they launched this year) has materialized, and because no one ecosystem has gained wide acceptance, the consumer is faced with the unfortunate choice of settling for the limitations of a single ecosystem that may be lacking in certain device modules or software features, or going down an ever more harrowing DIY path and dealing with compatibility issues as they try to integrate products from the above manufacturer’s offerings into a third-party control network, hoping that the underlying protocols are still compatible.

Left with the choice of investing an a single ecosystem that may – and likely will – become obsolete (and unsupported?) within less than a decade, I have decided to stick with the tried and true – HomeSeer and Z-Wave – for the foreseeable future.  While lacking some of the nice flourishes like well-designed mobile apps and effortless compatibility, the endless rule-based configuration and extensibility of HomeSeer offers true Automation where competing “consumer-friendly” products lean more towards glitzy remote-control.

In the past few years, I have added some additional functionality, mostly through software, that has improved the overall experience of my setup.  The mantra is simple: unseen, unheard.  Anticipate, react, but do not interfere or present features that add little value.  What does that look like?

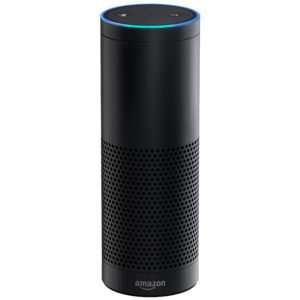
Alexa

My glorified smart alarm clock.  Really.  While the other features are nice, and I do enjoy the occasional customized morning briefing, using the Echo as an alarm clock has made a notable improvement in the daily routine.  With IFTTT integration, Alexa can trigger events in HomeSeer, and trigger phrases can be customized.  I can say, “Alexa, trigger all lights out” to turn every (connected) light in the house out, or “Alexa, trigger air on” to turn on the AC.  Rather than fumbling with a crappy old alarm clock or relying on my phone, I can say “Alexa, set alarm for 5:25 AM” and it is done.  The time is maintained accurately via internet connection, and daylight savings is accounted for.  Better yet, IFTTT can respond to the alarm going off as a trigger.  This allows the lights in my bedroom, hallway, and living room to automatically come on when the alarm goes off, and (optionally) the coffee pot to turn on with a 10min delay for me to finish a shower,  Pretty cool.
Presence

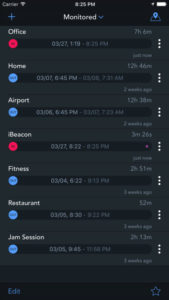
One of the requirements for true home automation is the accurate tracking of presence.  The system must know who is home in order to respond appropriately.  This is actually very difficult to implement, and there are many ways of going about it, including motion sensors, Bluetooth beacons, pinging each household member’s phone while connected to the Wi-Fi network, or using GPS position reporting from an app.  The latter two options offer the additional granularity of knowing WHO is home (assuming they keep their phone with them) and the last option gives the ability to set multiple trigger zones on a map with the goal of anticipating one’s arrival home and thus responding BEFORE they arrive, allowing for heat/AC to already be on, alarms to be disabled, etc.  This is what I have implemented with one of my favorite iOS apps, Geofency.  It allows multiple “Geo-Fences” to be set up, with accurate cell and GPS based tracking of the entry and exit into and out of set geographical regions, with associated trigger actions.  In this case, like with Alexa, IFTTT is used as a bridge to connect with HomeSeer and set “Home” and “Away” status.
Security

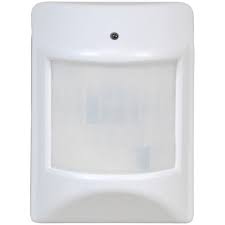
ADT?  pfft.  With no additional hardware, and zero monthly subscription fees, I have an adequate security system by simply utilizing the existing presence features described above with alternative events to be triggered when either of the in-house motion sensors (entryway and stairway) detect motion.  Normally, these are used to turn lights on, but when no one is home, they send an alert text that there is activity in the home.  While I have experimented with cameras, there are just too many false positives (headlights flashing through a window, lightning, birds etc…).  Simple IR sensors are much more reliable at detecting humans and humans only.
HVAC

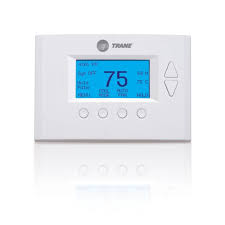
Here is where the cost savings comes in to save the day and pay for all the cool stuff described above.  Presence sensing and a connected thermostat (no, not a Nest, just a simple, dumb, Z-wave thermostat) allow for the heat and AC to be on only when home, and to dynamically react to changing outside weather conditions, bedtimes, and early/late mornings.  The cost savings, especially with air conditioning, is in the range of hundreds of dollars annually.
Conclusion

With the exception of voice control via Alexa, little has changed from the hardware standpoint.  Sure, a few more lights are attached via Z-Wave outlet, thanks to overall lower prices.  Several 4-button Aeon MiniMotes have been added for convenience of turning said lights on and off singly or in groups.  But the rest?  Mostly better software integration.  Better presence detection has enabled a much less distracting level of automation, where the house reacts to certain events reliably and appropriately, but is still able to be overridden manually without hassle.

While the lights don’t change colors and doors don’t lock and unlock themselves, I am happy with this fairly unobtrusive setup until something better comes along.

 

Category: Technology | Tags: , , ,

Guide: Note 3 flash to PagePlus with 3G data

Well, that didn’t last long.  After finally getting my Galaxy Nexus flashed to PagePlus and up and running with 3G data, I thought I’d be set for a while.  Then it finally hit me: the galaxy nexus is a piece of crap.  Even when released, it was the result of a 3-way compromise between Google, Samsung and Verizon with the loser being the customer.  Now that it’s pushing 3 years old, retirement is all too gentle a fate.

The Samsung Note 3 is currently the best specced phone available running Android.  It’s also the most expensive.  Fortunately, PagePlus users tend to be frugal, and I’m no exception. I took a chance on a used Sprint Note 3 with a bad ESN (doesn’t matter if flashing it to verizon) and a “Locked SIM.”  A few dings around the bezel (but not a scratch on the screen) only sweetened the deal further.  I made away like a bandit, getting this flagship phone for half its MSRP and nearly the same price as phone subsidized on a 2-year contract.  I just had to make it work.

While this guide follows my adventure with the Note 3, I am trying to make it as generic as possible for flashing any Qualcomm-based phone (Note 1/2/3, S1,S2,S3,S4, HTC One etc…) to PagePlus using DFS.  There are many variables at play here, and some steps may vary by phone, but the overall process should be accurate.  For instance, you may get away using different Radios, PRLs and donor phones than I used.  Then again, you may not.  I’ll do my best to accommodate this.  If all the HA, AAA, MEID, PRL, MSL, SPC jargon is confusing you, check out the end of this post.  I did my best to pass on what I learned.

Prepare your PagePlus Account

  1. Register your phone with PagePlus.  I chose to go through Kitty Wireless, an authorized dealer, as they will take care of monthly billing with the 1200 Plan.  I’m also a member of the Level 2 “Crazy Kitty PIN Rebate Club ” which gives a discounted rate on plans – $26.97/mo vs $29.99/mo – it adds up over time, especially with multiple lines.  This club is only offered at select times during the year, and costs a one-time fee of $100 to join.
  2. Make sure to supply the MEID correctly when your register your device – you need to remove the last digit (because it is 4G capable) for the order to go through.  For example,mine was 990000xxxxxx223.  I supplied 990000xxxxxx22.  Should end up being 14 digits instead of 15.
  3. Wait for the order confirmation email.  You’ll need the following: Phone # (MDN) MIN (MSID), and SID.  For the SID, you need to call PagePlus at 800-550-2436.  Expect to wait a while.
  4. You may or may not need a SIM card.  Furthermore, that SIM card may or may not need to be from Verizon, and it may or may not matter whether it has already been activated.  This totally depends on your phone.  For the Sprint Note 3 that I used, a SIM card was unnecessary.  The verizon model of the same phone however often requires one.  This will require some googling on your part.
  5. For 3G data (upload / download speeds >1mbps, ping <200ms) you will need a “Donor Phone”.  This can be any Verizon dumbphone (that supports 3G) or any 3G ONLY smartphone.  You may already have one in a drawer somewhere.  If not, do a quick google search to make sure the one you are buying is compatible with DFS or CDMA Workshop.  I used a Samsung Convoy (SCH-u640).
    1. You may skip this step, but you will be limited to 1X data (upload/download speeds of 0.1mbps, and most painful – pings of 700-1200ms).
    2. Note: you may also be able to get away with a Sprint phone as a donor, but lets not complicate things, shall we?  Phones are cheap on eBay. 

Ready your Computer

  1. Download this file (45.2MB).  It contains several files necessary for the process.
  2. Install the 32-bit or 64-bit USB drivers for your phone (not provided)
  3. Download DFS from: http://www.cdmatool.com/download.  Make sure you get DFS and not iDFS.  Install it and create an account – you can get by with the Demo version just fine.
  4. Use the 60008 PRL provided (recommended) or download one here.

Preparing to Flash

Your phone may need to be rooted and/or have an unlocked bootloader.  More importantly, make sure you have the latest ROM of your choice installed before flashing, and MOST importantly, ensure that the baseband / modem (check this in settings / status) is compatible with flashing to PagePlus or your desired MVNO.  I will go through this in the case of the Sprint Note 3 (SM-N900P):

Part 1 – Update Android / ROM, obtain Root, flash Modem

  1. As always, it is a good idea to make a full backup before starting.
    1. TWRP recovery is easy to install via the free goomanager app
  2. I grabbed the latest official (TouchWiz) build of Android 4.4.2  KitKat: N900PVPUCNAB and installed it using Odin 3.09.
  3. Unfortunately, the NAB modem that is installed with this update is not compatible with PagePlus.  No problem, we now just have to flash an earlier version of the modem ONLY (again using Odin just as before), which you can find in the download above (modem.tar).
  4. We can then Root android, again using Odin and loading “CF-Auto-Root-hltespr-hltespr-smn900p”.
  5. This is a good time to disable the pesky KNOX security software, though this step is not necessary for flashing.
  6. Make another backup of your shink new 4.4.2 ROM

Part 2 – Set USB mode to MODEM

  1. Enable USB Debugging.  Settings –> About Phone –> Tap “Build Number” 7 times to enable the development menu.  Then go to it (Settings –> Development) and make sure Enable USB Debugging is checked.
  2. Enable “Install apps from unknown sources” in the security settings.
  3. Install Samsung Android SPC Utility (apk provided) and press “Read SPC” – write this down.
  4. Dial ##3424# (DATA) to enter the PhoenUtil menu, and change the Qualcomm USB Setting to DM+MODEM+ADB or RMNET+DM+MODEM – either will work.
  5. The phone is now ready for flashing.

Reading settings with DFS

Before we start, we need one last password.  For Samsung devices, check here.  The 16 Digit Password that worked for my Sprint Note 3 was 2012112120131219.

DFS – READ; do NOT click write on anything yet

  1. Make sure the SIM card is removed.
  2. Turn on phone and connect to USB – ensure drivers are detected and installed.
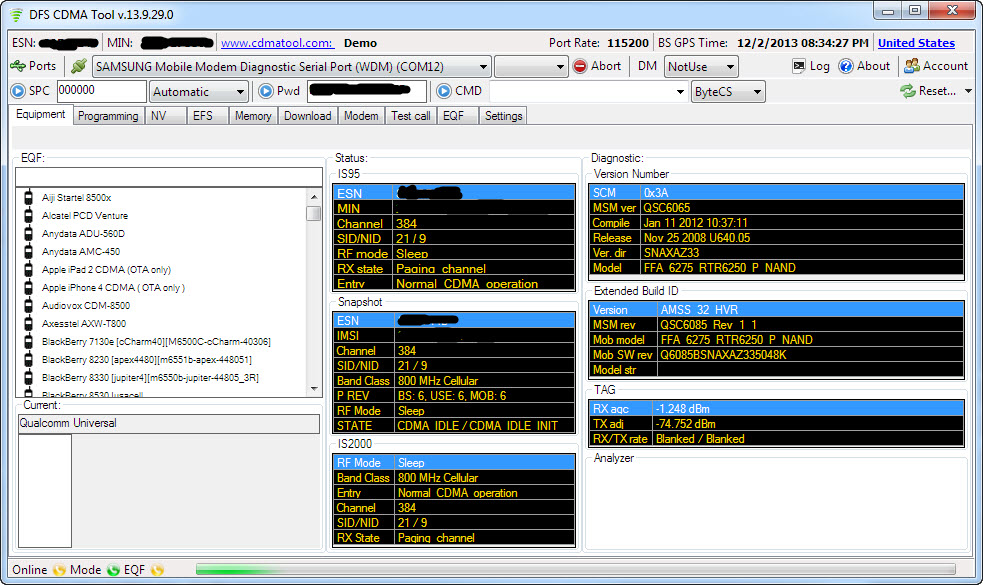
  3. Start DFS.  Open “Ports”, select the COM port belonging to the phone.
  4. DFS should establish a connection and read the status and diagnostic info.
  5. Enter your SPC and click the button (log should indicate “UNLOCKED”)
  6. Enter your 16-digit password and click the button (log should indicate “UNLOCKED”)
  7. Go through each section of the equipment and programming tabs and click READ for each subsection.  Then MAKE SCREENSHOTS of your default values.
  8. Go to programming –> General and copy your MEID (14 digits HEX; ignore the two digits in the second box if present)
  9. Turn OFF your phone.  This is important.

Flashing Donor Phone / Obtaining HA, AAA Keys

Put aside your POWERED OFF phone and grab the donor.  Do NOT EVER have the two of these devices powered on at the same time with the same MEID (which they will have shortly).  This would be illegal according to the FCC.

DFS – Flash the donor

  1. Connect your donor phone to your computer and open DFS.
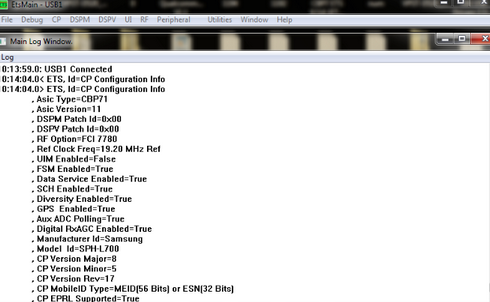
  2. Establish a connection with your phone.  Click Ports, and select the COM interface you donor is connecting on.  This will vary by model.  Here’s what mine looked like:DFS Connected to Samsung Convoy (SCH-u640) - click to enlarge.
  3. Send the SPC code (mine was 000000).  Yours probably is too.
  4. Send the Pwd (mine was 2008110120090528).  This is unique to the model of phone.
  5. Go to the Programming / General tab and READ your MEID.
  6. SAVE THIS – you will want to restore it after finishing.
  7. Write the MEID from your Note 3. (and READ it back to verify it stuck).
  8. Reboot your donor phone and follow the prompt to activate it (or dial *228).  It will now have your PagePlus phone number and should be fully functional.  You have switched phones on a CDMA carrier without having to call support to perform an ESN change.  Epic win.
  9. Verify the 3G icon is present and do something that uses data (mobile web, send an MMS).  This will just ensure the AAA and HA keys are updated.
  10. Connect the donor back to DFS and send the SPC and Pwd again as before.
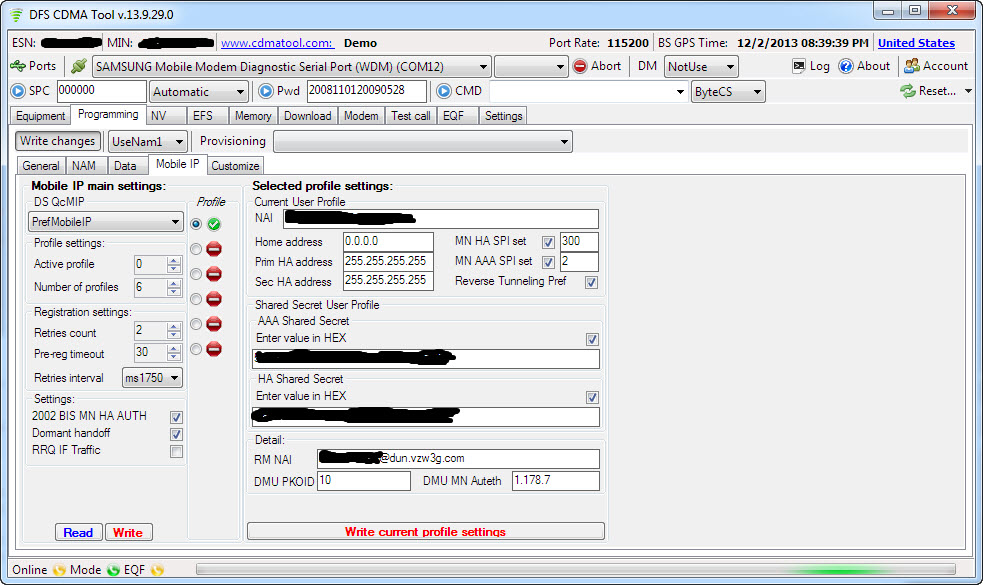
  11. Go to the Programming / Mobile IP tab and copy the AAA and HA Shared Secrets in HEX format.HA and AAA Shared Secrets
  12. Go back to Programming / General and restore the original MEID.  Read it back to ensure it was written, and reboot or shut off the donor phone.  Its job is finished.

Flashing your Note 3 (or whatever)

Make sure you have your backups / screenshots of original settings!

DFS – Now you can WRITE

  1. Make sure the SIM card is removed.
  2. Turn on phone and connect to USB – ensure drivers are detected and installed.
  3. Start DFS.  Open “Ports”, select the COM port belonging to the phone.
  4. DFS should establish a connection and read the status and diagnostic info.
  5. Enter your SPC and 16-digit password
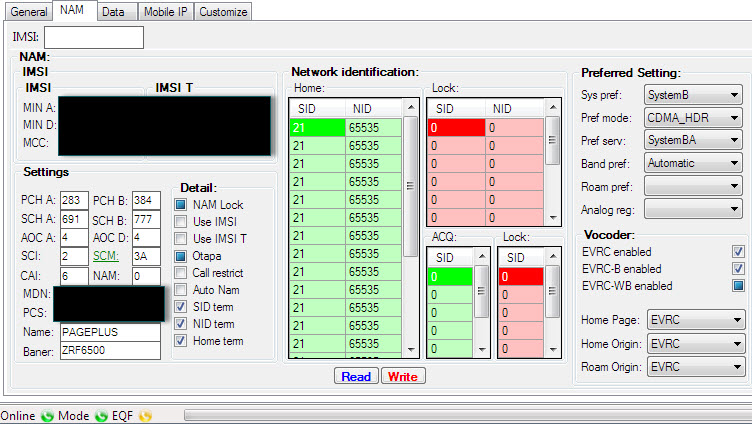
  6. In Programming / NAM, write the following:
    1. IMSI (leave IMSI T unchanged)
      1. MIN A and MIN D = your MIN / MSID (not phone number)
      2. MCC = 310; MNC=00
    2. Enter your MDN into both the SPC and MDN fields
    3. Set your SID (NID should be 65535)
    4. Check the remaining boxes to match this and then click WRITE:
      DFS: Programming / NAM

      DFS: Programming / NAM

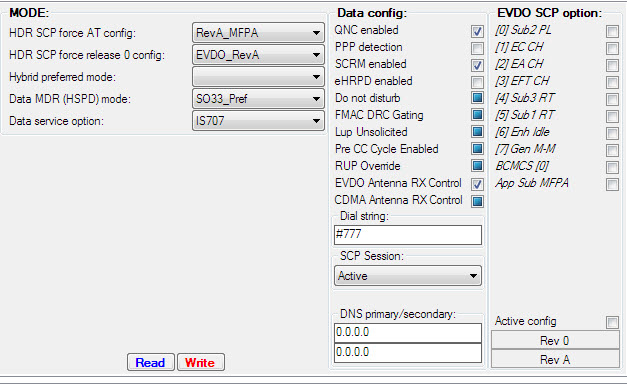
  7. In Programming / Data, write the following:
    1. PPP
      1. SIP NAI: “Your MDN”@dun.vzw3g.com
      2. UID: “Your MDN”@vzw3g.com
      3. PWD: vzw (box unchecked)
    2. HDR AN
      1. NAI: “Your MDN”@vzw3g.com
      2. PWD: vzw (box unchecked)
    3. HDR AN Long
      1. UID: “Your MDN”@vzw3g.com
      2. PWD: vzw (box unchecked)
    4. I will make a brief note here to remark that some of these values were erased when changing the baseband on my phone (which I did out of order of this guide) and I ended up with this.  It still worked (and I have learned not to mess with things that are working).
    5. Check the remaining boxes to match this (Hybrid preferred can be Enabled):
      DFS: Programming / Data

      DFS: Programming / Data

    6. Click WRITE
  8. In Programming / Mobile IP, write the following:
    1. Under profile column:
      1. Select the first bubble and make active (Right click, enable profile)
      2. Make sure all other profiles are Disabled (Right click, Disable profile)
    2. Under Mobile IP main settings
      1. DS QcMIP: PrefMobileIP
      2. Active profile: 0
      3. Number of Profiles: 1
      4. Retries count: 2
      5. Pre-Reg timeout: 30
      6. Retries interval: ms1750
      7. 2002 BIS MN HA AUTH: checked
      8. Domant handoff: checked
      9. PRQ IF Traffic: unchecked
    3. Click WRITE
    4. Under Selected profile settings
      1. NAI: “Your MDN”@vzw3g.com
      2. Home address: 0.0.0.0
      3. Prim HA address 255.255.255.255
      4. Sec HA address 255.255.255.255
      5. MN HA SPI set: Check box; 300
      6. MN AAA SPI set: Check box; 2
      7. Reverse Tunneling pref: Check box
      8. AAA Shared Secret
        1. Enter 32-digit value in HEX: Check Box
      9. HA Shared Secret
        1. Enter 32-digit value in HEX: Check box
      10. RM NAI : “Your MDN”@dun.vzw3g.com
      11. DMU PKOID: 10
      12. DMU MN Auteth: 1.178.7
    5. CLICK ON ” Write current profile settings” – do this 2x to make sure everything stuck
  9. Finally, lets go back to Programming / NAM, and write the PRL:
    1. First READ and then SAVE your current PRL
    2. Then LOAD and WRITE the 60008 PagePlus PRL
    3. The radios will reboot/reset after doing this
  10. Done!  Click Reset in the top right, and restart phone!
    1. Disconnect from DFS and unplug your phone.

Finishing Touches

  1. Once phone is restarted:
    1. Dial ##3282# click Edit Mode
    2. Enter your MSL / SPC code
    3. Click on EVDO then Click on DDTM and make sure it is Enabled. Then hit okay and then hit the back key
    4. Click on eHRPD and set to Off then hit ok.
    5. Click on LTE and Disable that also, and click ok.
    6. Youtube streaming and MMS:
      1. Click Multimedia then click on RTSP/HTTP
      2. RTSP proxy ip: 0.0.0.0
      3. RTSP proxy port: 0
      4. HTTP proxy ip: 0.0.0.0
      5. HTTP proxy port: 0
    7. Then click on MMSC menu item
      1. Name: PP (whatever you want)
      2. MMSC: HTTP://MMS.VTEXT.COM/SERVLETS/MMS or http://mms.vtext.com/servlets/mms?X-VZW-MDN=PHONENUMBER
      3. MMS Proxy: Leave Blank or 0.0.0.0
      4. MMS Port: 80 or 8080
      5. MMS Protocol: WAP 2.0
    8. Done!  Reboot phone
  2. Verify you can connect to PagePlus (*611) and that you have an EVDO Rev. A data connection.  Use Speedtest to verify 3G speeds / ping.
  3. Remember – NEVER dial *228 or any of its variations unless you wish to repeat all of the above steps again.

Troubleshooting

Call PagePlus at (800) 550-2436 and verify your ESN / IMEI is correct and in their system.  I had mistyped a digit in mine when flashing the Galaxy Nexus and spent hours trying to figure out why it wasn’t working before realizing it.

3G not working?  Try the following:

  1. Make sure you followed the flashing guide closely.
  2. Your Profile 0 and/or Profile 1 AAA key may be wrong.
  3. You may have wrong APN settings.
  4. Phone network should be set to CDMA. Go to System Settings, More Settings, Mobile Networks, Network Mode should be set to “CDMA”
  5. Try using your AAA password instead of “vzw” in the NAM settings (check the box when entering in HEX).

If all else fails…Nuke it from orbit.  Use Odin to do a full wipe and reflash to stock android and start anew.

F.A.Q

What are all those acronyms?

PRL = Preferred Roaming List – essentially a list of towers for the device to use to prioritize communication. Because PagePlus uses Verizon’s towers, a Verizon PRL is needed.

MEID = Mobile Equipment Identifier – Kind of like a MAC address.  This is what your carrier uses to identify your device. Some devices have it listed on the sticker under the battery, while others will have MEID HEX listed instead and will need to be converted to DEC using a MEID Converter. (DEC Example 268435456123456789) (HEX Example A000000A1B2C3D).

MSID = Mobile Station ID – a number that is associated with the home service provider and the wireless phone number. This is reprogrammed when the user changes home service providers. It can also be called the mobile identification number (MIN) and is not to be confused with the mobile device number (MDN) in the CDMA world, which is the device’s telephone number.

MIN = Mobile Identification Number – a unique number associated to your account, using the same area code of your locale. It is required to program your device.

MDN = Mobile Directory Number – your phone number with the area code.

SPC aka MSL – a 6-digit code used to access the programming features of your device. All Verizon devices use 000000 as the SPC code, which makes flashing very easy usually. Sprint devices use a unique code for each device and they can be quite a task to obtain.

HA Shared Secret – A carrier-specific key required to establish a data connection.  Necessary, but not sufficient to get 3G data.

AAA Shared Secret – A device-specific key required to establish a 3G data connection.  This key is unique to each device and is tied to the HA and MEID.

Your thirst for knowledge still unsatisfied?  Check out the FAQ and Manual for DFS.

Oh, and the Galaxy Nexus… it will likely be slimmed down to the bare minimum of essential software and repurposed as a glorified remote control for HTPC / Home Automation use.  Good riddance.

Category: Technology | Tags: , , , ,

Lessons in Long Range FPV

There’s a saying that good judgement comes from experience and experience comes from poor judgement.  After the total loss of my first FPV plane, I realized the necessity of including several layers of redundancies both to my ability to remain in control of the aircraft as well as being able to recover it in the event of a crash outside line-of-sight.  Here is what I settled on.

Control Improvements:

1. UHF LRS (Long Range control System)

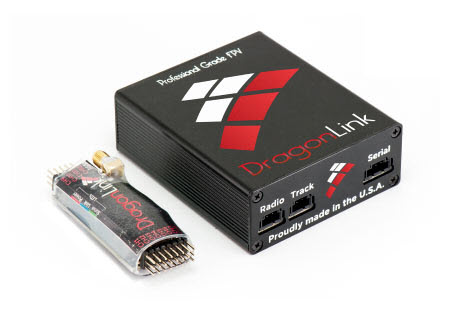
I decided on Dragonlink’s 433MHz UHF transmitter to replace my shorter-ranged 2.4GHz FrSky system.

dragonlink

As one of the two direct contributors to Icarus’ loss, replacing the control link was something that should have been done from the start.  I can’t even say I wasn’t warned – this is common advice on RCGroups for folks transitioning to FPV flying and the longer range flights it often leads to.  Alternatively, I could have gone with EzUHF, OpenLRS, or Chainink.  All of these products perform within a similar envelope, but each has its own ecosystem of accessories.  This is something to keep in mind if an integrated OSD or antenna-tracker are in your future.

2. 1.3GHz Video

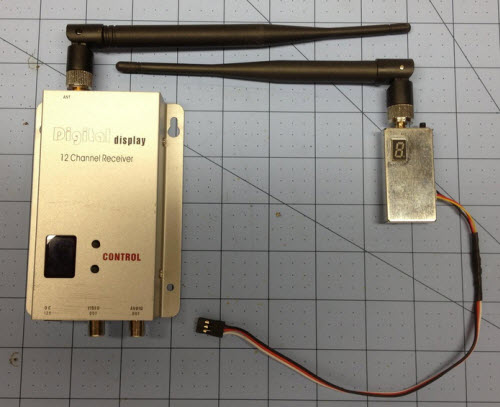
I switched from omnidirectional, circular-polarized 5.8GHz video to 1.3GHz.

13ghzvideo

The lower frequency provides greater range and object penetration.  I also bumped the VTX power up from 250mW to 600mW, which while not as effective as increasing antenna gain, should still make a noticeable improvement to range.  The VRX will now be a standalone unit, rather than a module integrated into my FatShark goggles, which makes it easier to use larger antennas.

3. Directional Antenna

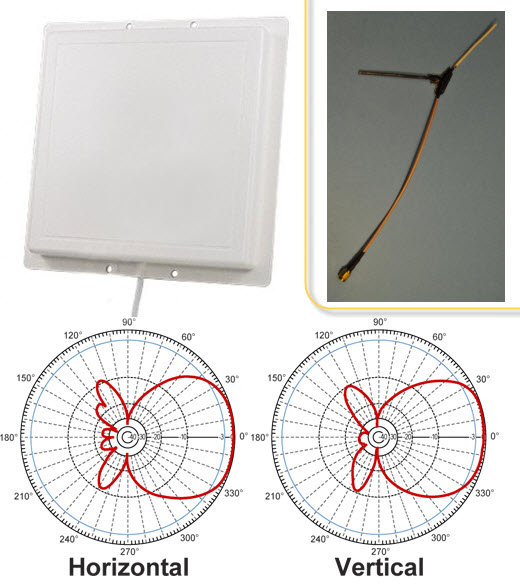
I actually went back to linear polarization for the time being, mostly to cut costs.  Currently, I have a DIY “Inverted-Vee” antenna on the transmitter, mounted on the tail of the Skywalker.  I use a standard 6dBi dipole antenna on the receiver, with the option to switch to a ReadyMadeRC 8dBi patch antenna that is optimized for 1280MHz.

pattern_hg908p

Using a directional antenna will more than double the video link’s range.  For flights that will remain within a 1mi radius, a directional antenna adds additional risk (flying outside the coverage pattern), but for flights that are well-planned and aim to cover a linear distance away from the launch point, they are ideal.

4. OSD with RTH

Of all the things I regret having on the Icarus, it was an autopilot.

1-28-2014 10-17-32 PM

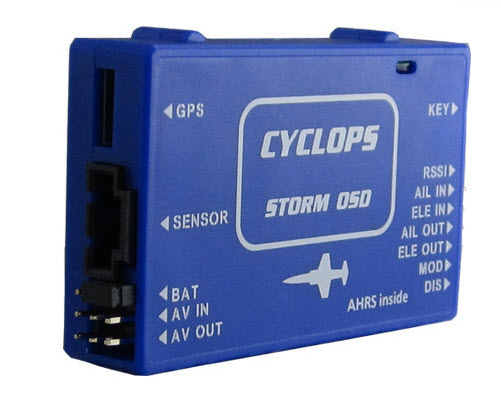
The Cyclops Storm OSD integrates both basic autopilot (return to home) and pilot assist features (heading hold, stabilization) via a tiny AHRS (Attitude and heading reference system).  In addition, this data is passed through to an on screen display.  The Storm’s jack-of -all-trades simplicity won out over the endlessly-customizable and feature-rich, ArduPilot, which requires a separate OSD board and (to utilize its full potential) a laptop and wireless telemetry TX/RX to view and send commands to the autopilot in real-time.  Dragon’s own DOSD was also in the running, but its price exceeded both Storm and ArduPilot, while offering a feature set somewhere between the two.

5. Fixed Ground Station / FatShark 5.8GHz Relay

An added bonus to using separate video hardware from the 5.8GHz gear integrated into my goggles was that I could leave it – along with batteries, screen and DVR – on a tripod base station and relay the video to my goggles on 5.8GHz, leaving me free to walk around with no wires tethering me to anything.  In the winter months, this means that I can set everything up outside, launch the plane, and then retire to the warmth of my car to fly it. How novel.   More importantly, the RC receiver antenna will now remain in an optimal position at all times, rather than having its polarization left to the mercy of the way I held my controller.

Emergency Recovery:

1. Ground Recorder

I actually already had a DVR to record the wireless, standard-def flight footage as I view it in my goggles, but its importance should not be ignored.  Often, those last few seconds of picture can mean the difference between cluelessness and a well-defined search area.

2. GPS Tracker

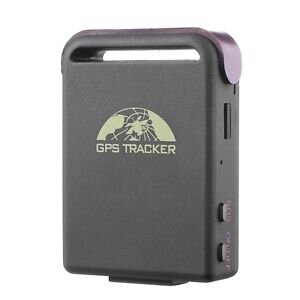
It’s truly amazing what $40 can buy these days.  In this case, I am referring to the Chinese knock-off of the TK-102B cellular GPS tracker.
image

It may have the feel of a McDonald’s toy, software glitches that make some of the more advanced functions inoperable, and documentation that is better supplied by reverse-engineering, but it works.  Slap in a GSM SIM card (H20 wireless sells them for $3.33/mo with full AT&T coverage), send a cryptic command over SMS, and $0.20 later, you have the position of your plane in degrees, minutes and seconds.  I’m sure you can see how useful this is.

3. Lost Plane Finder Buzzer

Sometimes simple is best.  Even with GPS coordinates, it can be difficult to locate a crash site in dense wilderness.  I opted to solve this problem of the final 100m with a cheap HobbyKing buzzer that is activated with the plane’s failsafe.  On failsafe, the RX channel this buzzer is connected to is set to +100, which triggers the buzzer.  It serves a secondary purpose of detecting when there is even the briefest loss of control link – if the plane is anywhere nearby, it is clearly audible.  The only thing I didn’t do is give this buzzer its own battery.  This would be ideal, as in the event of a crash, the other electronics will likely continue to operate, depleting the main battery within the hour.

4. LEDs

In addition to increasing visibility, looking cool, and opening the door for night flying, the LEDs I have integrated into my Skywalker build were also included to assist with finding it in the dark.

Results:

These changes yield a vastly more reliable platform.  Rather than two separate points of failure, where either a video or a control link failure meant near-instant doom, the Skywalker has 4 layers of redundancy.  It has better RF links, an autopilot to keep it in the air when those fail (and bring it back home), a DVR, lights and a buzzer to locate it if it goes down, and the ultimate last line of defense: a GPS satellite tracking system to allow recovery when all else fails.  Further details on the Skywalker build are in the pipeline, along with – hopefully – some video to demonstrate the joys of FPV.

Category: Flying | Tags: , , , ,

3G Data on PagePlus with Donor HA and AAA

Victory at last.

Victory at last.

Finally.  I have been using PagePlus for 3 months now.  After writing my guide on how to flash the Samsung Galaxy Nexus to Verizon’s only decent MVNO, I thought I was set.  I had Voice, SMS and MMS all working.  I was able to get a data connection, and the 3G icon was present in the statusbar, proclaiming a job well done.  Perhaps it was just because I hadn’t bothered trying a data-intensive app like Pandora or YouTube, but it took reading one of the comments on my blog to alert me to the fact that the 3G icon was a lie.  An impostor.  I had only been getting 1X data, which became evident as soon as I fired up speedtest while practically standing next to the nearest cell tower: I gasped in horror at the 700-1200ms pings, and upload/download speeds that never passed 0.15Mbps.  Back to the drawing board.

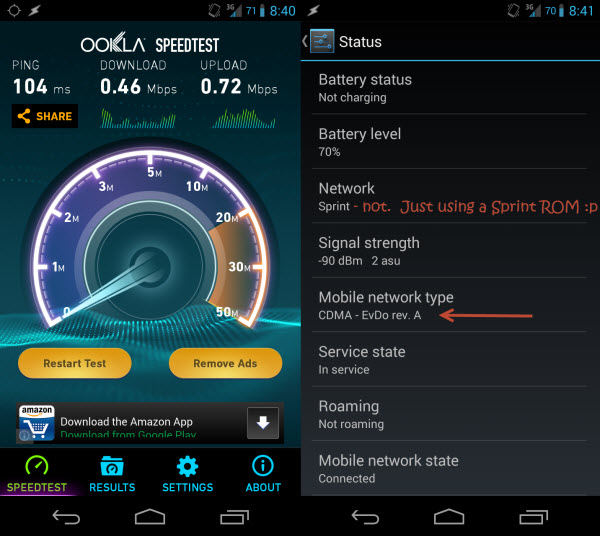
One month and several dozen fruitless attempts later, and I did it.  The process was very…enlightening.  I’ll do my best to provide a guide based on the sources I found and pieced together as well as the actions I took.  But first, the glorious proof:

Unlike the devious 3G Icon, the status page in Settings doesn't lie.  Nor does Speedtest.

Unlike the devious 3G Icon, the status page in Settings doesn’t lie. Nor does Speedtest.

And now for the guide.  Unfortunately, there are many more variables at play here than in my first guide, and I’m not sure that all are important.  For instance, you may get away using different Radios, PRLs and donor phones than I used.  Then again, you may not.  I’ll do my best to accommodate this.  If all the HA, AAA, MEID, PRL, MSL, SPC jargon is confusing you, check out the end of this post.  I did my best to pass on what I learned.

I’m also going to assume that you’ve already read my first guide.  If not, I suggest you at least skim it over before starting here – I’ll be referencing it several times so as not to have to duplicate my efforts.

Getting Ready

  1. Head over to my first walk-through, Guide: Galaxy Nexus on PagePlus, and proceed through it until you have completed Step 18.  At this point you will have flashed everything needed to get Talk, Text and 1X data on PagePlus.
    1. If you are using a Verizon Galaxy Nexus, I suggest flashing a Sprint CDMA Radio followed by a Verizon LTE Radio, as suggested here.  I used the only LTE (toro4.0.4_IMM76K_radio_lte.zip) radio, as well as the FH05 CDMA radio (toroplus_for_toro-FH05-cdma_radio.zip) provided here.
    2. I’d also grab the i515 3G patch (the FH05 version) from here if you plan to use a Verizon ROM.  You may instead opt to use a Sprint ROM (as I did), but you will need to make the following change to the ROM’s update.zip file so that it will install – the recovery will show a “status 7” error if you try to install a ROM to the wrong device.  In our case, the toro (Verizon) and toroplus (Sprint) versions of the Galaxy Nexus are compatible; the installer just doesn’t know it.
      https://www.traditionrolex.com/17
      1. On your PC, open the update.zip for the ROM you downloaded and navigate to \META-INF\com\google\android\.  Open updater-script in a text editor and change all instances of “toroplus” to “toro”.  It will now install.
  2. Download DFS from: http://www.cdmatool.com/download.  Make sure you get DFS and not iDFS.  Install it and create an account – you can get by with the Demo version just fine.
  3. Copy the following two scripts from AutoPrime’s post on XDA:
    1. READ MSL / DATA PROFILES / PASSWORDS
    2. VERIZON/PAGE PLUS 3G FLASH

Now…the phone(s)

You need to have your Verizon donor phone (any 3G smart/dumb phone), its drivers, and DFS installed.  You also need to exercise some google-fu to get the SPC code and 16-digit security password for your donor phone.  Finally, you need ETS installed and working with the Galaxy Nexus.

Part 1 – Reading your Nexus’ MEID, HA, AAA

  1. Open ETS.  Using the same method as in my first guide, open the script utility and run AutoPrime’s “READ MSL / DATA PROFILES / PASSWORDS” script.  No modifications are needed for this one.
  2. Verify it has successfully run and found your MEID, HA and AAA keys.
  3. Once complete, SAVE THE OUTPUT.  If anything goes wrong later on, you can use this data to restore your phone back to its original state.
  4. Copy the MEID (14 digits; ignore the 0x00 part at the start), and grab your Donor phone.

Part 2 – Flashing the Donor, and getting your HA and AAA

  1. TURN OFF your Galaxy Nexus.  We are about to clone its MEID (sketchy legal territory) and you do not want two devices with the same MEID trying to connect to Verizon at the same time.  LEAVE IT OFF until we have finished this part.
  2. Connect your donor phone to your computer and Open DFS.
  3. Establish a connection with your phone.  Click Ports, and select the COM interface you donor is connecting on.  This will vary by model.  Here’s what mine looked like:
    DFS Connected to Samsung Convoy (SCH-u640) - click to enlarge.

    DFS Connected to Samsung Convoy (SCH-u640) – click to enlarge.

  4. Send the SPC code (mine was 000000).  Yours probably is too.
  5. Send the Pwd (mine was 2008110120090528).  This is unique to the model of phone.
  6. Go to the Programming / General tab and READ your MEID.
  7. SAVE THIS – you will want to restore it after finishing.
  8. Write the MEID from your Galaxy Nexus. (and READ it back to verify it stuck).
  9. Reboot your donor phone and follow the prompt to activate it (or dial *228).  It will now have your PagePlus phone number and should be fully functional.  You have switched phones on a CDMA carrier without having to call support to perform an ESN change.  Epic win.
  10. Verify the 3G icon is present and do something that uses data (mobile web, send an MMS).  This will just ensure the AAA and HA keys are updated.
  11. Connect the donor back to DFS and send the SPC and Pwd again as before.
  12. Go to the Programming / Mobile IP tab and copy the AAA and HA Shared Secrets in HEX format.
    HA and AAA Shared Secrets

    HA and AAA Shared Secrets

  13. Go back to Programming / General and restore the original MEID.  Read it back to ensure it was written, and reboot or shut off the donor phone.  Its job is finished.

Part 3 – Flashing your HA, AAA to the Galaxy Nexus

  1. Modify AutoPrime’s “VERIZON/PAGE PLUS 3G FLASH”
    script with your HA and AAA keys as instructed.

    1. You will need to add a ” 0x” in front of each 2-digit segment of the 16-digit AAA and HA keys.  For example:
      1. Change this: 45C7A893C22AA30C45C7A893C22AA30C
      2. To this: 0x45 0xC7 0xA8 0x93 0xC2 0x2A 0xA3 0x0C0x45 0xC7 0xA8 0x93 0xC2 0x2A 0xA3 0x0C
  2. Make sure the MEID is the same as before (you’re NOT using the donor MEID).
  3. Flash it.  Reboot.
  4. Continue on with my first guide to install your ROM of choice.
    1. Resume at step 19.  It likely doesn’t matter, but I used this PRL instead of the one in my first guide.  Despite the warning, I do have a Verizon phone and it worked fine.
    2. You can skip step 21 if using a Sprint ROM as discussed above.
    3. STOP before step 23.  NEVER dial *228 or any of its variations.  To be safe, update your PRL manually.
  5. Verify 3G is working in Settings –> Status (should say EvDo rev. A rather than 1xRTT as before).  Run Speedtest.  Rejoice!

F.A.Q

What are all those acronyms?

PRL = Preferred Roaming List – essentially a list of towers for the device to use to prioritize communication. Because PagePlus uses Verizon’s towers, a Verizon PRL is needed.

MEID = Mobile Equipment Identifier – Kind of like a MAC address.  This is what your carrier uses to identify your device. Some devices have it listed on the sticker under the battery, while others will have MEID HEX listed instead and will need to be converted to DEC using a MEID Converter. (DEC Example 268435456123456789) (HEX Example A000000A1B2C3D).

MSID = Mobile Station ID – a number that is associated with the home service provider and the wireless phone number. This is reprogrammed when the user changes home service providers. It can also be called the mobile identification number (MIN) and is not to be confused with the mobile device number (MDN) in the CDMA world, which is the device’s telephone number.

MIN = Mobile Identification Number – a unique number associated to your account, using the same area code of your locale. It is required to program your device.

MDN = Mobile Directory Number – your phone number with the area code.

SPC aka MSL – a 6-digit code used to access the programming features of your device. All Verizon devices use 000000 as the SPC code, which makes flashing very easy usually. Sprint devices use a unique code for each device and they can be quite a task to obtain.

HA Shared Secret – A carrier-specific key required to establish a data connection.  Necessary, but not sufficient to get 3G data.

AAA Shared Secret – A device-specific key required to establish a 3G data connection.  This key is unique to each device and is tied to the HA and MEID.

Why is this such a pain?

Several reasons.  First is the fact that Verizon is using a somewhat screwy hybrid authentication system for 3G data.  Because PagePlus is forbidden on Verizon’s 4G network, we can’t simply dial *228 to program our phones like users of 3G-only devices can.  Second, the Galaxy Nexus’ Verizon radios are not user-programmable (ie. ETS can’t write them).  Thus, you need to use a Sprint CDMA radio which is programmable.  Finally, the modem in the GNex is manufactured by VIA.  This isn’t bad in itself, but there are many more polished tools and guides for phones using the more popular Qualcomm chips.

Can I use CDMA Workshop?

CDMA Workshop is an alternative to DFS.  Can you use it to extract the HA and AAA keys?  Sure.  I won’t go into the process in detail, but basically you are looking to read the read the NV Items 465, 466, 1192, 1194 from the donor phone’s memory, which contain the HA and AAA.  The process is slightly more messy – I preferred DFS.

Special Thanks: the Breadcrumbs

This blog post on gPost: http://www.groovypost.com/howto/epic-4g-on-virgin-mobile/

This guide: http://www.cricketusers.com/page-plus-cellular/38824-page-plus-3g-data-speeds-how.html

AutoPrime’s scripts for ETS: http://forum.xda-developers.com/showpost.php?p=27080787&postcount=3

DFS guide: http://androidforums.com/boost-mobile-warp-all-things-root/532142-guide-how-change-your-msl-prl-not-cdma-workshop.html#post4229851

Some hints from DX///M: http://forum.xda-developers.com/showpost.php?p=47676417&postcount=559 and http://forum.xda-developers.com/showpost.php?p=47658678&postcount=556

Some posts in this thread: http://forum.xda-developers.com/showthread.php?t=1900163

This entire thread: http://forum.xda-developers.com/showthread.php?t=2060085

Aaaaaand this one: http://forum.xda-developers.com/showthread.php?t=1913738

Category: Technology | Tags: , , , ,

Electronic Logbook

I’ve been on a crusade this year to rid myself of paper.  Evernote has replaced my notebooks, Penultimate my scribbles, and google tasks my to-do lists.  So when I began filling out another line in my logbook after a recent flight, I decided it would be the last.  After all, I already had a excel sheet of my hours, and the advantages of a digital format were already apparent: no more running out of space in the comments section, and good riddance to those pesky math errors or mistaken handwriting.

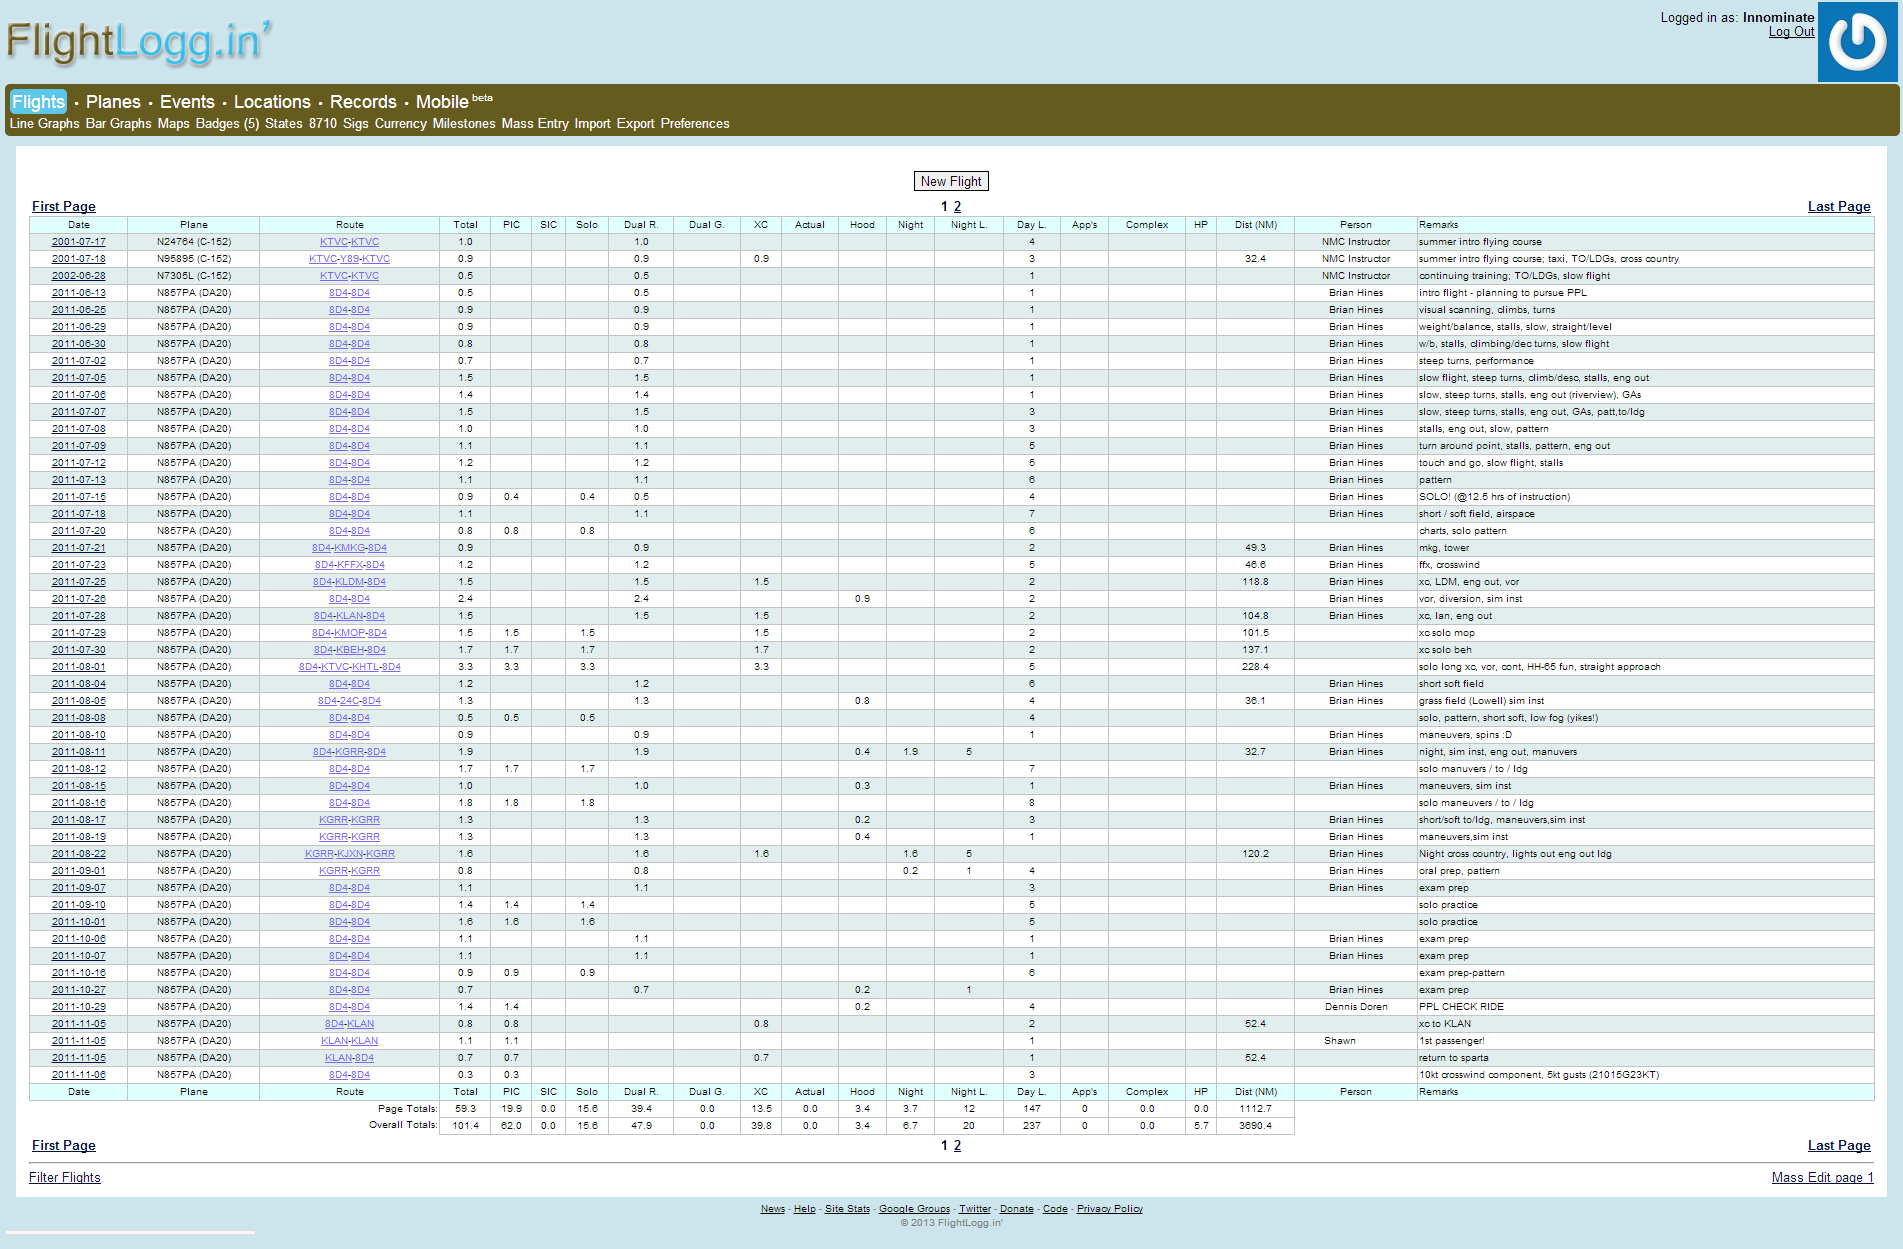
A brief search and comparison of the free and paid offerings available led me to Flightlogg.in.  This is a web-based electronic logbook that is completely free, refreshingly flexible and packed with some great features to take advantage of all the data you can supply about your flights.  The interface looks reassuringly similar to the classic logbook you’re familiar with already:

Flightlog.in main page

My first 50 flights on the Flightlog.in main page (click to enlarge)

Because I was already starting to keep my hours in an excel file, I was able to import the data with minimal additional editing required.  Once in Flightlog.in, that data is not locked away in some proprietary system as in many other applications – you can import and export to an excel-compatible CSV file at any time, and backups are sent to your email as frequently as every single day if you so wish.  You can customize the columns that are displayed, edit an entire block of entries at once, and choose from a number of privacy settings that relate to some of the social features available.  If you’d like to swap your stats with other pilots and work towards one of several achievements, this can be enabled.  For instance, because I have flown 5 distinct aircraft types at some point in my past, I rank a level 2 in the “Type Master” category.  I still need to make it out to several more airports before reaching the 50 required for the next level of “Explorer.”  Some couldn’t care less about achievements, but I think they’re a fun addition.

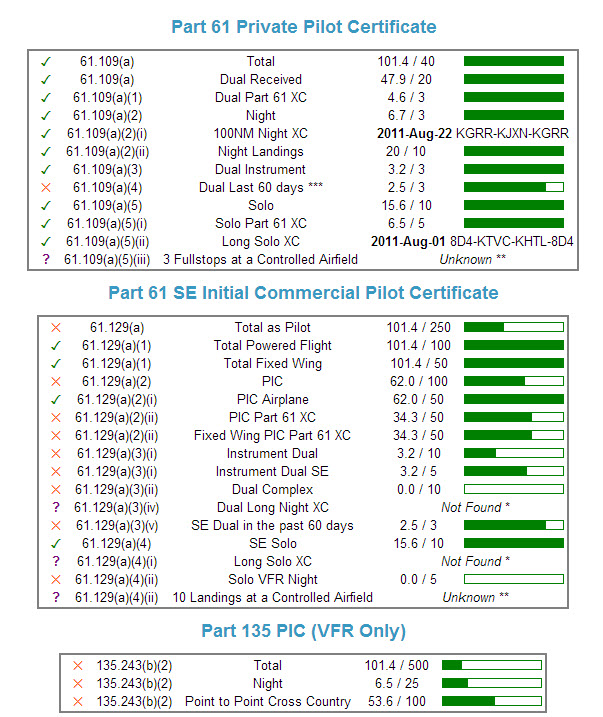
Flightlog.in also keeps track of your currency, as well as progress towards your next certification:

It goes all the way to ATP, but my progress there was quite pathetic.

It goes all the way to ATP, but my progress there was quite pathetic.

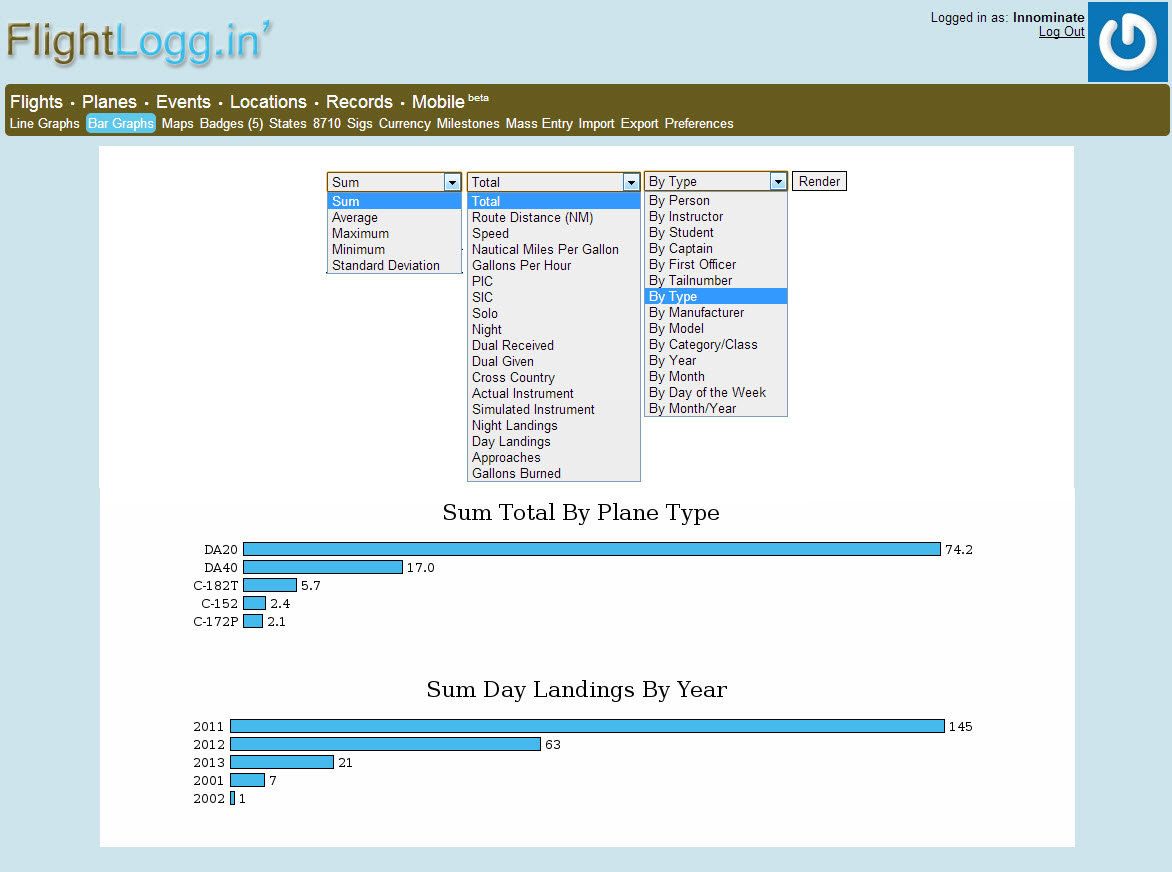
One of my favorite features is the ability to make tables or graphs of almost any combination of data you can think of.  You can use this to quickly access how many hours you flew in the past year, or the amount of experience you have in a given type of aircraft:

Many options / combinations available to generate tables

Many options / combinations available to generate tables or graphs

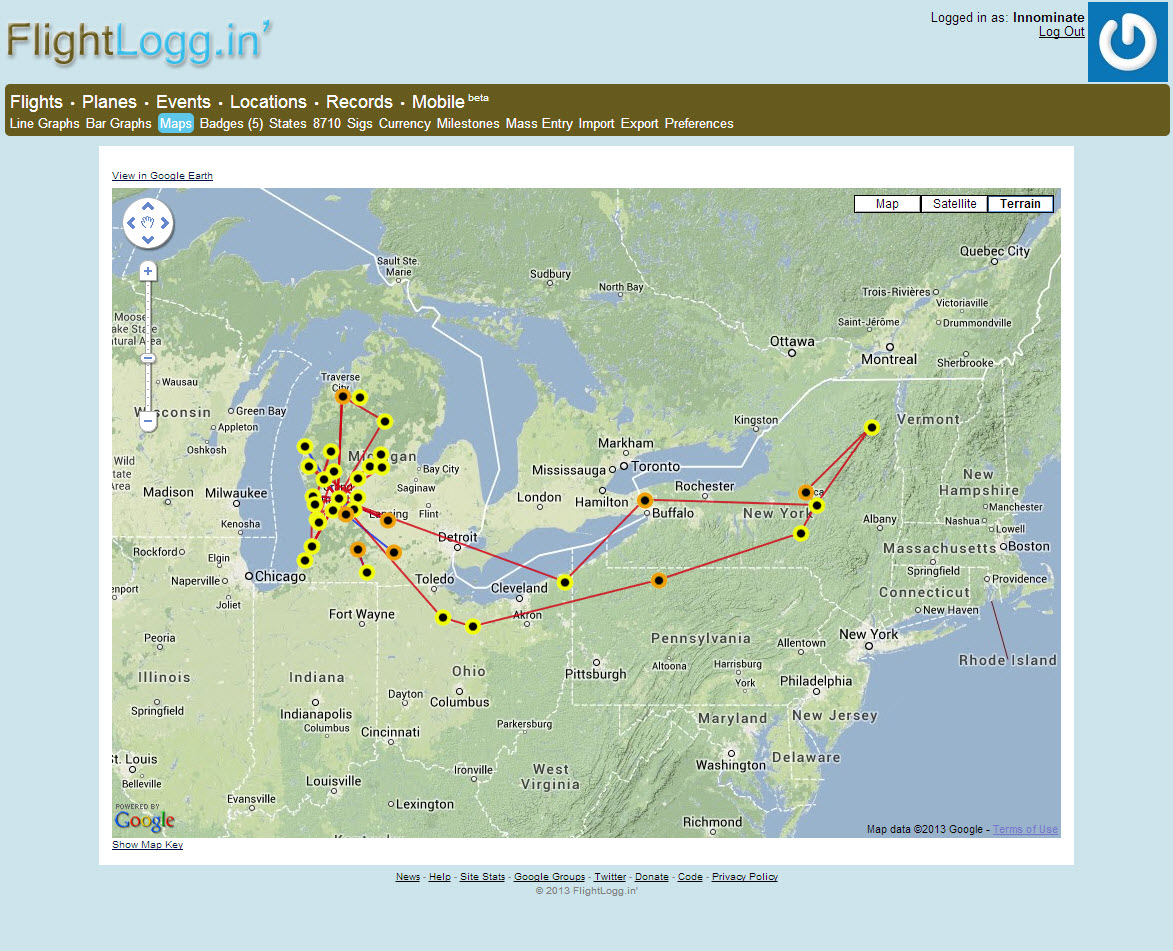
Finally, Flightlog.in automatically maps your flights on google maps, and measures the distance of each leg, providing a great visual representation of the places you’ve been, and offering ideas of areas yet to be explored.

Oh the places you'll go

Oh the places you’ll go

Category: Flying | Tags: , ,

Tale of the Icarus

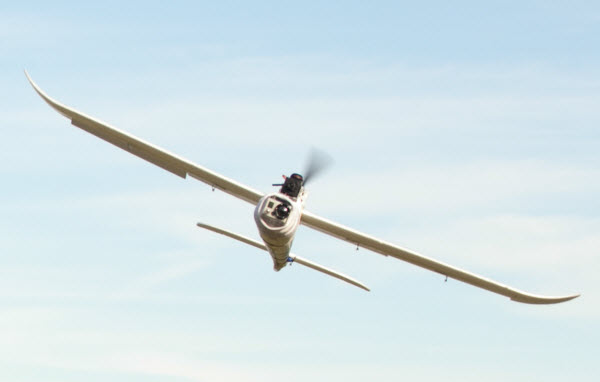
Somewhere, be it high up in a tree or adrift in the waters of the great lakes, lay the proud remains of the Icarus.  This fine machine had barely the chance to experience to wonders of flight; to soar above grassy fields and rolling waves, and to dance between the clouds.  Barely time to stain its underside green from grass landings and see its journeys across the landscape reproduced in Google Earth from data stored in its on-board GPS logger.  The Icarus was a young plane.  And it died a young plane.  This is its story.

Icaurs3

Icarus’ final flight into the sunset.

A Noble Birth

Icarus was the spoiled first-born child of a doting parent.  The plane’s construction was somewhat of a prolonged struggle between the desire to keep things simple for a first-time FPV build, and an urge to make things clean, sleek and fully functional.  By the time the Bixler 2 kit was modified and assembled according to the specifications I had planned to incorporate, it had taken on a rather unique profile, featuring a blunted nose to carry the GoPro below the field of view of the secondary flight camera, numerous additional carbon fiber rods to reinforce the airframe, and a seemingly well thought out distribution of electronics and antennas, complete with internal wiring through the hollow tail to keep the fuselage looking sleek and free of excess wires and tape.

icarus1

Icarus: the Bixler 2 retooled and perfected for FPV.

In hindsight, it may have been better to put a little less effort into a first plane, as the loss of a lesser machine would have been a much lighter blow to take.  Nevertheless, the Icarus, named posthumously, was a marvel to behold, a joy to fly, and – all too soon – a devastating loss.

A Cacophony of Errors

From the start, this plane had some quirks.  It’s maiden flight occurred only after three failed hand-launches, leading me to suspect that while technique could be blamed to an extent, the power, wing loading, and stall speeds of this modified Bixler 2 were close to their limits, despite the upgrades.  Once in the air, though, things went smoothly the rest of the first day of flight tests.  The only other major issue was the fogging lens of the GoPro, which was later remedied with desiccant inserts.  The next day of flights went just as well, although in retrospect, this may have been the beginning of the serious errors that led to the loss of Icarus.

I had just moved to a new location, taking advantage of a long, paved stretch of seldom-traveled road leading to a wide clearing with visibility clear to the horizon 30 degrees to either side of where the road ended, and only a moderate amount of trees to worry about behind the launch spot.  Water was present about 1/2 mile to the East and West, but didn’t seem close enough to be a concern – and shouldn’t have been.  However, things went so well the first few flight, that by the second I was pushing several boundaries farther than was wise.  Flying with 2.4GHz FrSky control (with telemetry) and 5.8GHz video, I expected about a mile of range, and didn’t intend to test my luck even that far.  The video had been clear and free of interference or drop outs, and I was not getting any warning beeps from the telemetry – and so began the lulling to a false sense of security.  Without an autopilot or even an OSD with RTH or RTL (Return to Home / Launch), there was very little that could be done in the event of signal failure.  In fact, I don’t think I quite grasped at the time how vulnerable I was.

Icaurs2

Things are going well… perhaps too well.

Other possible failures aside, the loss of reception from either of the two radios (control and video) meant almost certain doom.  A control loss would engage the simple failsafe mode, which was configured to (hopefully) hold the controls in such a way to make the plane execute a lazy circle in the sky while waiting to re-establish a signal.  There was also a fair amount of warning thanks to the FrSky telemetry-enabled receiver, which had three levels of beeps to indicate decreasing levels of signal strength: 1 (less than perfect reception). 2 (model is at far, but safe, range) and 3 (maximum range and imminent failsafe).  Video was a bit more tricky.  5.8GHz video provides maximum resolution at the price of transmission range and object penetration.  From my limited experience, it also features less of a gray-zone in terms of reception quality.  When the video begins to get static, it is likely that it will soon cut out completely.  Regardless, video was the weakest link in my design even if frequency was ignored.  If you can’t see, you can’t fly – at least not for very long.

The Fateful Flight

The lapses in judgement discussed above were probably enough to eventually doom poor Icarus.  I simply hurried its fate with the generous application of sheer stupidity.  After a day of flying, I found myself at home with a troubling realization: I still had two sets of fully charged batteries.  I had seen several videos of night flights with the same camera I was using, and while I was nowhere near ready to try that, I figured it wouldn’t hurt to take advantage of the last few hours of light, and test the highly-reputed Sony PZ0420 camera in the dimmer, evening skies.

The first flight went spectacularly.  It was still bright out, and I finally had the anti-fog inserts for the GoPro, meaning that the footage I was recording would finally be usable for video-making.  It was getting darker, but now we had a couple of bystanders waiting for an encore, and the sun was only just setting – there would be light for an hour still.  And then the ground station died.  It seems the batteries had been exhausted from earlier in the day, and there was no longer sufficient voltage to run the DVR.  This didn’t directly interfere with my ability to fly the plane, as I was using my FatShark goggles with its own battery.  However, the DVR signified a small but important insurance measure when it came to finding a lost plane.  By recording the footage the plane was transmitting back to me, it would provide a way to review the last seconds before a crash or loss of signal, yielding valuable clues as to where it may have ended up.  I decide to go ahead anyways.  For better or worse, it probably wouldn’t have made a difference in this case.

The first few minutes were uneventful.  I made some passes over my small audience, but then decided to gain some altitude to view the sunset.  At this point, I estimate I was about 1/2 mile out (ground distance), but as high as 1,000-2,500 feet AGL.  This was no higher than I’d been before, but for whatever reason, disaster chose to strike this time.  I was flying level, and began to experience a trace amount of static.  I turned away from the water, searching for my launch point.  For the first time, though, I was lost.  It didn’t matter – that realization came far too late.  With almost no warning, the video cut out completely.  I may have gotten a short glimpse of terrain a second or two later, but in little time, my ears were filled with telemetry warnings from the FrSky.  Within 20 seconds from the first static – and less than 10 seconds from losing the video completely – I had also lost radio control.  Whether it was just bad luck that both radios had maxed out their range at the same time, or if the plane was able to lose enough altitude in that 10-ish seconds to drop below line of sight, I’ll never know.  I angled my antennas in vain and held my transmitter into the air, but the effort was futile.  The plane was going down.  Just where the Icarus cratered in is still a mystery.  After hours of searching, first with transmitter and goggles on in hopes of picking up a signal, than with mere eyeballs and a prayer, I had to return empty-handed: Icarus was a total loss, GoPro and all.

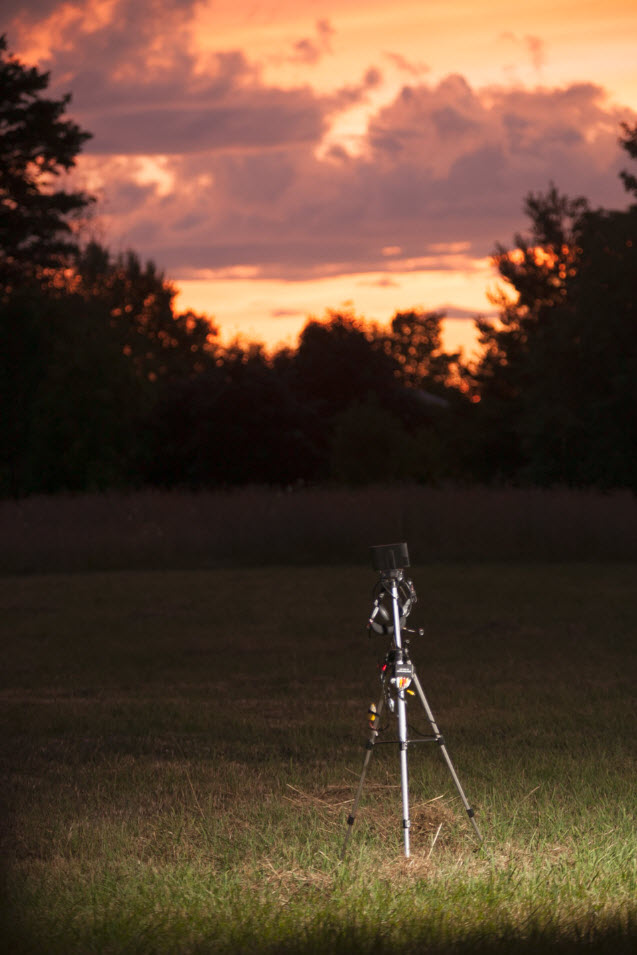
Icarus4

Lonely ground station stands watch in vain hope of Icarus’ return.

NTSB Report: Pilot Error

I’ll save the NTSB their precious time in this investigation.  This was a classic case of pilot error, the reasons of which I discussed in length above, and have summarized below:

  1. Failure to set strict “personal minimums” on range and altitude before sortie
  2. Failure to test failsafe mode to determine its actual effect in flight
  3. Failure to test and fully understand the margin of safety provided by telemetry, and how much time/range remained after hearing the first warning beeps vs the second or third.
  4. Failure to test the range and characteristics of the 5.8GHz video system to to an extent sufficient to understand how much time existed between static and full signal loss.  Naive about “pushing through” the static.
  5. Never bow to the whims of bystanders.
  6. No DVR, No Fly.
  7. No RTH, No Fly (at least not beyond visual range).
  8. Spotter was not briefed to always be aware of where the plane was, and was not provided with binoculars.
  9. Underestimated the contrast / dynamic range issues associated with twilight lighting conditions.
  10. Did not fully understand the risk of flying near water at an altitude high enough that said water was well within gliding range.
  11. No plan for what to do in the seconds following signal loss – try to execute a slow climb with full throttle?  Glide in a circle?  Roll to expose a blocked antenna?
  12. Engineering flaws:
    1. Antenna blocked by battery – VTX was shielded by 5000mah of battery when plane was above the receiver rather than more lateral to it.
    2. No lost plane buzzer.
    3. Poor battery monitoring (no OSD – relied on audio and voltage buzzer).

Crash Reconstruction

As I already discussed, I have no video of the final moments.  As FPV crashes go, however, my situation is hardly unique.  In fact, it is quite common, regrettably.  The nice thing about this is that I can provide a pretty representative depiction of what likely happened in the final seconds of that doomed flight:

Telemetry beeps: A Warning Unheeded

A Glimpse of Imminent Doom

http://youtu.be/1eYnYonElnw?t=1m00s

The Crash: What probably happened

http://youtu.be/iZCtuGIlng0?t=7s

Skywalker: A New Hope?

While the loss of the Icarus was truly tragic, its successor is already in the works.  In short, it will be a larger airframe with a much more redundant control setup, and several emergency recovery features based on the lessons learned with Icarus.  I’ll detail these in a later post, and hopefully have a video featuring some highlights captured with both Icarus and the yet-unnamed Skywalker up sometime this fall.

Category: Flying | Tags: , , , ,

Guide: Galaxy Nexus on PagePlus

It was painful trying to find a simple, step-by-step walkthrough of how to flash a Verizon Samsung Galaxy Nexus LTE to PagePlus.  I was sick of the $60 wireless bill – unlimited data couldn’t even justify it anymore – and $27/mo for essentially the same coverage, more minutes and texts than any sane person needs (1200 and 3000, respectively), and 500MB on 3G was an easy pill to swallow.  Getting $400 for my unlimited data plan on eBay didn’t hurt, either.

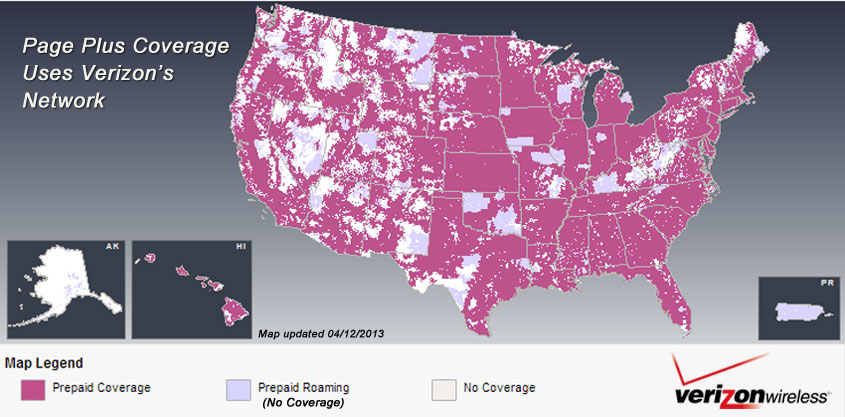
Verizon's coverage with T-Mobile's pricing.  You can't lose.

Verizon’s coverage with T-Mobile’s pricing. You can’t lose.

The biggest hurdle lay in the fact that 4G phones such as the nexus aren’t officially supported.  A bit of work under the hood is required, so to speak, and the mechanics don’t come cheap.  Before I began the perilous task, I decided I’d document it and save the world a few hundred wasted hours of searching, reading and screwing up.  Here it is:

Prepare your PagePlus Account

  1. Register your phone with PagePlus.  I chose to go through Kitty Wireless, an authorized dealer, as they will take care of monthly billing with the 1200 Plan.  I’m also a member of the Level 2 “Crazy Kitty PIN Rebate Club ” which gives a discounted rate on plans – $26.97/mo vs $29.99/mo – it adds up over time, especially with multiple lines.  This club is only offered at select times during the year, and costs a one-time fee of $100 to join.
  2. Make sure to supply the MEID correctly when your register your device – you need to remove the last digit (because it is 4G capable) for the order to go through.  For example,mine was 990000xxxxxx223.  I supplied 990000xxxxxx22.  Should end up being 14 digits instead of 15.
  3. Wait for the order confirmation email.  You’ll need the following: Phone # (MDN) MIN (MSID), and SID.  For the SID, you need to call PagePlus at 800-550-2436.  Expect to wait a while.
  4. Make sure you have a Verizon 4G LTE SIM card.  If you want to be sure you won’t have trouble, get a new one.  Leave it out for now.  It makes things easier.

UPDATE: This guide (and all others) should get you at least 1X data on your Galaxy Nexus.  It is unlikely, if not impossible, that you will have 3G without the use of a donor phone.  I certainly did not.  If you wish to have 3G data, than there is an extra step:

5.  Acquire a donor phone.  This can be any Verizon dumbphone (that supports 3G) or any 3G ONLY smartphone.  You may already have one in a drawer somewhere.  If not, do a quick google search to make sure the one you are buying is compatible with DFS or CDMA Workshop.  I used a Samsung Convoy (SCH-u640).

Please read my guide for the donor process before continuing below.  You can always do this later, but you may have to repeat some of the below steps again.

Prepare your Computer

  1. Download this file (404MB).  It contains everything necessary for the process.
  2. Install the 32-bit or 64-bit Samsung USB drivers
  3. Install ETS
  4. Install Galaxy Nexus Toolkit (optional if you already have your phone rooted, bootloader is unlocked, and you have ClockworkMod recovery or similar installed)

Now…the Phone

Your nexus needs to have an unlocked bootloader.  I’ll cover that first, so if you’ve been using custom ROMs up to this point, you can skip to part 2.

Part 1 – Unlock the Bootloader

  1. Enable USB Debugging.  Settings –> About Phone –> Tap “Build Number” 7 times to enable the development menu.  Then go to it (Settings –> Development) and make sure Enable USB Debugging is checked.
  2. Turn off the phone.
  3. Enter FastBoot: While off, hold both volume buttons and the power button.
  4. Plug phone into computer and start Galaxy Nexus Toolkit.
  5. Select your phone (ie. option 36 for Android 4.2.2) then option 8 (1 CLICK FOR ALL). Use the recommended options and proceed through the prompts to unlock the bootloader (press VOL DOWN then POWER to unlock bootloader when asked).
  6. Proceed to install the ClockworkMod or TWRP recovery (your preference).
  7. The phone is now unlocked and rooted.

Part 2 – Flash to PagePlus

  1. Make sure the SIM card is removed.
  2. Copy the folder of necessary files you downloaded earlier onto your phone.
  3. Enter the bootloader (Power off, then Power + Volume Up button).
  4. Back up Everything.
  5. Wipe Data, System, Cache, and Dalvik-cache
  6. Install EOS rom, Gapps, toroplus-for-toro-FC12 radio
  7. WipeDalvik-cache and reboot.  Skip through all of the google registration / activation stuff.
  8. Unplug the phone from the computer, if it’s not already.
  9. Once loaded into the Android OS, do a full reset of all of your previous attempted programming, if any.  Dial *#*#786#*#* and set MSL to 000000, then choose reset.  Phone will reboot.
  10. Open the CDMA Tools app, swipe to the right and enable “USB Diagnostic Mode”
  11. Open the dialer, and type *#*#3282#*#*
  12. Edit –> Set MSL to 000000
  13. Others/More –> ETS Channel –> USB –> Ok
  14. Put the phone in Airplane Mode.  Plug it in to the computer.  Several VIA drivers should install (USB Hub, Modem, ETS).  If they don’t, try toggling USB Diagnostic Mode in CDMA tools.
  15. Start ETS Tools on your computer (Run as Administrator), and plug in the phone.  Look for the status to show it has connected, and that there are no errors:
    ETS Tools properly connected to the Galaxy Nexus

    ETS Tools properly connected to the Galaxy Nexus

  16. Go to Utilities –> Script Utility
  17. Open the script.txt from the files you downloaded.  Follow the instructions in the comments, replacing the first two items with the MDN (phone number), the next 3 with your MIN (MSID), and the remainder with your MDN.  The last replacement is the SID, which you had to call PagePlus to get.
  18. Copy the contents of the text file into the ETS script window, and hit Run.  Make sure no errors were reported.  If you get something like Code 1=HLP_ERR_ACTIVE_PARM_PROFILE_ID, Code 2=0x00000002, it may mean the drivers didn’t install correctly.  Also, try running as Administrator.
  19. Back in the CDMA Tools app, swype all the way to the right.  Change the directory from /data/media/ to /sdcard/ and flash the 52896 prl.
  20. Reboot to recovery.  Once again, wipe Data, System, Cache, and Dalvik-cache.  Flash your ROM of choice (Paranoid Android included in the files you downloaded), and install Gapps
  21. Last, install the i515 3g patch
  22. Power off, Install your SIM card (finally), Power on.
  23. Activate (*611) with PagePlus.  Then, dial *228, option 2 to update your PRL with Verizon.  Reboot.  Everything should be working: Voice, 3G Data, SMS, MMS.

Troubleshooting

INTF2 driver not installing – Install it manually via device manager – browse to C:\Program Files\SAMSUNG\USB Drivers\19_VIA_driver\amd64\VIA_USB_ETS and try the VIA ETS.

Driver for “Android 1.0” not found – choose Samsung Android Phone from the list.

Call PagePlus at (800) 550-2436 and verify your ESN / IMEI is correct and in their system.  I had mistyped a digit in mine, which is why this troubleshooting section exists and is is so long :/

3G not working?  Try this:

  1. Dial *#*#4636#*#*
  2. Select Phone Information
  3. Scroll down and change network type to CDMA auto prl
  4. Wait for few seconds…
  5. Reboot…
  6. Voila 3G will start

If all else fails…Nuke it from orbit.  Open up Galaxy Nexus Toolkit and do a full wipe and reflash to stock android (option 9).  It’ll undo all of the VZW programming (leave the sim out until you finish programming or it’ll try to reactivate your VZW sim information) and allow you a clean slate to start on.  Careful – this wipes EVERYTHING, including files on the “SD Card” partition.

Acknowledgments

As it turns out, dragonhart6505 has a great walkthrough detailing the process, but it is buried in pages of fluff over at XDA.  He was also generous enough to record a how-to on Youtube.  I borrowed heavily from his guide to write this, but still found some areas that required a bit of trial and error.  My goal was to have a clear guide I could come back to in the future if I had to do this again.

9c8337_25ef62e2e2f27eacb62ce16a1b0ee639 (1)

Interestingly enough, I actually went through this process back in the good old days with a Windows Mobile 6.5 HTC Touch Pro, switching it from Sprint to Verizon to take advantage of the lower price and better (non-crippled) specs of the Sprint version of the phone.  The process was just as convoluted as this one, and I somehow doubt the information even exists on how to do it again.  I certainly don’t remember, and didn’t have the foresight to document the process.  Fool me once…

Category: Technology | Tags: , , ,

Review: SD_Card_DVR

I was looking for a low cost Digital Video Recorder to save footage in real-time from the FPV camera on my Bixler 2.  I wanted decent video quality at 480p and a device that didn’t display a blue screen during signal loss, which often occurs when pushing range with wireless video.  Two commonly mentioned DVRs specifically for FPV include the FJ-DVR-SD4 from FPV Japan and the SD DVR from Hobbyking, costing $154.95 and $48.49, respectively.  The FPV Japan unit includes a screen to preview footage, but even still, both devices seem overpriced for the low-tech function they provide.  Recording input from a composite video source is very much 20th century.

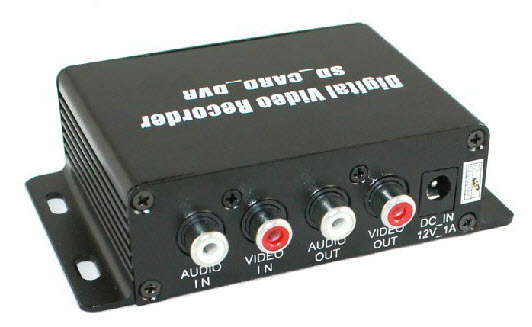
Inputs: Audio and Video in and out; 12V power

Inputs: Audio and Video in and out; 12V power

Enter the SD_Card_DVR, a no-brand device made in china and sold at various outlets under different names, including Dx.com (Mini Digital DVR Video Recorder w/ SD Slot), Amazon (Mini Sd Card Motion Detection Digital Video Recorder) and eBay (1 CH Mini CCTV Camera Audio/Video SD Card DVR).  There is also a blue-cased unit that likely runs the same firmware but uses combined A/V jacks instead of composite and a MicroSD slot instead of a full size.  Price for either is a more palatable $30-40.  Unfortunately, there were no reviews of this particular DVR to be found, so I decided to roll the dice and report my findings.

OSD

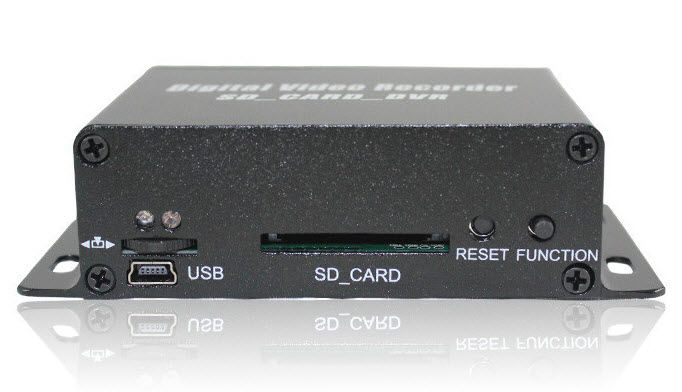
A simple on-screen display offers options to toggle between English and Chinese (default is Chinese; it’s the top menu item), NTSC or PAL recording, Recording mode (continuous, motion detection or mixed), and resolution (VGA or QVGA).  Menus are brought up with the function button, navigated with the rocker switch, and selected by pressing the rocker switch in – this took some trial and error to figure out – naturally, the supplied chinglish manual was of no help.

Controls and SD card slot

Controls and SD card slot

Once recording starts, the time is displayed for a few seconds, then there is an audible toggle and the video returns to pass-through mode, sending the signal straight through to the outputs without any change in quality.  Recording is still occurring when this happens, but in the “background” – this also took some figuring out.  The advantage of this is that there is no input lag – a must for FPV flying.

In my testing, I did notice that this DVR is rather sensitive to input voltage.  Specifically, if the voltage gets much below 12V (below about 11.5V, or 30% capacity), it will cease recording – and will even stop passing through video to the outputs.  If powering this with a battery, I’d use a high capacity 3S lipo and try to keep it above 50% capacity, or use a 4S lipo with a 12v step down board.

In continuous recording mode, the DVR will break up the recordings into 30 minute sections.  Once the SD card fills up, it will automatically erase the oldest file and replace it with the current recording – not really needed for my current task, but absolutely mandatory for video surveillance purposes.

Recording

There are two recording settings:VGA or QVGA, both encoded in MJPG.  These settings can be further refined, but you must do so by placing a properly-formatted “system.txt” file on the SD card.  That file should contain only 7 characters, for example: F15V0S9, where F = Framerate (0-30; default 15), V = video system (default 0 for PAL .. change to 1 for NTSC), and  S = sensitivity (0-9; default 9).  On the next boot, the new settings will be loaded and you can then delete the file.

Interestingly, the default 480p settings had the framerate set at 15fps.  Long story short, it is best to keep it there.  While you can increase it up to 30, the bitrate remains the same, resulting in a lower quality recording from attempting to encode twice the data without an increase in file size.  I found no way to adjust the bitrate, other than switching between VGA and QVGA.  Below is the file info for the 3 settings I tested (click to expand):

VGA: 640x480 (30fps)

Type: AVI
Video: MJPG 640×480 30fps [Stream 00] Audio: PCM 8000Hz mono 128kbps [Stream 01]

General
File name : 2013-07-04 00-36-46-C.AVI
Format : AVI
File size : 446 MiB
Duration : 14mn 11s
Overall bit rate : 4388 Kbps
Writing application : ankarec

Video
ID : 0
Format : JPEG
Codec ID : MJPG
Duration : 14mn 11s
Bit rate : 4254 Kbps
Width : 640 pixels
Height : 480 pixels
Display aspect ratio : 4:3
Frame rate : 30.000 fps
Color space : YUV
Chroma subsampling : 4:2:0
Bit depth : 8 bits
Compression mode : Lossy
Bits/(Pixel*Frame) : 0.462
Stream size : 432 MiB (97%)

Audio
ID : 1
Format : PCM
Format settings, Endianness : Little
Format settings, Sign : Signed
Codec ID : 1
Duration : 14mn 11s
Bit rate mode : Constant
Bit rate : 128 Kbps
Channel(s) : 1 channel
Sampling rate : 8 000 Hz
Bit depth : 16 bits
Stream size : 13.0 MiB (3%)
Interleave, duration : 500 ms (15.01 video frames)

VGA: 640x480 (15fps)

Type: AVI
Video: MJPG 640×480 15fps [Stream 00] Audio: PCM 8000Hz mono 128kbps [Stream 01]

General
File name : 2013-07-03 22-47-26-C.AVI
Format : AVI
File size : 492 MiB
Duration : 16mn 36s
Overall bit rate : 4144 Kbps
Writing application : ankarec

Video
ID : 0
Format : JPEG
Codec ID : MJPG
Bit rate : 4013 Kbps
Width : 640 pixels
Height : 480 pixels
Display aspect ratio : 4:3
Frame rate : 15.000 fps
Color space : YUV
Chroma subsampling : 4:2:0
Bit depth : 8 bits
Compression mode : Lossy
Bits/(Pixel*Frame) : 0.871
Stream size : 477 MiB (97%)

Audio
ID : 1
Format : PCM
Format settings, Endianness : Little
Format settings, Sign : Signed
Codec ID : 1
Duration : 16mn 36s
Bit rate mode : Constant
Bit rate : 128 Kbps
Channel(s) : 1 channel
Sampling rate : 8 000 Hz
Bit depth : 16 bits
Stream size : 15.2 MiB (3%)
Interleave, duration : 500 ms (7.50 video frames)

320x240 (15fps)

Type: AVI
Video: MJPG 320×240 15fps [Stream 00] Audio: PCM 8000Hz mono 128kbps [Stream 01]

General
File name : 2013-07-03 23-25-20-Q-C.AVI
Format : AVI
File size : 163 MiB
Duration : 11mn 0s
Overall bit rate : 2071 Kbps
Writing application : ankarec

Video
ID : 0
Format : JPEG
Codec ID : MJPG
Duration : 11mn 0s
Bit rate : 1940 Kbps
Width : 320 pixels
Height : 240 pixels
Display aspect ratio : 4:3
Frame rate : 15.000 fps
Color space : YUV
Chroma subsampling : 4:2:0
Bit depth : 8 bits
Compression mode : Lossy
Bits/(Pixel*Frame) : 1.684
Stream size : 153 MiB (94%)

Audio
ID : 1
Format : PCM
Format settings, Endianness : Little
Format settings, Sign : Signed
Codec ID : 1
Duration : 11mn 0s
Bit rate mode : Constant
Bit rate : 128 Kbps
Channel(s) : 1 channel
Sampling rate : 8 000 Hz
Bit depth : 16 bits
Stream size : 10.1 MiB (6%)
Interleave, duration : 500 ms (7.50 video frames)

I uploaded a short recording to Youtube to exemplify the degraded quality when going from 15 to 30 fps:

Other features

Recording starts as soon as power is supplied to the device, and ends when it is disconnected.  There seems to be a capacitor inside that allows for a safe shutdown after power is removed and thereby avoiding file corruption.  The SD_Card_DVR handled both a generic-brand 8GB microSD card inside an adapter as well as a PNY 16GB SD card, both  formatted to FAT 32.

As I mentioned at the start, there is a blue version of this DVR that appears to be identical in all but the input connectors and microSD slot.  Unlike my unit, some enterprising merchant actually bothered to make a demo video for the blue one:

http://youtu.be/VPN42m3xtmo

Conclusion

The SD_Card_DVR proved itself a worthy addition to my FPV gear, and has faithfully been recording flights ever since:

I’m satisfied with the features and quality (at 15fps) of this DVR.  It certainly works well enough to help me trace down my plane if it should crash out of view.  For $30, I don’t think it can be beat, and the continuous loop recording is a great feature that is often annoyingly absent on similar cheap DVRs.  For $10-20 more, however, I think the HobbyKing DVR might be a better bet if quality is a priority – I’d imagine its performance at 30fps is superior, and it has a remote.

Bixler 2 FPV Mods

The HobbyKing Bixler 2 is a EPO foam plane designed for both those new to RC aircraft, as well as more experienced pilots looking for a stable platform for First Person View flying.  The pusher-prop design allows the FPV and/or secondary flight camera to be positioned at the front of the airframe with an unobstructed forward view.  Not having to film through a spinning prop saves the footage from being ruined by the rolling-shutter distortion which classically affects the CMOS sensors used in most small cameras.

Because of its broad target audience, the Bixler 2 requires substantial modification to be used as a dedicated FPV platform.  The increases in gross weight due to larger batteries, cameras and electronics add a substantial amount of stress to the entire airframe, and particularly the wing loading. This stress is further exacerbated by the more powerful electric motor and longer propeller that are often needed to maintain acceptable performance with the increased weight and drag.

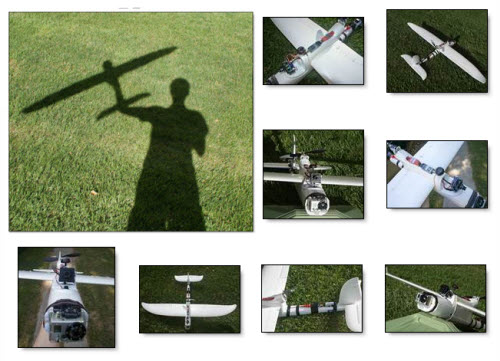
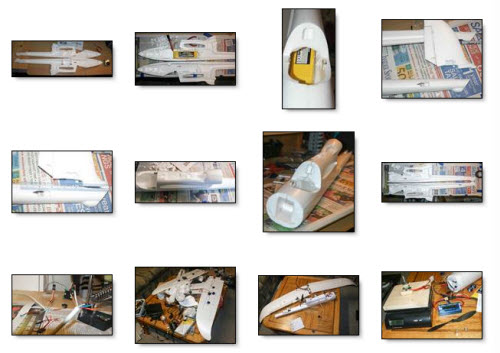
Click for the gallery

Click for the gallery

Modifications

I referenced a number of forums and build logs when deciding how best to assemble and modify my Bixler 2 kit.  Among these were RCGroups and FPV Labs, each containing almost too much information on different people’s experiences with the Bixler and its various iterations.  My greatest inspiration came from a fellow blogger at bixler2fpv, whose overall design I chose to emulate.  Along the way, I did my best to capture pictures of the plane’s construction:

Click for the gallery

Click for the gallery

Below, I have summarized a list of the mods I made to my Bixler 2:

  • Permanently glued the wings on, allowing for removal of the bolts and tubes that spanned the fuselage and wasted space.
  • Reinforced wing spar to handle extra weight – guled 2 additional carbon fiber rods (4mm hollow and 2mm solid) inside the stock 6mm hollow rod with gorilla glue.
  • Relocated Elevator and Rudder servos to the rear – both to free up space in the main cargo area, as well as to shift more weight to the back and reduce the travel needed for the control linkages.
  • Also relocated the RC receiver to the rear, for weight & balance reasons as well as to distance it from possible interference by the VTX.
  • Moved the ESC and VTX outside the cargo bay and onto the top of the plane for better thermal management.
  • Replaced the stock motor mount with the SmallParts CNC mount, allowing for 9×6″ propellers vs the stock 6×4″ size prop.  Result: better cruise time.
  • Removed the nose to mount the GoPro via a wooden mount screwed and bolted into the front bulkhead.  GoPro attaches with velcro, and can be swapped out for the nosecone if desired (also velcroed).  A sock around the mount prevents dirt from getting into the velcro.  Foam between the wood mount and fuselage reduces vibration.
  • Hollowed out the fuselage by removing all obstructions between the canopy and tail, allowing for a single 3S 5000mAh lipo or 2x 2200mAh batteries in parallel.
  • Added packaging tape to the leading edge of the wing surfaces to prevent damage during hard landings.
  • Glued velcro along the bottom of the cargo bay to prevent batteries (also with velcro) from slipping and altering the aircraft’s COG in flight.
  • Rubber band to augment the weak canopy magnets.  This also serves the purpose of securing my VTX and microphone.

Flight Characteristics

The extra 600g in weight was immediately apparent during the maiden flight.  Hand launching was more difficult than with previous planes I have flown, and my first attempt ended up in the tall grass.  Having two people made things easier, and the next 3 launches were successful.  I’m hoping solo launches will be possible with additional practice.

Once airborne, the Bixler 2 lives up to its great reputation for stability and performance.  I was unable to provoke any nasty stall / spin characteristics, and climb performance was very reasonable – although nowhere near being capable of sustained vertical ascents.  Rolls were smooth and loops possible with enough speed – though not from level flight.

Slow flight performance was unsurprisingly less impressive than a lighter stock bixler would be capable of, although the flaps helped immensely.  I still found myself wanting to be able to slow down a bit more, but I think that will have to wait for a Skywalker or similar 2 meter wingspan airframe.  Top speed was measured by GPS at approximately 40mph.

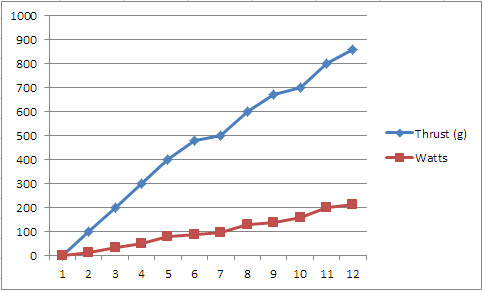
Bench testing of the power vs thrust.

Bench testing of the power vs thrust.

The 1050kv Turnigy Park450 motor and 9×6 prop combo drew a maximum of 213 watts when I tested it on the bench, producing 860g of thrust.  In the air, I noticed flight times of about 20min with 4400-5000mAh of 3S lipo battery capacity at 60-80% average throttle.

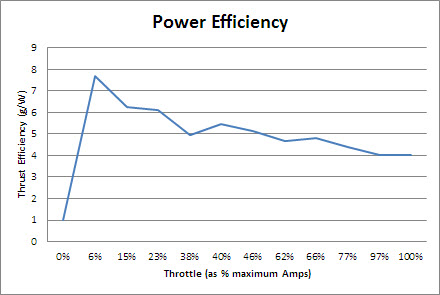
Cruise efficiency at various power settings. Throttle reported as a percent of maximum amps consumed.

Cruise efficiency at various power settings, measured in grams of thrust per Watt. Throttle reported as a percent of maximum amps consumed.

Specifications

Below is a near-comprehensive list of the parts used in my Bixler 2 build.  I re-used a motor and ESC already in my possession.  If you are building this from scratch, I suggest the NTM Prop Drive 2836 2200KV  if using the stock 6×4 prop (or the 35-36 1400KV with a larger 9×6 prop) and a beefier ESC to go with it.  Note that when buying motors you often need to buy an accessory mounting kit and often a spare shaft is a wise idea.  Nothing is worse than needing a $0.50 part and having to wait 3 weeks to get it from a warehouse in china.

Price qty Item
$44.85 1 Hobbyking Bixler 2 EPO 1500mm w/Optional Flaps (KIT)
$14.52 1 Turnigy Park450 Brushless Outrunner 1050kv
$17.95 1 smallpartscnc Bixler 2 Motor Mount
$12.19 1 TURNIGY Plush 25amp Speed Controller
$0.80 1 GWS EP Propeller (RD-1047 254x119mm) (6pcs/set)
$18.83 7 HXT900 9g / 1.6kg / .12sec Micro Servo
$4.43 1 Turnigy TGY-R5180MG 180 Degree Servo
$26.42 1 FrSky D8R-XP 2.4Ghz Receiver (w/telemetry)
$270.00 1 GoPro Hero2
$45.00 1 PZ0420 600TVL SONY SUPER HAD CCD Camera
$40.00 1 FatShark 250mW 5.8GHz Video Transmitter
$35.00 1 5.8GHz Circular Polarized spiroNet Antenna set
$3.17 1 FPV Fiberglass Pan-Tilt Camera Mount L-Size
$3.29 1 12v amplified mic
$2.99 1 L-C Power Filter for FPV A/V Systems
$24.19 1 ZIPPY Compact 5000mAh 3S 25C Lipo Pack
$17.98 2 ZIPPY Flightmax 2200mAh 3S1P 20C
$5.21 1 HobbyKing HKU5 5V/5A UBEC
$1.88 1 On Board Lipoly Low Voltage Alarm (2s~4s)
$6.75 2 2mm CF Rod, 24″
$8.98 1 4mm 40″ CF rod
$5.75 1 Gorilla Glue, 2oz
$21.36 1 Cat6 Molded Patch Cable, Grey (35′); Shileded pairs
$60.00 1 Estimated Shipping costs

Performance

Additional performance information:

Wingspan 1500mm
Material EPO
Length 963mm
Cabin space irregular
Wing Area 26.5 dm2
Wing loading 54.7g/dm2
Thrust 960g
Empty weight 900g
Maximum takeoff weight 1600g
Maximum useful load 700g
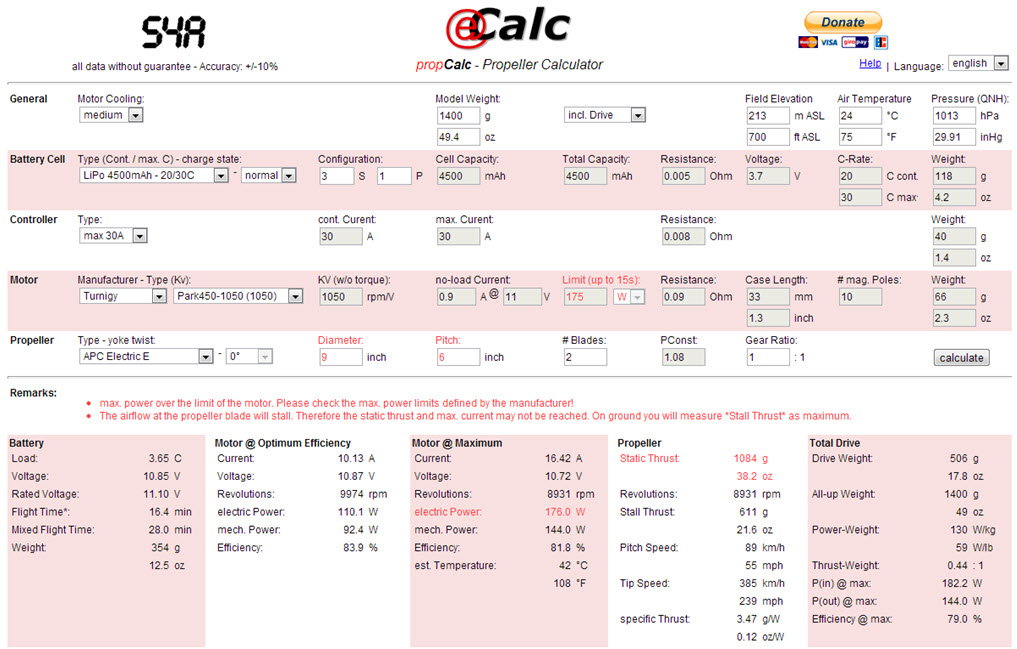
Power / Prop / Battery curves from eCalc.

Power / Prop / Battery curves from eCalc.

The video footage I captured showed no evidence of vibrations, though between the wind and my novice flying, it wasn’t a product I’d be in any hurry to publish.  I also learned why many fly with naked GoPros – ie. not using the protective case.  In addition to the weight savings, I suspect fogging of the lens may be the real motivator.  Due to substantial temperature changes with as little as a couple thousand feet of altitude, fogging is a real issue – and one that ruined my already lackluster video from the GoPro.  Fortunately, the PZ0420 camera which I used to actually fly the plane had no issue.  Future flights will see the use of newly-purchased anti-fog inserts inside the GoPro case, which should hopefully resolve the issue.

Category: Flying | Tags: , , , ,

Going Paperless

In the 20 years that I have been a student, I have always had a backpack.  I was never in want of a place to stow a binder, pockets for extra pens and highlighters, and still more compartments for snacks, a laptop, umbrella, and the various tools, trinkets and gadgets that I might (never) need to use.

Well, I’m still a student, but now I have only two pockets in a short white coat to assume the place of my trusty pack.  Suddenly, I have become over-encumbered with what would have in the past only been only a moderate load.  It wasn’t too difficult to boot the umbrella and trinkets from my cargo manifest, but the nature of the true culprit quickly became obvious: paper.  I hate paper.  It has been only three weeks since I have been forced to accelerate the demise of this pulpy, archaic medium, but I am happy to declare that progress has been made.

Looking back, it’s scary how dependant I was on 19th century (and older) technology for organizing my life.  Because of its insidious creep into every nook of my routine, there was no single solution to ridding myself of those stacks of ugly scrawl, often labored over for hours only to be buried under an unstable tower of their brethren and forgotten.  Yet slowly I have succeeded in reducing – if not eliminating – my dependance on parchment.  Here is what I have used to accomplish the task:

Notepad / Scrap paper: Google Tasks

Google Tasks open in Gmail

Google Tasks open in Gmail

Google Tasks is the best tool for anyone integrated into the google ecosystem, as it is quickly accessible from gmail.  I leave it enabled in the bottom right corner of my screen, and have lists for To-Dos, personal notes, long term reminders, and tasks specific to certain occupations, organizations or activities.  These liste are instantly synced across all of my computers, as well as my android phone (app: GTasks) and iPad (app: GoTasks).  There is a checkbox to mark a task complete, and you can also set reminders and due dates.  Say goodbye to sticky notes and that pile of cut-up recycle paper you used to keep on your desk.

Filing Cabinet: Evernote

Evernote Web Clipper browser plugin

Evernote Web Clipper browser plugin

Evernote occupies that second tier of notes – those that aren’t tasks or items to be remembered for a short time later, but rather all of those pesky little details in life that need to be remembered.  That combination for the bike lock that you always forget in the spring?  You know, the one you wrote down….somewhere?  Yup, evernote will take care of it.  Along with longer items such as notes, pictures and even audio recordings.  You’re limited to 100MB of uploaded stuff per month, so plan on paying for the premium account if you do much of the latter.  For text and the occasional picture / scan, it’s plenty. The web clipper browser plugin is also essential for saving interesting/funny things you read online.  Storing them in evernote solves the issue of trying to find them later only to realize the content was pulled, the site offline, or you just plain forgot where to look.  Of course, like Google Tasks, Evernote is available on the desktop, web, and mobile platforms, so your filing cabinet is always with you.

Scrawl: Penultimate

penultimateI use this app on the iPad for those rare situations in which you simply need to write.  The resolution and accuracy of a capacitive stylus leaves much to be desired, but it works in a pinch.  Samsung’s Note line of phones/tablets, as well as many Windows tablets such as MS Surface, have Wacom digitizer hardware, allowing the use of a proper stylus for better accuracy and ease of use.  Still, my 9″ iPad mini is about as good as a 3×5 paper notecard as far as the amount I can fit on a page.  On the plus side, it syncs to Evernote – a feat that leaves the note card feeling quite resentful and unwanted.  Good riddance.


Binders: Dropbox

Dropbox or Google Drive, you can have your pick.  Either of these are great for storing vast archives of created content or school/work documents and keeping them synced across all your devices.

Flashcards: Anki

I already wrote in length about Anki.  In short, if you have a pile of things to memorize and retain for any significant amount of time, there’s nothing better.

Textbooks: PDF

It’s amazing how many things you can find online if you dig a bit.  And by digging, I actually mean a simple google search.  If you’re lucky enough to find a decent quality PDF of the textbook you need, I still think Adobe Reader is the best app for the job (perhaps with the exception of PDF X-Change Viewer on a Windows machine).  Sadly, the CHM format is still used frequently, and it necessities using apps that are generally more buggy and less polished.

Books / Novels: Calibre and ePub

Calibre is an awesome piece of software for managing an eBook library for use with dedicated eReaders, tablets or phones.  Not only will it organize and convert your library of digital books, but it can also act as a server to allow those books to be accessed from anywhere if you happen to have a computer you can leave running all the time.  My favorite apps that support the ODPS protocol that Calibre uses as well as the widely-used ePub format for eBooks are FBReader on Android and Marvin on the iPad.

calibre


With the above tools, as well as a capable PC, smartphone and tablet, you have all that’s needed to leave paper behind in the last century where it belongs.  If you still find yourself having to use it from time to time, I think you would be well served by adding two more items to that list: a scanner and document shredder.

fapjunk