Blog Archives

The Ultimate Travel Packing List

Happy New Year! I am kicking off 2019 with a trip to Slovakia of all places – to Ski, of all things. Because, well, its Winter, and despite living one state over from Colorado…that’s just too easy. Plus, this trip nets me a new culture to experience and I’ve yet to explore anywhere in Eastern Europe – can’t have that. With miles covering the airfare, and choosing a classy resort in former communist territory rather than something a bit more bougie in, say, Austria or Der Schweiz…I’ll still come out ahead compared to a similar week long trip to an equally extortionist destination in lovely CO.

Even award tickets net 2 free checked bags flying Business on Star Alliance, so that means no renting skis! It also provides a good opportunity to review the packing list I’ve painstakingly curated over the past several years, which I’ll share below.

The Comprehensive Packing List, rev. 1055

Before Leaving

Air Travel Checklist

  • REMOVE knife from KEYS and WALLET
  • No spare batteries in CHECKED baggage (carry on ok)
  • Liquids: Up to 3.4 oz./100.55 ml or less per item, placed in a quart-sized, ziplock bag (otherwise, can be checked).
  • Check Carry-on dimensions for each airline (must valet check carry-on for CR2 or under seat if empty flight)
    • Delta carry on: 22″ x 14″ x 9″
    • United carry on: 45.2″ (=22″ x 14″ x 9″ but not restricted by each dimension; just the total). 40lbs.
    • Southwest carry on: 24 x 16 x 10 inches. 2 free checked bags (<62 inches (L+W+H) and 50 lbs per)
  • Checked-in (have boarding pass) 30min before SCHEDULED departure!
  • Have these items out
    • TSA Screen: Must remove: Shoes + Laptops + bag of liquids + Belts + Light jackets
    • Pre-Check: Nothing has to be taken out / off (except heavy jacket / metal)
    • Jelly: checked only (and disallowed in many countries)
    • Fruits can be checked or carry on
    • Ice pak ok if frozen solid (again USA only in most cases)ood (mostly ok):
  • INTERNATIONAL: arrive 2h early. Print out flight itinerary (showing departing flight from countries, especially for transit visas, eg PVG/PEK).
  • Local Storage for Essential Data – may not have gmail access from Wi-Fi without a connected device or SMS to 2-factor authenticate.
  • Sleeping in terminal secure area: Can’t do if need to exit secure to claim checked bag!

Tier 1 (Essentials)

  • Dobkit
    • Cue-tips
    • Clipper
    • Zip-Lock / <100ml containers
      • Shampoo
      • Soap
      • Mouthwash
      • Laundry detergent x2 loads
    • Lg Deodorant
    • Shaver
    • Caffeine pills
  • Backpack
    • Laptop + charger
    • Power strip + Extension cord
    • Accessories
      • MicroSD reader
      • USB Chargers
      • Cables: 2x Lightning, 1x Micro USB, 1x Mini USB
      • SIM removal tool and case
      • Mousepad, Mouse (fresh batts)
      • USB WiFi Adapter (high gain)
      • External HDD
      • Micro Router (VPN), ethernet cable
      • HDMI Cable, Wireless MHL to HDMI / MiraCast
    • Portable Power Pack
    • Luggage Scale
    • 3.5mm Headphone Extension for iPhone case (or dongle)
    • Pen, paper, envelopes, stamps
    • Plastic and cloth grocery bag(s)
    • Zip-lock with: Additional Zip-lock(s), garbage bag, earplugs, rubber-bands, paper-clip, tape
    • AAA + AA x2 (must be carry-on)
    • Umbrella
  • Car Rental Bag
    • Dash mount (windshield mount ILLEGAL in CA and MN)
    • Fast Charger
    • BT Headset
    • Sunglasses
    • 3.5mm M-M cable
    • Radar Detector – check laws (ALL legal for RD; laser jammers in
      CA,CO,IL,MN,NB,OK,SC,TN,TX,UT,VA,DC). Varies by country.
  • Slippers (skip for intl / warm trip)
  • Jacket
  • Bose QC-25 NC Headphones
  • Sansa + Headphones (IEM +/- BT)
  • Shirts, Pants (short sleeve only if packing light; 2 shorts,1 gym short, 1 jeans, 1 dress pant/shirt, days x t-shirts)
  • Socks, Underwear
  • Special shoes, socks, ties, tie clips, belt
  • Wallet, Credit cards
  • Lounge cards, GCs, Hotel-branded CCs, CCs used in bookings
  • Foreign money bag(s)
  • Priority Pass, Amex Platinum, Lounge cards, Loyalty Cards
  • Snacks + Water bottle (empty) +/- Coffee travel mug or Thermos
  • Passport / ID
  • Lunchbox +/- Cold Pack (MUST be FROZEN – often a TSA hassle)
  • House Key(s)
  • Bag strap x2
  • Travel Belt
  • Caribener
  • Selfie Stick
  • Yi Cam / GoPro and case

Tier 2

  • iPad
  • Maps.me: Save offline maps
  • Download podcasts / Audiobooks
  • Swimsuit + Sandals + Goggles
  • Sweatpants
  • Lg mouthwash
  • Lg Toothpaste
  • Home Toothbrush
  • External HDD with media – LOAD
  • USB utility / install drive

Tier 3

  • Bathrobe
  • Running cloths, shoes
  • DSLR
  • Tripod
  • Shower towel
  • Laundry bag
  • Tupperware container for food
  • Bike + U-Lock
  • Padlock
  • gorilla glue
  • Measuring tape
  • Hiking boots
  • Hammock
  • Car inverter
  • GoPro / YiCam + kit (suction mount, headstrap, adapters, stickers, case)

Interview

  • Suit
  • Dress Shoes + socks*days
  • Undershirt(s)
  • Interview Folder

Hot Climate

  • Sunglasses
  • Mask + Snorkel + Fins
  • Beach towel
  • Yi Cam / GoPro and case
  • Sun shirt
  • Sun Hat
  • Sunscreen
  • Watershoes
  • Foot rinse bottle

Cold Climate

  • Warm socks
  • Heavy Jacket / undershirts
  • Boots
  • Gloves
  • Headband
  • Skis + Poles + Goggles + Facemask + Warmers +/- Helmet

Bike

  • U-Lock
  • Cell phone holder
  • Water-shoes instead of sandals
  • Scope out WM rental locations

Rain (heavy precip)

  • Waterproof suit
  • Boots – waterproofed
  • Ball-cap hat for hood

Road Trip

  • Cooler
  • Yeti
  • Blankets

Off the Grid

  • Radios
  • emergency phone (or ensure GSM roaming is working)
  • EPIRB

International

  • Passport
  • Printed boarding passes
  • Printed hotel addresses with local translation
  • Printed Hotel, Car reservations
  • Power Adapter (Switzerland not supported by common multi-adapter)
    • Verify correct voltage (110-220 compatible) for electronics
  • Trip advisor hotel / area reviews
  • No FTF credit card(s), hotel/airline cards
  • Chip+PIN card capable of EMV payments with PIN
  • Notify CC companies of travel plans
    • Amex – doesn’t care
    • Chase (use app): or online
    • Schwab: online (no FTF, ATM Fees Waived)
    • Fidelity: 800-323-5353…card#…0 (1% FTF; ATM fees waived)
  • Local currency plans / needs (Debit ATM vs CC vs cash exchange)
  • Face mask, N95 (china lol)
  • Download offline maps, translate language/OCR packs, currency conversions, LastPass, IDs, etc…
  • Transfer files to phone / HDD
  • VPN / RDP needs, functionality
  • Verify VISA, vaccination, driving requirements:
  • Register with STEP: https://step.state.gov/step/
  • Weigh Luggage
  • Evernote agenda / day plans; convert to travel log after or during trip
Category: Travel | Tags: , , ,

Home Automation Update

2017.

As with all things that change, much remains the same.  The past several years have seen an explosion of new products in the “Smart Home” market, yet no clear winner has emerged, resulting in a landscape that is even more fragmented and beset by compatibility issues than ever before.  Whereas 5 years ago one was faced with a choice of several protocols (Z-wave, X10, ZigBee) and control software options (HomeSeer or Vera) or expensive, bundled turn-key solutions like Control4 or Savant, the product offerings are now much more diverse.  Almost every large tech company (Google, Apple, Samsung) and many home appliance stores (Home Depot, Lowe’s) have their own brand-name devices, home automation hubs, and cloud subscription services.  Nothing as ambitious as Google Home (the platform, not the smart speaker they launched this year) has materialized, and because no one ecosystem has gained wide acceptance, the consumer is faced with the unfortunate choice of settling for the limitations of a single ecosystem that may be lacking in certain device modules or software features, or going down an ever more harrowing DIY path and dealing with compatibility issues as they try to integrate products from the above manufacturer’s offerings into a third-party control network, hoping that the underlying protocols are still compatible.

Left with the choice of investing an a single ecosystem that may – and likely will – become obsolete (and unsupported?) within less than a decade, I have decided to stick with the tried and true – HomeSeer and Z-Wave – for the foreseeable future.  While lacking some of the nice flourishes like well-designed mobile apps and effortless compatibility, the endless rule-based configuration and extensibility of HomeSeer offers true Automation where competing “consumer-friendly” products lean more towards glitzy remote-control.

In the past few years, I have added some additional functionality, mostly through software, that has improved the overall experience of my setup.  The mantra is simple: unseen, unheard.  Anticipate, react, but do not interfere or present features that add little value.  What does that look like?

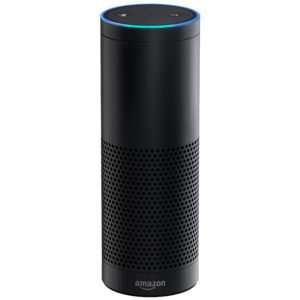
Alexa

My glorified smart alarm clock.  Really.  While the other features are nice, and I do enjoy the occasional customized morning briefing, using the Echo as an alarm clock has made a notable improvement in the daily routine.  With IFTTT integration, Alexa can trigger events in HomeSeer, and trigger phrases can be customized.  I can say, “Alexa, trigger all lights out” to turn every (connected) light in the house out, or “Alexa, trigger air on” to turn on the AC.  Rather than fumbling with a crappy old alarm clock or relying on my phone, I can say “Alexa, set alarm for 5:25 AM” and it is done.  The time is maintained accurately via internet connection, and daylight savings is accounted for.  Better yet, IFTTT can respond to the alarm going off as a trigger.  This allows the lights in my bedroom, hallway, and living room to automatically come on when the alarm goes off, and (optionally) the coffee pot to turn on with a 10min delay for me to finish a shower,  Pretty cool.

Presence

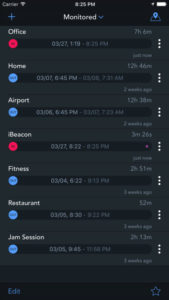
One of the requirements for true home automation is the accurate tracking of presence.  The system must know who is home in order to respond appropriately.  This is actually very difficult to implement, and there are many ways of going about it, including motion sensors, Bluetooth beacons, pinging each household member’s phone while connected to the Wi-Fi network, or using GPS position reporting from an app.  The latter two options offer the additional granularity of knowing WHO is home (assuming they keep their phone with them) and the last option gives the ability to set multiple trigger zones on a map with the goal of anticipating one’s arrival home and thus responding BEFORE they arrive, allowing for heat/AC to already be on, alarms to be disabled, etc.  This is what I have implemented with one of my favorite iOS apps, Geofency.  It allows multiple “Geo-Fences” to be set up, with accurate cell and GPS based tracking of the entry and exit into and out of set geographical regions, with associated trigger actions.  In this case, like with Alexa, IFTTT is used as a bridge to connect with HomeSeer and set “Home” and “Away” status.

Security

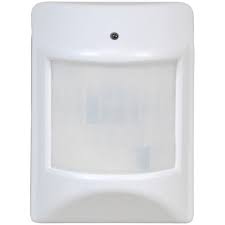
ADT?  pfft.  With no additional hardware, and zero monthly subscription fees, I have an adequate security system by simply utilizing the existing presence features described above with alternative events to be triggered when either of the in-house motion sensors (entryway and stairway) detect motion.  Normally, these are used to turn lights on, but when no one is home, they send an alert text that there is activity in the home.  While I have experimented with cameras, there are just too many false positives (headlights flashing through a window, lightning, birds etc…).  Simple IR sensors are much more reliable at detecting humans and humans only.

HVAC

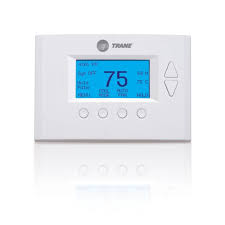
Here is where the cost savings comes in to save the day and pay for all the cool stuff described above.  Presence sensing and a connected thermostat (no, not a Nest, just a simple, dumb, Z-wave thermostat) allow for the heat and AC to be on only when home, and to dynamically react to changing outside weather conditions, bedtimes, and early/late mornings.  The cost savings, especially with air conditioning, is in the range of hundreds of dollars annually.

Conclusion

With the exception of voice control via Alexa, little has changed from the hardware standpoint.  Sure, a few more lights are attached via Z-Wave outlet, thanks to overall lower prices.  Several 4-button Aeon MiniMotes have been added for convenience of turning said lights on and off singly or in groups.  But the rest?  Mostly better software integration.  Better presence detection has enabled a much less distracting level of automation, where the house reacts to certain events reliably and appropriately, but is still able to be overridden manually without hassle.

While the lights don’t change colors and doors don’t lock and unlock themselves, I am happy with this fairly unobtrusive setup until something better comes along.


Category: Technology | Tags: , , ,

eBay Bulk Listing for Free with File Exchange

Posted on by 0 comment

eBay’s website has become a cesspool of CPU and Memory intensive Web 2.0 sludge, which makes using it to do anything which benefits from parallelization a nightmare.  Bulk listings?  Pay a third party webapp for the privilege.  Or not.  eBay has an obscure backend involving uploading CSV files to create or edit listings, and even leave feedback in bulk.  You just have to figure it out.

So, here we go:

Selling Workflow

  1. Take photos
  2. In Lightroom, rotate, crop and export <1MB preset
    1. delete originals from disk
  3. FS Viewer fullscreen: F2 Rename
  4. Excel Update Quantities, Pricing
    1. Download current listings
      1. http://k2b-bulk.ebay.com/ws/eBayISAPI.dll?SMDownloadRequest&ssPageName=STRK:ME:LNLK
      2. Active—FileExchange—Revise Price and Quantity—All
      3. Link sent to email
    2. Adjust names, prices
    3. Adjust Quantities
    4. FORMAT Item ID + Transaction ID to number (use format settings menu, change decimal places to 0)
    5. Save, confirm CSV
    6. Upload
      1. http://bulksell.ebay.com/ws/eBayISAPI.dll?FileExchangeUploadForm&ssPageName=STRK:ME:LNLK
    7. Verify (DL report)
      1. http://bulksell.ebay.com/ws/eBayISAPI.dll?FileExchangeUploadResults&ssPageName=STRK:ME:LNLK
  5. Excel New Listings:
    1. Template from “Listed.xls” containing previous listings
    2. Category
    3. Title
    4. Brand
    5. Verify
      1. Condition 1000-New
      2. Format
    6. PicURL-Boxart
      1. hardlink
        1. https://www.google.com/imghp?safe=off&source=lnms
      2. FTP
        1. Use predictable link formatting
      3. dropbox public or imgur (unreliable)
    7. Description (same for all SW)
    8. Price
    9. Quantity
    10. SAVE AS CSV, comma delim
    11. Upload
      1. http://bulksell.ebay.com/ws/eBayISAPI.dll?FileExchangeUploadForm&ssPageName=STRK:ME:LNLK
    12. Verify (DL report)
      1. http://bulksell.ebay.com/ws/eBayISAPI.dll?FileExchangeUploadResults&ssPageName=STRK:ME:LNLK
    13. Copy to Listed for templates

I can post a template for this if anyone is interested.


Feedback Workflow (mark as shipped, positive FB)

  1. Download “sold and not shipped”
    1. http://k2b-bulk.ebay.com/ws/eBayISAPI.dll?SMDownloadRequest&ssPageName=STRK:ME:LNLK
  2. Copy Item ID + Transaction ID columns to sold template.
    1. format Item ID + Transaction ID to number (use format settings menu, change decimal places to 0)
  3. Upload
    1. http://bulksell.ebay.com/ws/eBayISAPI.dll?FileExchangeUploadForm&ssPageName=STRK:ME:LNLK
  4. Verify (DL report)
    1. http://bulksell.ebay.com/ws/eBayISAPI.dll?FileExchangeUploadResults&ssPageName=STRK:ME:LNLK


Category: Technology | Tags: ,

The Elusive Arubus Smart Card

Aruba is not cheap; like any tourist haven, the island has mastered the art of maximum cash extraction from its carefree visitors, to who hardly notice the exorbitant taxi fares and dining tabs while escaping from a hectic life in another continent.  And why should they?  With resorts regularly pricing rooms north of $300-400 per night during high season – not to mention airfare – the other costs are drops in the ocean.

arubalogo

However, when your ocean is more of a grudging, desert puddle, those drops are seen with a slightly different perspective: after all, what is a puddle but a meager collection of drops? When your AirBnB is running $43/night (weekly rate during low season, mind), those $20 taxi fares start to look rather obscene.  I could go about 25mi in Abu Dhabi for that rate and if it was a round trip… well, you could hire a car and driver for an entire day in Bali with a bit of bartering.  Which means I was quick to investigate other options, and in Aruba (shared taxi “car-bus” vans aside – they cost a flat USD $2 by the way), that means the bus – I mean, Arubus.

logo


At USD $2.60 per ride (4/2016) and no such thing as transfers, Arubus can quickly become one of the most expensive public transit systems around, especially as there is no such thing as a transfer.  Want to get from anywhere south of Oranjestad to somewhere north of town (eg Eagle Beach, Palm Beach, Arashi beach)?  That’ll be $5.20.  Round trip?  $10.40.  To Baby Beach and back from the high rise hotels, with 3 “transfers”?  $15.60.  Per person.  Ouch.  Those $20, 72hr European transit cards begin to be sorely missed.

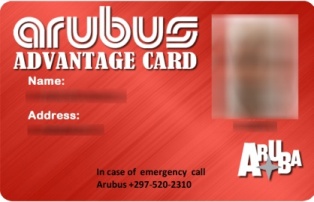
But hey, what is this Arubus Advantage Smart Card I see the occasional dutch ad for at (the very few well marked) bus stops?  Well, the fact is, no one seems to know – in English-speaking tourist-ville, at least.  Surprisingly, despite all the forums and TripAdvisor / FlyerTalk posts on Aruba, this topic is woefully under-discussed online as well.  There were plenty of folks asking for details on these “smart cards”, but no one providing answers.  The few posts I could find with any information at all didn’t really look very promising.  Cards for residents only?  No longer being used at all?  Lots of second-hand information, and most of it from 2012-2014 at that.

Arubus-cu-Advantage-di-50-florin

So, on day 2 of our visit, my dad and I made a trip to Arubus Headquarters.  On foot, of course.  It’s about a 10 minute walk North from the airport, which also happens to be where the nearest bus stop is located.  They are open on weekdays from 8am-3:30pm (yes, the website and office door say 4:00 or 4:30, but they were closing when we arrived at 3:25).  So, lets get some questions answered with sweet, up to date (2016), first hand facts:

  1. Do I have to be a resident or citizen of Aruba to get a Smart Card?
    1. No, and no.  Citizens can get the more discounted Advantage card, but the standard card is available to all.  Here is the application form.
  2. How much is it?
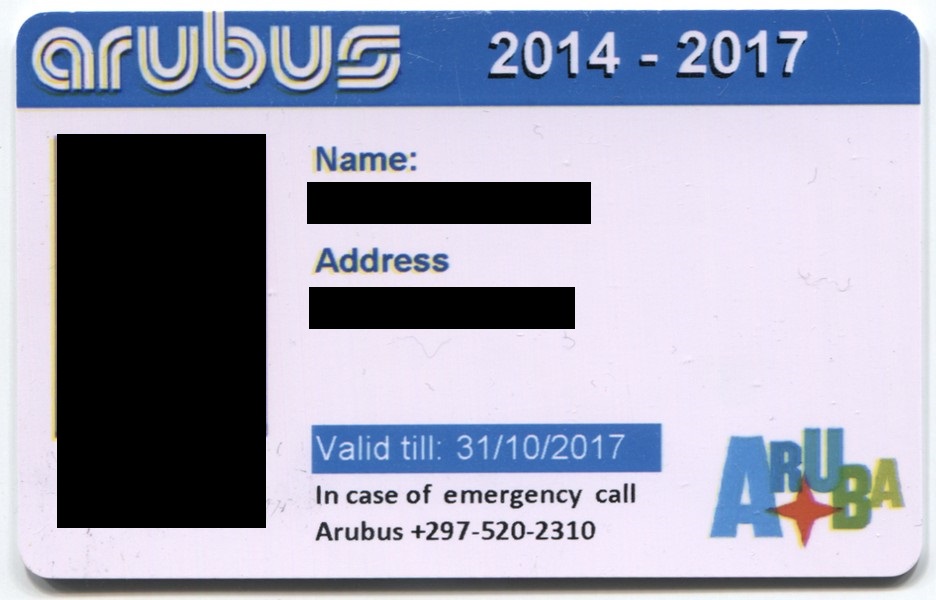
    1. $9 USD (15 AWG) for the card.  Additional funds can be loaded later or at the time of purchase to pay for fares, at 3 AWG each (about $1.70 US). Currency conversion happens when the card is loaded.  Smart Cards expire every three years, starting in 2014 (so the card I purchased in 2016 expires in 2017.  If I were to buy a new one then, it would expire in 2020).
  3. Do they take foreign credit cards?
    1. Not reliably.  They have a MasterCard sign, but could not process my US card.  USD was accepted, though.
  4. Do I need a card for each member of my family.
    1. No.  The same card can be used multiple times for each person in your party.  Probably don’t even have to be family, though I’d recommend the cardholder at least be present in the group, as their picture is on the card.
  5. What information and/or ID do I need to provide?
    1. I was not asked for any ID.  Put down the address for the AirBnB apartment and they took my photo.  Card was printed in <10min.ArubusSmartCard
  6. Where can the cards be reloaded?
    1. There are about 17 locations listed online.  The information card I took lists 19.  I suggest loading enough to get you through your stay upon arrival and/or purchase of the card – my first attempt to reload a card (at “S-Chow Supermarket” in Savaneta was unsuccessful because their reload machine was out of service.  The La Estrellla I tried next in Oranjestad had no issues and accepted a credit card.Reload
  7. Is it worth it?
    1. It pays for itself after 10 trips, you don’t have to fumble with cash and change, and you get a souvenir to take home.  I’d say so.


Ok, so if you found that useful, here are some common sense questions that don’t seem to be answered well anywhere about using the bus in general.  Also learned from experience (often the hard way):


  1. Is there a map and/or timetable?
    1. Yes, on the website (map and timetable).  Here is a picture of all routes.
  2. When will the bus arrive at my stop?
    1. Your guess is as good as mine.  The times listed are strictly departure times from the main terminal at either end of the line.
  3. How long does it take to get to…?
    1. From Orangestad:
      1. North
        1. 10min to Eagle Beach
        2. 15min to Palm Beach (high rise hotels)
        3. 20min to Malmok Beach  (line 10/10A; shorter operating times)
        4. 25min to Arashi Beach (line 10A; shorter operating times)
      2. South
        1. 10min to Airport
        2. 20min to Savaneta / Mangel Halto
        3. 30-40min to San Nicolas
        4. 1hr to Baby Beach (have to transfer at San Nicolas; this line also has reduced hours ~10am-5pm)
  4. Where do I catch the bus?
    1. Stops are poorly (if at all) marked.  However, google maps seems to be fairly accurate, and stops in general are pretty closely spaced.  Look for locals waiting together, or just wave when the bus is approaching; it’ll stop.
  5. Why did the driver just go past my stop?
    1. You didn’t push the button (usually on the overhead hand rails).  Do this even if you told the driver your destination – he might forget.
  6. Is it safe?  Clean?  Timely?
    1. In my experience, very much so.  The drivers I had spoke and understood English, buses were clean, other riders did not appear to be sketchy in any way, and pleasant tropical music was playing from the overhead speakers.  With only departure times posted, it is difficult to comment on timeliness, though the departure times did seem to be well adhered to.


Aruba seems to follow the trend of many tourist destinations by leveraging obscurity to provide affordable transportation options for the local populace while maximizing cash flow from tourists.  You can usually tell from the airport if your destination is such a city, as there will be no bus stop there (it will be off airport grounds, likely on the nearest city street, and quite probably not that far of a walk if you know where to go).  Arubus follows this doctrine as if it were their corporate mission statement.  From the lack of documentation on their (English?) website to the lack of clearly marked bus stops and a fare structure that punishes ignorance to the maximum tolerable penalty, there is a subtle intelligence to the whole operation.  Once you figure out how things are run, make a few mistakes and learn the unspoken way of things, the system actually works quite well for getting around the west coast of the island (and to Noord or Santa Cruz) and is far more reasonable than any of the other alternatives.

image015

Before my trip, I read numerous reports that shared a common theme: you need a car to get around Aruba.  After 9 days, I would disagree, but with several conditions.  Bringing a family?  Get a car.  Trying to see many different attractions in a short vacation (<5 days)… get a car.  The idea of walking 1-2 miles per day, at times in the 90′ sun not what you pictured for your beach vacation?  get a car.  Staying out late (eg the am hours)?  get a car.  Content to chill at your high-rise and go on the occasional arranged excursion… well, this post isn’t really for you and you can probably skip the bus vs car argument altogether – enjoy those Hummer taxis!

Category: Travel | Tags: , ,

Direct DC Power to Smartphone – No Battery

This seems like it should be simple.  Phones of all variety – Android, Apple, “smart” and “dumb” use 3.7-3.85V single cell lithium-ion batteries.  Just attach a 3.7V DC adapter to the (+) and (-) terminals of the phone and you’re good to go, right?  Wrong.  A bit more trickery is required, and some additional finesse is well worth the effort.

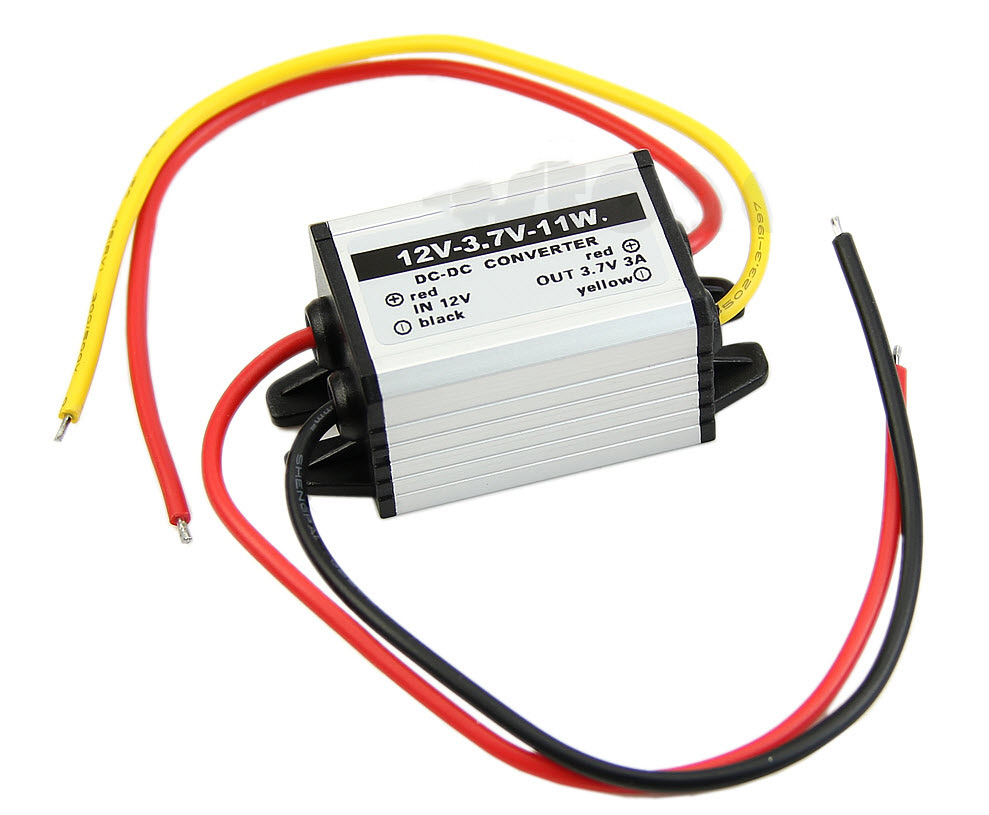
Two things are absolutely essential for this.  First is a DC adapter with 3.7-4.2V output rated at 1.5A or greater.  I used a DC-DC adapter for 12V input and 3A, 3.7V output, available on eBay.  If you don’t mind a bit more work, this step-down converter is fully adjustable by removing the heat shrink and turning a screw (while connected to a multimeter), allowing for 12V input and your choice of <10V output, and is actually what I ended up preferring to use.  An AC adapter may be more convenient, depending on the intended use, though I had a hard time finding an inexpensive option with sufficient output (1.2A was the best I found).  12V AC-DC adapters are cheap and plentiful, so you could always just combine one of those with either of the DC-DC step-down converters from above (which could likely power 2-3 phones in parallel).

2015-07-07_1-40-40

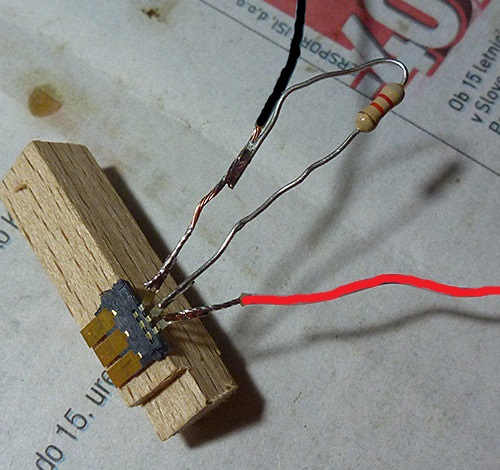
The second item needed is a resistor.  This bridges the ground and BSI (Battery Status Indicator) contact.  If a fourth contact is present, this is likely for NFC, and will be left alone.  For samsung phones, the BSI pin is typically found between the (+) and (-).  The purpose of the resistor is to identify the battery as compatible with the phone and may also assist in reporting the capacity / charge level / temperature.  The 68K resistor I used, plus the 3.7V output from the adapter made my Galaxy Nexus report a battery level of 14%.  I also tried a 100K resistor, which reported a similar, or slightly lower, capacity.  With further testing (using the adjustable step-down converter), it appears that the input voltage of the battery, rather than resistor size, determines the phone’s reported battery level, through a resistor is still necessary for the phone to recognize the battery and power on.  I ended settling on 4.15V, which made the phone report 100%.

FYGRTN8HVC1FEZE.LARGE

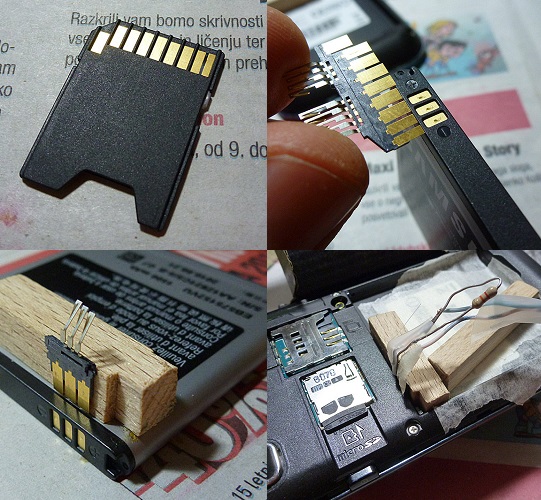
If you want a removable solution, you can construct a “faux battery” using your scrap material of choice and a microSD to SD card adapter – if you’re anything like me, you have an unused one laying around.  There’s a good example of this over on Instructables:

fauxbatt

Of course, you could just solder directly to the contacts on the phone, which may not be a bad idea if the modification will be anything approaching permanent.  The “faux battery” solution can be made quite sturdy, but nothing beats solder for peace of mind.

This solution works great for in-place installations such as home automation remotes, fixed displays and long-endurance photo / video, cellular hotspot and communication uses.  Unfortunately, for a hands-free implementation in a car or similar situation where the phone would ideally boot up when power is connected, additional work will be needed, as simply connecting power – just like inserting a new battery – does not result in the phone turning itself on.  You’d likely need to disassemble the power button and simulate a “momentary press” using capacitors / relays, which is beyond the scope of this post.  I may revisit this topic though, as I constructed such a solution back when I made a CarPC (before Android and cheap tablets were a thing).


Category: Technology | Tags: , , , ,

TK102 Clone – GPS Tracker Setup Guide

As with most Chinese knockoff and clone devices, one can expect minor variations in hardware, numerous inconsistencies in software / firmware and a complete lack of documentation.  For a device where all commands must be issued over SMS text message, figuring out how the Xexun / ZY International TK102 / TK102B / TK102-II functions without a proper manual is difficult enough, but for my “clone,” the closest to which I’ve come to identifying as a Heacent HC06A board inside a TK102 shell, in which the formatting of the commands has inexplicably been altered, the task was a miserable one.

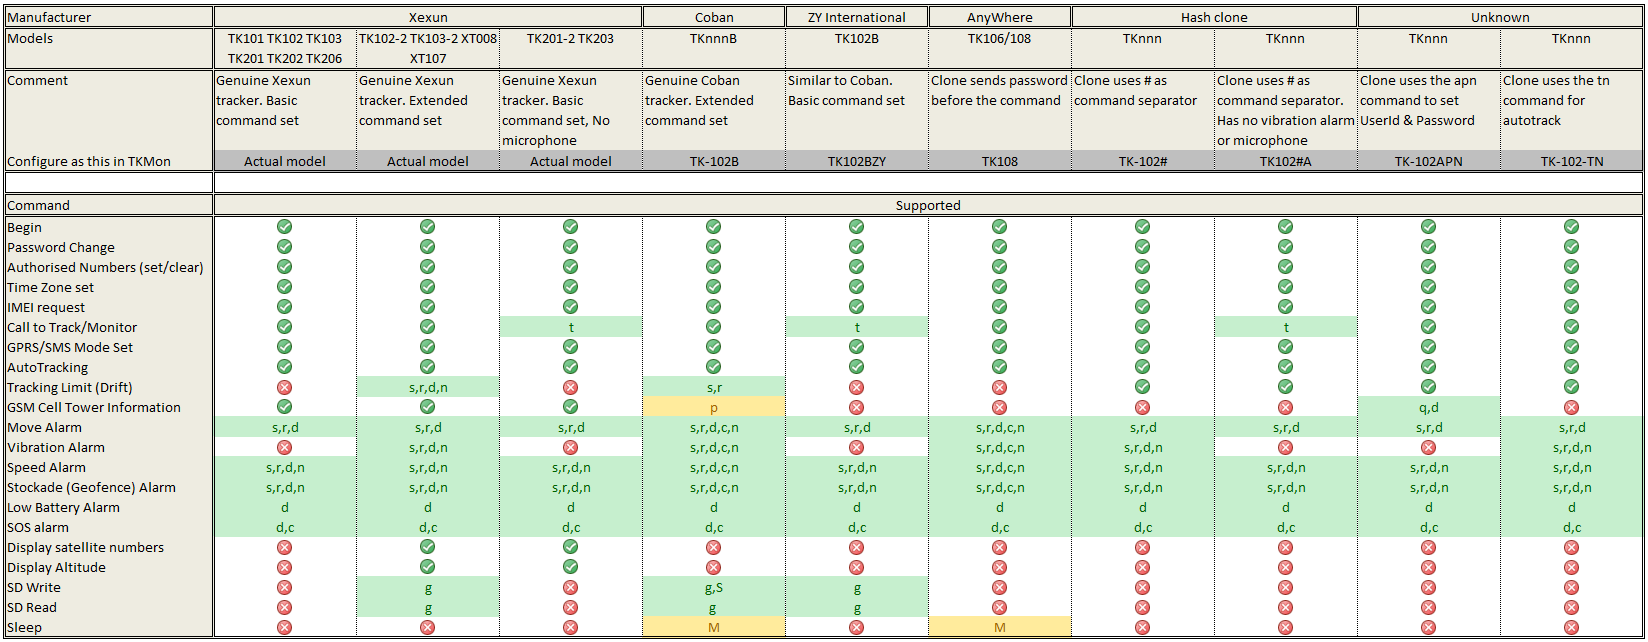
SupportedDevs_1

Mine resembles the “Hash Clone.” Click for the key and link to the source, the developer of an android app for these trackers.


That said, at $27.97, this type of hassle is almost expected, and for a fully functioning (once understood) GPS / GSM tracker, the lack of documentation does little to spoil the deal.

The Elusive list of Commands

For this device, the commands use “#” for padding/separations, rather than a space as on the official devices and many of the, er, “more official” clones.  The commands also vary slightly.  As with the original, all passwords must be numeric only, and six digits.  The default is “123456.”  Here is what I have gotten to work:


Function SMS Command SMS Response Notes
Initialization #begin#123456# begin ok resets password
Change Password #123456#123456#987654# password ok
Get IMEI #imei#123456# imei:123456789000015 15 digits
Set Timezone #timezone#123456#S0400# time ok S equals negative?
Set APN #apn#123456#epc.tmobile.com#user#pwd# apn ok user and pwd are optional
Set Server IP #adminip#123456#193.193.165.166#20751# adminip ok IP and port (IP can be a url)
Remove IP #noadminip#123456# noadminip ok Limit 1 IP / Domain?
Admin Number #admin#123456#18001234567# admin ok need country prefix
Remove Number #noadmin#123456#18001234567# noadmin ok Can store 5 numbers
Admin SMS #adminsms#123456#18001234567# sms ok Can store 5 numbers?
Remove SMS #noadminsms#123456#18001234567# noadminsms ok
Check Status #check#123456# electricity:24.97% GPS:A gprs:open gsm :75 A= fix ; open=online
Google Maps link #smslink#123456# http://maps.google.com/?q=N41.000000,W87.000000
Auto Track #fix#030#004#123456# set fix ok interval (<20) # total (<255)
Auto Track-alt #fix#030s#004n#123456# set fix ok s: second, m: minute, h: hour
Stop Auto Track #nofix#123456# Cancel fix time ok!
Listen to Microphone #monitor#123456# monitor ok Call to listen to mic
Back to default mode #tracker#123456# tracker ok Switch back to normal mode

From the various sources I pieced this together from, I still couldn’t figure out the following issues:

  1. Admin phone number: Requires an international prefix (eg +1 for the US).  The example they list is for China (+86), which is formatted as 0086.  Unsure how many zeros should precede the “1” for US.  I’m also not sure a prefix is even needed unless you’re calling from out of the country.
  2. The “Auto Track” position updates don’t seem to be sent via SMS, only GPRS when a server is configured.  Not sure if that’s because I incorrectly whitelisted my number or if I never tried with GPRS disabled.
  3. I tried a bunch of free android apps; none worked with this clone; they don’t like the “#”s.  This app looks like it would work, but it is $10.  I’ll just use Tasker.
  4. The :Low Battery Alert” supposedly begins to alert at 3.7V and sends you SMS in 30m intervals thereafter. In my experience, “Low” is about 60%.
  5. Several commands I did not mention above or test, but which should work:


Function SMS Command SMS Response Notes
Geo-fence #stockade#123456#500#60#22. 312451#113.54376# stockade+geo-info radius#time#longitude#latitude
Disable Geo-fence #nostockade#123456#
Movement alert #move#123456# move+geo-info Must be still during setup
Disable Movement alert #nomove#123456# move ok
Overspeed alert #speed#123456#080# speed ok km/h; not less than 20km/h
Disable Overspeed alert #nospeed#123456#

For the Geo-Fencing, apparently there’s a way to either set a coordinate and diameter, or to use two coordinates, where the first defines the top left corner of the box making up the geo-fence, and the second is the coordinate of the bottom right corner.

Now, Make it Pretty…

Finally, here is how to get the GPRS / data connection set up using GPS-Trace.com

  1. Register at this website: http://gps-trace.com/
  2. Setup your GPS with the following configurations (remember to leave the GPS tracker outdoors with clear view of the sky):
    1. If you have not already set up your GPS password:
      1. Send SMS command: #begin#123456# (you should receive an SMS saying “begin ok”)
      2. Make a phone call to the SIM card you put in your GPS (you should receive info such as geographic coordinates);
    2. Send SMS command: #imei#123456# and save your IMEI for later.
    3. Send SMS command: #timezone#123456#S0300# (this is the setting for GMT -3, Brazilian time);
    4. Send SMS command: #adminip#123456#193.193.165.166#20751#
      1. This is for setting the correct IP and port to work with gps-trace
  3. On gps-trace.com, considering you’ve already registered your account, you should now add a new unit – must use “Vehicle”
    1. Look for the “new unit” icon placed on the bottom right side of the screen
    2. Fill the “unit name” field with a name of your choice
    3. Fill in the phone number in international format (“+1” prefix for US)
    4. In “device type” choose “Heacent HC06A”
    5. Fill the IMEI field with your device’s IMEI number (15 digits)
    6. Fill the “password” field with your device’s password (default is 123456)

Now both the Auto Track and individual polling options (smslink and simply calling the device) should also result in a transmission to gps-trace with your coordinates mapped and timestamped.  Theoretically, the above method could be adopted with any online service, or hosted oneself with something like GPS-Gate.

c8ab2848-6466-6241-e541-dc493b82b49d

The TK102B…or a not-so-identical clone.

Or Make it Yours

As an alternative to GPS-Trace Orange, I have actually found Traccar, and more specifically, the Traccar-Web UI modification to offer the best blend of features, simplicity and the ability to export data for use in google Earth or similar.  You can either create an account and use the free demo server each of these projects maintains, or download and host your own server, which is what I did.  This allowed me to watch the connection log as my tracker attempted to send data, make sure it was actually connected, and figure out which port it should use.  Traccar uses ports 5000-5100 based on the format of the data the GPS tracker sends, as each is formatted differently.  The HC06A / TK-102 clone, for example, sends a HEX string that converts to “#123456789000015##1#0000#AUT#01#31041001a4776d #8312.534700,W,4120.236900,N,0.00,0.00#060715#212609.000##”.  It’s sending the IMEI, lat/lon, date and time as well as some other stuff I couldn’t decipher.  If this is sent to Traccar on port 5016, it is able to correctly parse the data and display it on a map.

traccar

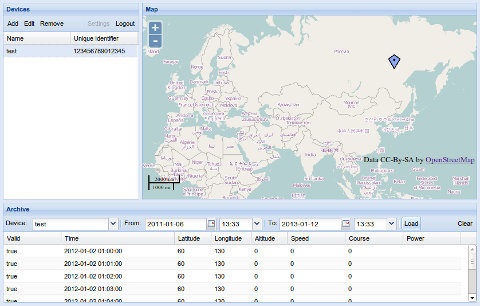
Traccar. The UI modification adds several additional features, including import/export.

So, to adapt the above instructions for GPS Trace Orange if you prefer to use Traccar instead, simply change the IP and Port to reflect this.  For the Traccar demo server, this would be:  #adminip#123456#104.43.219.242#5016# or alternativly the UI-Mod server is #adminip#123456#188.166.50.6 #5016# .  You can also use your own server, such as #adminip#123456#innominatethoughts.com#5016#.  Using text for your domain does indeed work, rather than needing to use the IP, which is great if you’re using a dynamic IP with DDNS.  Whichever version of Traccar use, you’ll need to create an account, add a device, and use the IMEI as the “unique identifier.”

Category: Technology | Tags: , , , ,

Anti-Shopping Spree

I don’t get traditional shopping.  Just as I feel betrayed when donating money to an organization with a poor operational overhead ratio, spending my hard earned cash on highly marked-up trinkets and goods that will either rapidly depreciate or end up contributing to the organizational nightmare occupying my basement just feels foolish. The best way to avoid the curse of buyer’s remorse, is to go “un-shopping”, whereby one takes advantage of Capitalist America’s commercial incentives and credit card reward offers to leave each store with more money than before.

An intro to Manufactured Spending

I’ve been experimenting with “Manufactured Spending” and “Travel Hacking” for the past several months, and the topic itself deserves an entire post – if, that is, the effort is even worth the time.  There are so many other bloggers out there covering this topic that I doubt a novice has much to contribute in terms of adding to the overall science and technique of this…hobby.

That said, there is value to be had in anecdotes, so here is an example of a recent shopping trip on mine, and a breakdown of how the different elements of manufactured spending worked together to produce a nice little bonus for the day’s hard work.

To take full advantage of most of these offers, a cornucopia of different credit cards are required, though even with only several, one can still come out with a decent haul.

Staples $200 MasterCard gift card
– $6.95 (fee for gift card)
+ $20 (10% off $200 cashback with Bank of America credit card offer)
+ $15 (staples rebate for buying a gift card of at least $100)
+ $2.07 (Miles of credit card at 1% on all purchases)
—————
$13.05 cash (arguably, the staples gift card could go here as well)
$17.07 Non-cash equivalent (Virgin Atlantic miles, staples GC)

Note that the value of the gift card is not counted, as we can liquidate it without any additional fees – more on this in a minute.

Marriott $600 gift card
– $0.00 (fee for gift card)
+ $50 ($50 off $200 cashback with Amex offer, card 1/3)
+ $50 ($50 off $200 cashback with Amex offer, card 2/3)
+ $50 ($50 off $200 cashback with Amex offer, card 3/3)
+ $2.00 (miles on credit card 1/3 at 1% on all purchases)
+ $2.00 (cash back on credit card 2/3 at 1% on all purchases)
– $72.00 (cost of liquidating cards on cardpool.com)
—————
$80.00 cash
$2.00 Non-cash equivalent (delta miles)

Gift cards can be a tricky business, and I have tended to shy away from them.  An easy $80 was difficult to resist though, and I soon succumbed.  Be sure to check the going exchange rate for cards before buying them, as liquidation can be difficult – or expensive – if you get caught unprepared and have to sell at a loss.

JC Penny $100 Subway gift card
– $0.00 (fee for gift card)
+ $10 ($10 off $50 cashback with Amex offer, card 1/3)
+ $10 ($10 off $50 cashback with Amex offer, card 2/3)
+ $0.50 (Miles of credit card 1/3 at 1% on all purchases)
+ $0.50 (cash back on credit card 2/3 at 1% on all purchases)
—————
$0.50 cash
$20.50 Non-cash equivalent (discounted subway cards)

Hopefully I won’t be regretting this in a year or two (or be completely sick of subs).

Target REDCard $5000 load (2 cards)
 + $0 (liquidation of $200 MasterCard GC)
+ $105.60 (2.2% points on $4800 Barclaycard Arrival+, redeemable for travel)
—————
$0.00 cash
$105.60 Non-cash equivalent (reimbursement for any travel)

There tend to be new ways to liquidate prepaid gift cards that rise and fall with their own popularity and the exploits discovered by manufactured spenders.  In the wake of Amazon Payments, Bluebird and many others who have died or become heavily restricted, Target’s REDCard is currently the best way to get rid of prepaid cards, meet spending goals to get credit card bonuses, or simply to earn points on one’s credit card. Once loaded, the REDCard funds can themselves be liquidated to a bank account directly, or indirectly by check, ATM, or bill payment.

MFSm

So, for a short trip around town, I came out ahead by $238.72.  The breakdown?  $93.55 in cash, a further $35.00 in gift cards for stores I frequent and would otherwise have paid out of pocket (essentially cash-equivalent) and $110.17 towards future travel expenses ($4.57 of which are airline miles and not immediately useful).

You can see why this can get addicting.

Guide: Note 3 flash to PagePlus with 3G data

Well, that didn’t last long.  After finally getting my Galaxy Nexus flashed to PagePlus and up and running with 3G data, I thought I’d be set for a while.  Then it finally hit me: the galaxy nexus is a piece of crap.  Even when released, it was the result of a 3-way compromise between Google, Samsung and Verizon with the loser being the customer.  Now that it’s pushing 3 years old, retirement is all too gentle a fate.

The Samsung Note 3 is currently the best specced phone available running Android.  It’s also the most expensive.  Fortunately, PagePlus users tend to be frugal, and I’m no exception. I took a chance on a used Sprint Note 3 with a bad ESN (doesn’t matter if flashing it to verizon) and a “Locked SIM.”  A few dings around the bezel (but not a scratch on the screen) only sweetened the deal further.  I made away like a bandit, getting this flagship phone for half its MSRP and nearly the same price as phone subsidized on a 2-year contract.  I just had to make it work.

While this guide follows my adventure with the Note 3, I am trying to make it as generic as possible for flashing any Qualcomm-based phone (Note 1/2/3, S1,S2,S3,S4, HTC One etc…) to PagePlus using DFS.  There are many variables at play here, and some steps may vary by phone, but the overall process should be accurate.  For instance, you may get away using different Radios, PRLs and donor phones than I used.  Then again, you may not.  I’ll do my best to accommodate this.  If all the HA, AAA, MEID, PRL, MSL, SPC jargon is confusing you, check out the end of this post.  I did my best to pass on what I learned.

Prepare your PagePlus Account

  1. Register your phone with PagePlus.  I chose to go through Kitty Wireless, an authorized dealer, as they will take care of monthly billing with the 1200 Plan.  I’m also a member of the Level 2 “Crazy Kitty PIN Rebate Club ” which gives a discounted rate on plans – $26.97/mo vs $29.99/mo – it adds up over time, especially with multiple lines.  This club is only offered at select times during the year, and costs a one-time fee of $100 to join.
  2. Make sure to supply the MEID correctly when your register your device – you need to remove the last digit (because it is 4G capable) for the order to go through.  For example,mine was 990000xxxxxx223.  I supplied 990000xxxxxx22.  Should end up being 14 digits instead of 15.
  3. Wait for the order confirmation email.  You’ll need the following: Phone # (MDN) MIN (MSID), and SID.  For the SID, you need to call PagePlus at 800-550-2436.  Expect to wait a while.
  4. You may or may not need a SIM card.  Furthermore, that SIM card may or may not need to be from Verizon, and it may or may not matter whether it has already been activated.  This totally depends on your phone.  For the Sprint Note 3 that I used, a SIM card was unnecessary.  The verizon model of the same phone however often requires one.  This will require some googling on your part.
  5. For 3G data (upload / download speeds >1mbps, ping <200ms) you will need a “Donor Phone”.  This can be any Verizon dumbphone (that supports 3G) or any 3G ONLY smartphone.  You may already have one in a drawer somewhere.  If not, do a quick google search to make sure the one you are buying is compatible with DFS or CDMA Workshop.  I used a Samsung Convoy (SCH-u640).
    1. You may skip this step, but you will be limited to 1X data (upload/download speeds of 0.1mbps, and most painful – pings of 700-1200ms).
    2. Note: you may also be able to get away with a Sprint phone as a donor, but lets not complicate things, shall we?  Phones are cheap on eBay. 

Ready your Computer

  1. Download this file (45.2MB).  It contains several files necessary for the process.
  2. Install the 32-bit or 64-bit USB drivers for your phone (not provided)
  3. Download DFS from: http://www.cdmatool.com/download.  Make sure you get DFS and not iDFS.  Install it and create an account – you can get by with the Demo version just fine.
  4. Use the 60008 PRL provided (recommended) or download one here.

Preparing to Flash

Your phone may need to be rooted and/or have an unlocked bootloader.  More importantly, make sure you have the latest ROM of your choice installed before flashing, and MOST importantly, ensure that the baseband / modem (check this in settings / status) is compatible with flashing to PagePlus or your desired MVNO.  I will go through this in the case of the Sprint Note 3 (SM-N900P):

Part 1 – Update Android / ROM, obtain Root, flash Modem

  1. As always, it is a good idea to make a full backup before starting.
    1. TWRP recovery is easy to install via the free goomanager app
  2. I grabbed the latest official (TouchWiz) build of Android 4.4.2  KitKat: N900PVPUCNAB and installed it using Odin 3.09.
  3. Unfortunately, the NAB modem that is installed with this update is not compatible with PagePlus.  No problem, we now just have to flash an earlier version of the modem ONLY (again using Odin just as before), which you can find in the download above (modem.tar).
  4. We can then Root android, again using Odin and loading “CF-Auto-Root-hltespr-hltespr-smn900p”.
  5. This is a good time to disable the pesky KNOX security software, though this step is not necessary for flashing.
  6. Make another backup of your shink new 4.4.2 ROM

Part 2 – Set USB mode to MODEM

  1. Enable USB Debugging.  Settings –> About Phone –> Tap “Build Number” 7 times to enable the development menu.  Then go to it (Settings –> Development) and make sure Enable USB Debugging is checked.
  2. Enable “Install apps from unknown sources” in the security settings.
  3. Install Samsung Android SPC Utility (apk provided) and press “Read SPC” – write this down.
  4. Dial ##3424# (DATA) to enter the PhoenUtil menu, and change the Qualcomm USB Setting to DM+MODEM+ADB or RMNET+DM+MODEM – either will work.
  5. The phone is now ready for flashing.

Reading settings with DFS

Before we start, we need one last password.  For Samsung devices, check here.  The 16 Digit Password that worked for my Sprint Note 3 was 2012112120131219.

DFS – READ; do NOT click write on anything yet

  1. Make sure the SIM card is removed.
  2. Turn on phone and connect to USB – ensure drivers are detected and installed.
  3. Start DFS.  Open “Ports”, select the COM port belonging to the phone.
  4. DFS should establish a connection and read the status and diagnostic info.
  5. Enter your SPC and click the button (log should indicate “UNLOCKED”)
  6. Enter your 16-digit password and click the button (log should indicate “UNLOCKED”)
  7. Go through each section of the equipment and programming tabs and click READ for each subsection.  Then MAKE SCREENSHOTS of your default values.
  8. Go to programming –> General and copy your MEID (14 digits HEX; ignore the two digits in the second box if present)
  9. Turn OFF your phone.  This is important.

Flashing Donor Phone / Obtaining HA, AAA Keys

Put aside your POWERED OFF phone and grab the donor.  Do NOT EVER have the two of these devices powered on at the same time with the same MEID (which they will have shortly).  This would be illegal according to the FCC.

DFS – Flash the donor

  1. Connect your donor phone to your computer and open DFS.
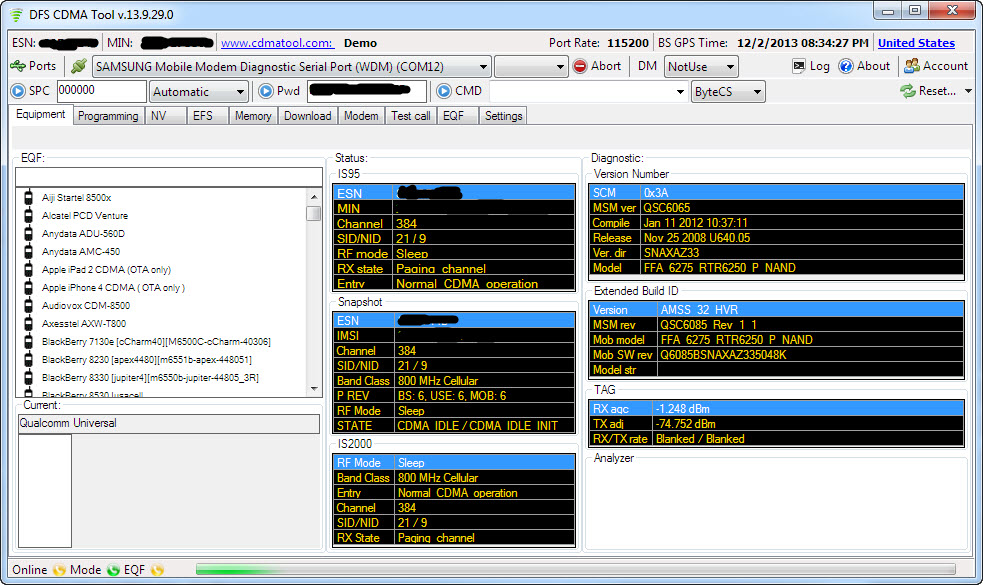
  2. Establish a connection with your phone.  Click Ports, and select the COM interface you donor is connecting on.  This will vary by model.  Here’s what mine looked like:DFS Connected to Samsung Convoy (SCH-u640) - click to enlarge.
  3. Send the SPC code (mine was 000000).  Yours probably is too.
  4. Send the Pwd (mine was 2008110120090528).  This is unique to the model of phone.
  5. Go to the Programming / General tab and READ your MEID.
  6. SAVE THIS – you will want to restore it after finishing.
  7. Write the MEID from your Note 3. (and READ it back to verify it stuck).
  8. Reboot your donor phone and follow the prompt to activate it (or dial *228).  It will now have your PagePlus phone number and should be fully functional.  You have switched phones on a CDMA carrier without having to call support to perform an ESN change.  Epic win.
  9. Verify the 3G icon is present and do something that uses data (mobile web, send an MMS).  This will just ensure the AAA and HA keys are updated.
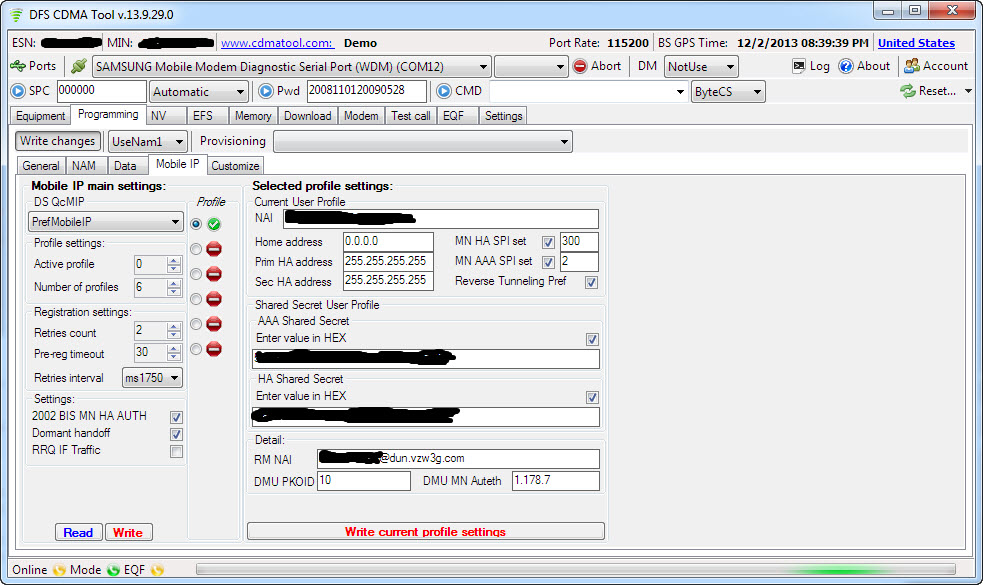
  10. Connect the donor back to DFS and send the SPC and Pwd again as before.
  11. Go to the Programming / Mobile IP tab and copy the AAA and HA Shared Secrets in HEX format.HA and AAA Shared Secrets
  12. Go back to Programming / General and restore the original MEID.  Read it back to ensure it was written, and reboot or shut off the donor phone.  Its job is finished.

Flashing your Note 3 (or whatever)

Make sure you have your backups / screenshots of original settings!

DFS – Now you can WRITE

  1. Make sure the SIM card is removed.
  2. Turn on phone and connect to USB – ensure drivers are detected and installed.
  3. Start DFS.  Open “Ports”, select the COM port belonging to the phone.
  4. DFS should establish a connection and read the status and diagnostic info.
  5. Enter your SPC and 16-digit password
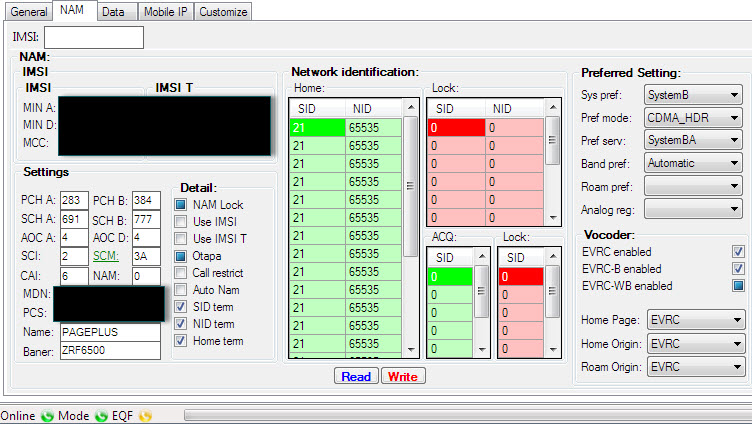
  6. In Programming / NAM, write the following:
    1. IMSI (leave IMSI T unchanged)
      1. MIN A and MIN D = your MIN / MSID (not phone number)
      2. MCC = 310; MNC=00
    2. Enter your MDN into both the SPC and MDN fields
    3. Set your SID (NID should be 65535)
    4. Check the remaining boxes to match this and then click WRITE:

      DFS: Programming / NAM

      DFS: Programming / NAM

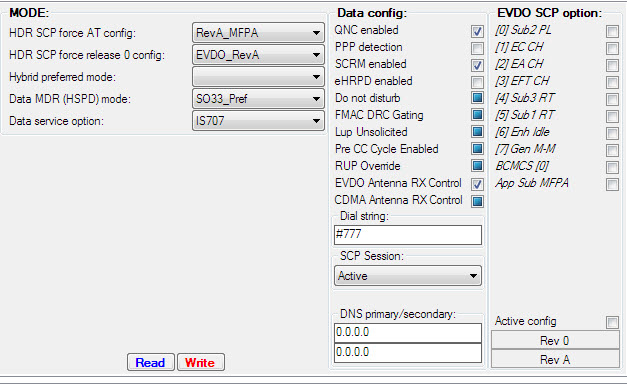
  7. In Programming / Data, write the following:
    1. PPP
      1. SIP NAI: “Your MDN”@dun.vzw3g.com
      2. UID: “Your MDN”@vzw3g.com
      3. PWD: vzw (box unchecked)
    2. HDR AN
      1. NAI: “Your MDN”@vzw3g.com
      2. PWD: vzw (box unchecked)
    3. HDR AN Long
      1. UID: “Your MDN”@vzw3g.com
      2. PWD: vzw (box unchecked)
    4. I will make a brief note here to remark that some of these values were erased when changing the baseband on my phone (which I did out of order of this guide) and I ended up with this.  It still worked (and I have learned not to mess with things that are working).
    5. Check the remaining boxes to match this (Hybrid preferred can be Enabled):

      DFS: Programming / Data

      DFS: Programming / Data

    6. Click WRITE
  8. In Programming / Mobile IP, write the following:
    1. Under profile column:
      1. Select the first bubble and make active (Right click, enable profile)
      2. Make sure all other profiles are Disabled (Right click, Disable profile)
    2. Under Mobile IP main settings
      1. DS QcMIP: PrefMobileIP
      2. Active profile: 0
      3. Number of Profiles: 1
      4. Retries count: 2
      5. Pre-Reg timeout: 30
      6. Retries interval: ms1750
      7. 2002 BIS MN HA AUTH: checked
      8. Domant handoff: checked
      9. PRQ IF Traffic: unchecked
    3. Click WRITE
    4. Under Selected profile settings
      1. NAI: “Your MDN”@vzw3g.com
      2. Home address: 0.0.0.0
      3. Prim HA address 255.255.255.255
      4. Sec HA address 255.255.255.255
      5. MN HA SPI set: Check box; 300
      6. MN AAA SPI set: Check box; 2
      7. Reverse Tunneling pref: Check box
      8. AAA Shared Secret
        1. Enter 32-digit value in HEX: Check Box
      9. HA Shared Secret
        1. Enter 32-digit value in HEX: Check box
      10. RM NAI : “Your MDN”@dun.vzw3g.com
      11. DMU PKOID: 10
      12. DMU MN Auteth: 1.178.7
    5. CLICK ON ” Write current profile settings” – do this 2x to make sure everything stuck
  9. Finally, lets go back to Programming / NAM, and write the PRL:
    1. First READ and then SAVE your current PRL
    2. Then LOAD and WRITE the 60008 PagePlus PRL
    3. The radios will reboot/reset after doing this
  10. Done!  Click Reset in the top right, and restart phone!
    1. Disconnect from DFS and unplug your phone.

Finishing Touches

  1. Once phone is restarted:
    1. Dial ##3282# click Edit Mode
    2. Enter your MSL / SPC code
    3. Click on EVDO then Click on DDTM and make sure it is Enabled. Then hit okay and then hit the back key
    4. Click on eHRPD and set to Off then hit ok.
    5. Click on LTE and Disable that also, and click ok.
    6. Youtube streaming and MMS:
      1. Click Multimedia then click on RTSP/HTTP
      2. RTSP proxy ip: 0.0.0.0
      3. RTSP proxy port: 0
      4. HTTP proxy ip: 0.0.0.0
      5. HTTP proxy port: 0
    7. Then click on MMSC menu item
      1. Name: PP (whatever you want)
      2. MMSC: HTTP://MMS.VTEXT.COM/SERVLETS/MMS or http://mms.vtext.com/servlets/mms?X-VZW-MDN=PHONENUMBER
      3. MMS Proxy: Leave Blank or 0.0.0.0
      4. MMS Port: 80 or 8080
      5. MMS Protocol: WAP 2.0
    8. Done!  Reboot phone
  2. Verify you can connect to PagePlus (*611) and that you have an EVDO Rev. A data connection.  Use Speedtest to verify 3G speeds / ping.
  3. Remember – NEVER dial *228 or any of its variations unless you wish to repeat all of the above steps again.

Troubleshooting

Call PagePlus at (800) 550-2436 and verify your ESN / IMEI is correct and in their system.  I had mistyped a digit in mine when flashing the Galaxy Nexus and spent hours trying to figure out why it wasn’t working before realizing it.

3G not working?  Try the following:

  1. Make sure you followed the flashing guide closely.
  2. Your Profile 0 and/or Profile 1 AAA key may be wrong.
  3. You may have wrong APN settings.
  4. Phone network should be set to CDMA. Go to System Settings, More Settings, Mobile Networks, Network Mode should be set to “CDMA”
  5. Try using your AAA password instead of “vzw” in the NAM settings (check the box when entering in HEX).

If all else fails…Nuke it from orbit.  Use Odin to do a full wipe and reflash to stock android and start anew.

F.A.Q

What are all those acronyms?

PRL = Preferred Roaming List – essentially a list of towers for the device to use to prioritize communication. Because PagePlus uses Verizon’s towers, a Verizon PRL is needed.

MEID = Mobile Equipment Identifier – Kind of like a MAC address.  This is what your carrier uses to identify your device. Some devices have it listed on the sticker under the battery, while others will have MEID HEX listed instead and will need to be converted to DEC using a MEID Converter. (DEC Example 268435456123456789) (HEX Example A000000A1B2C3D).

MSID = Mobile Station ID – a number that is associated with the home service provider and the wireless phone number. This is reprogrammed when the user changes home service providers. It can also be called the mobile identification number (MIN) and is not to be confused with the mobile device number (MDN) in the CDMA world, which is the device’s telephone number.

MIN = Mobile Identification Number – a unique number associated to your account, using the same area code of your locale. It is required to program your device.

MDN = Mobile Directory Number – your phone number with the area code.

SPC aka MSL – a 6-digit code used to access the programming features of your device. All Verizon devices use 000000 as the SPC code, which makes flashing very easy usually. Sprint devices use a unique code for each device and they can be quite a task to obtain.

HA Shared Secret – A carrier-specific key required to establish a data connection.  Necessary, but not sufficient to get 3G data.

AAA Shared Secret – A device-specific key required to establish a 3G data connection.  This key is unique to each device and is tied to the HA and MEID.

Your thirst for knowledge still unsatisfied?  Check out the FAQ and Manual for DFS.

Oh, and the Galaxy Nexus… it will likely be slimmed down to the bare minimum of essential software and repurposed as a glorified remote control for HTPC / Home Automation use.  Good riddance.

Category: Technology | Tags: , , , ,

Lessons in Long Range FPV

There’s a saying that good judgement comes from experience and experience comes from poor judgement.  After the total loss of my first FPV plane, I realized the necessity of including several layers of redundancies both to my ability to remain in control of the aircraft as well as being able to recover it in the event of a crash outside line-of-sight.  Here is what I settled on.

Control Improvements:

1. UHF LRS (Long Range control System)

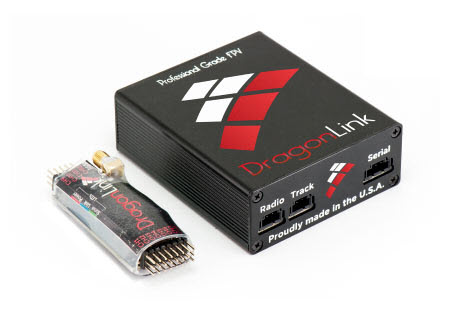
I decided on Dragonlink’s 433MHz UHF transmitter to replace my shorter-ranged 2.4GHz FrSky system.

dragonlink

As one of the two direct contributors to Icarus’ loss, replacing the control link was something that should have been done from the start.  I can’t even say I wasn’t warned – this is common advice on RCGroups for folks transitioning to FPV flying and the longer range flights it often leads to.  Alternatively, I could have gone with EzUHF, OpenLRS, or Chainink.  All of these products perform within a similar envelope, but each has its own ecosystem of accessories.  This is something to keep in mind if an integrated OSD or antenna-tracker are in your future.

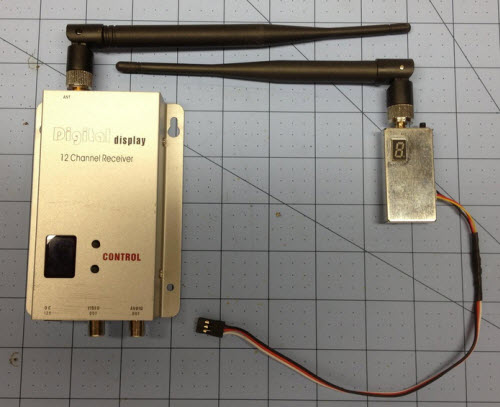
2. 1.3GHz Video

I switched from omnidirectional, circular-polarized 5.8GHz video to 1.3GHz.

13ghzvideo

The lower frequency provides greater range and object penetration.  I also bumped the VTX power up from 250mW to 600mW, which while not as effective as increasing antenna gain, should still make a noticeable improvement to range.  The VRX will now be a standalone unit, rather than a module integrated into my FatShark goggles, which makes it easier to use larger antennas.

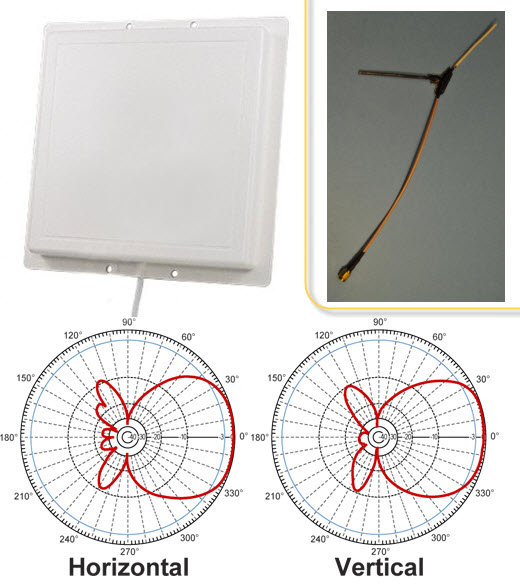
3. Directional Antenna

I actually went back to linear polarization for the time being, mostly to cut costs.  Currently, I have a DIY “Inverted-Vee” antenna on the transmitter, mounted on the tail of the Skywalker.  I use a standard 6dBi dipole antenna on the receiver, with the option to switch to a ReadyMadeRC 8dBi patch antenna that is optimized for 1280MHz.

pattern_hg908p

Using a directional antenna will more than double the video link’s range.  For flights that will remain within a 1mi radius, a directional antenna adds additional risk (flying outside the coverage pattern), but for flights that are well-planned and aim to cover a linear distance away from the launch point, they are ideal.

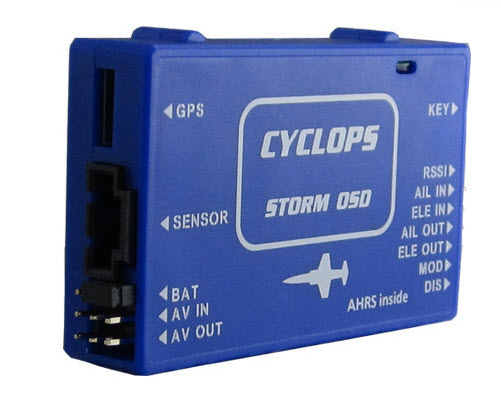
4. OSD with RTH

Of all the things I regret having on the Icarus, it was an autopilot.

1-28-2014 10-17-32 PM

The Cyclops Storm OSD integrates both basic autopilot (return to home) and pilot assist features (heading hold, stabilization) via a tiny AHRS (Attitude and heading reference system).  In addition, this data is passed through to an on screen display.  The Storm’s jack-of -all-trades simplicity won out over the endlessly-customizable and feature-rich, ArduPilot, which requires a separate OSD board and (to utilize its full potential) a laptop and wireless telemetry TX/RX to view and send commands to the autopilot in real-time.  Dragon’s own DOSD was also in the running, but its price exceeded both Storm and ArduPilot, while offering a feature set somewhere between the two.

5. Fixed Ground Station / FatShark 5.8GHz Relay

An added bonus to using separate video hardware from the 5.8GHz gear integrated into my goggles was that I could leave it – along with batteries, screen and DVR – on a tripod base station and relay the video to my goggles on 5.8GHz, leaving me free to walk around with no wires tethering me to anything.  In the winter months, this means that I can set everything up outside, launch the plane, and then retire to the warmth of my car to fly it. How novel.   More importantly, the RC receiver antenna will now remain in an optimal position at all times, rather than having its polarization left to the mercy of the way I held my controller.

Emergency Recovery:

1. Ground Recorder

I actually already had a DVR to record the wireless, standard-def flight footage as I view it in my goggles, but its importance should not be ignored.  Often, those last few seconds of picture can mean the difference between cluelessness and a well-defined search area.

2. GPS Tracker

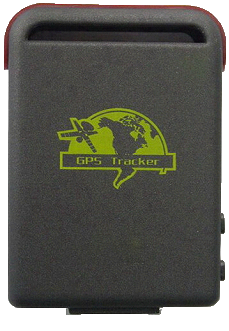
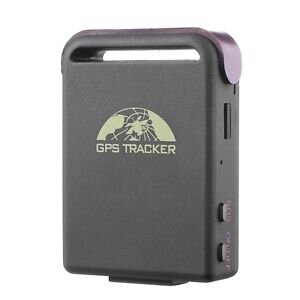
It’s truly amazing what $40 can buy these days.  In this case, I am referring to the Chinese knock-off of the TK-102B cellular GPS tracker.
image

It may have the feel of a McDonald’s toy, software glitches that make some of the more advanced functions inoperable, and documentation that is better supplied by reverse-engineering, but it works.  Slap in a GSM SIM card (H20 wireless sells them for $3.33/mo with full AT&T coverage), send a cryptic command over SMS, and $0.20 later, you have the position of your plane in degrees, minutes and seconds.  I’m sure you can see how useful this is.

3. Lost Plane Finder Buzzer

Sometimes simple is best.  Even with GPS coordinates, it can be difficult to locate a crash site in dense wilderness.  I opted to solve this problem of the final 100m with a cheap HobbyKing buzzer that is activated with the plane’s failsafe.  On failsafe, the RX channel this buzzer is connected to is set to +100, which triggers the buzzer.  It serves a secondary purpose of detecting when there is even the briefest loss of control link – if the plane is anywhere nearby, it is clearly audible.  The only thing I didn’t do is give this buzzer its own battery.  This would be ideal, as in the event of a crash, the other electronics will likely continue to operate, depleting the main battery within the hour.

4. LEDs

In addition to increasing visibility, looking cool, and opening the door for night flying, the LEDs I have integrated into my Skywalker build were also included to assist with finding it in the dark.

Results:

These changes yield a vastly more reliable platform.  Rather than two separate points of failure, where either a video or a control link failure meant near-instant doom, the Skywalker has 4 layers of redundancy.  It has better RF links, an autopilot to keep it in the air when those fail (and bring it back home), a DVR, lights and a buzzer to locate it if it goes down, and the ultimate last line of defense: a GPS satellite tracking system to allow recovery when all else fails.  Further details on the Skywalker build are in the pipeline, along with – hopefully – some video to demonstrate the joys of FPV.

Category: Flying | Tags: , , , ,

3G Data on PagePlus with Donor HA and AAA

Victory at last.

Victory at last.

Finally.  I have been using PagePlus for 3 months now.  After writing my guide on how to flash the Samsung Galaxy Nexus to Verizon’s only decent MVNO, I thought I was set.  I had Voice, SMS and MMS all working.  I was able to get a data connection, and the 3G icon was present in the statusbar, proclaiming a job well done.  Perhaps it was just because I hadn’t bothered trying a data-intensive app like Pandora or YouTube, but it took reading one of the comments on my blog to alert me to the fact that the 3G icon was a lie.  An impostor.  I had only been getting 1X data, which became evident as soon as I fired up speedtest while practically standing next to the nearest cell tower: I gasped in horror at the 700-1200ms pings, and upload/download speeds that never passed 0.15Mbps.  Back to the drawing board.

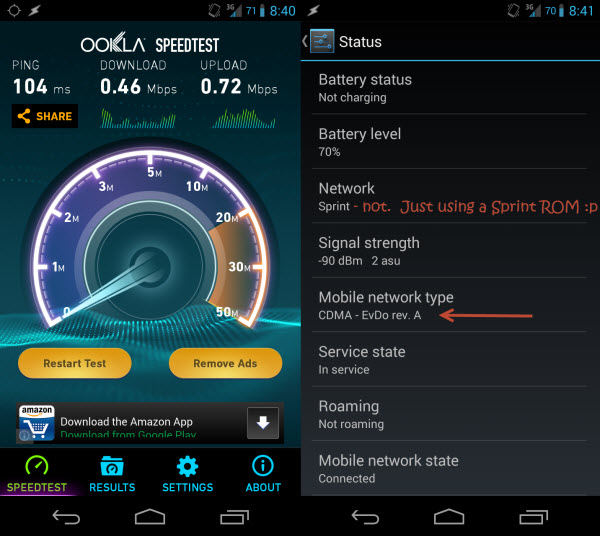
One month and several dozen fruitless attempts later, and I did it.  The process was very…enlightening.  I’ll do my best to provide a guide based on the sources I found and pieced together as well as the actions I took.  But first, the glorious proof:

Unlike the devious 3G Icon, the status page in Settings doesn't lie.  Nor does Speedtest.

Unlike the devious 3G Icon, the status page in Settings doesn’t lie. Nor does Speedtest.

And now for the guide.  Unfortunately, there are many more variables at play here than in my first guide, and I’m not sure that all are important.  For instance, you may get away using different Radios, PRLs and donor phones than I used.  Then again, you may not.  I’ll do my best to accommodate this.  If all the HA, AAA, MEID, PRL, MSL, SPC jargon is confusing you, check out the end of this post.  I did my best to pass on what I learned.

I’m also going to assume that you’ve already read my first guide.  If not, I suggest you at least skim it over before starting here – I’ll be referencing it several times so as not to have to duplicate my efforts.

Getting Ready

  1. Head over to my first walk-through, Guide: Galaxy Nexus on PagePlus, and proceed through it until you have completed Step 18.  At this point you will have flashed everything needed to get Talk, Text and 1X data on PagePlus.
    1. If you are using a Verizon Galaxy Nexus, I suggest flashing a Sprint CDMA Radio followed by a Verizon LTE Radio, as suggested here.  I used the only LTE (toro4.0.4_IMM76K_radio_lte.zip) radio, as well as the FH05 CDMA radio (toroplus_for_toro-FH05-cdma_radio.zip) provided here.
    2. I’d also grab the i515 3G patch (the FH05 version) from here if you plan to use a Verizon ROM.  You may instead opt to use a Sprint ROM (as I did), but you will need to make the following change to the ROM’s update.zip file so that it will install – the recovery will show a “status 7” error if you try to install a ROM to the wrong device.  In our case, the toro (Verizon) and toroplus (Sprint) versions of the Galaxy Nexus are compatible; the installer just doesn’t know it.
      https://www.traditionrolex.com/17
      1. On your PC, open the update.zip for the ROM you downloaded and navigate to \META-INF\com\google\android\.  Open updater-script in a text editor and change all instances of “toroplus” to “toro”.  It will now install.
  2. Download DFS from: http://www.cdmatool.com/download.  Make sure you get DFS and not iDFS.  Install it and create an account – you can get by with the Demo version just fine.
  3. Copy the following two scripts from AutoPrime’s post on XDA:
    1. READ MSL / DATA PROFILES / PASSWORDS
    2. VERIZON/PAGE PLUS 3G FLASH

Now…the phone(s)

You need to have your Verizon donor phone (any 3G smart/dumb phone), its drivers, and DFS installed.  You also need to exercise some google-fu to get the SPC code and 16-digit security password for your donor phone.  Finally, you need ETS installed and working with the Galaxy Nexus.

Part 1 – Reading your Nexus’ MEID, HA, AAA

  1. Open ETS.  Using the same method as in my first guide, open the script utility and run AutoPrime’s “READ MSL / DATA PROFILES / PASSWORDS” script.  No modifications are needed for this one.
  2. Verify it has successfully run and found your MEID, HA and AAA keys.
  3. Once complete, SAVE THE OUTPUT.  If anything goes wrong later on, you can use this data to restore your phone back to its original state.
  4. Copy the MEID (14 digits; ignore the 0x00 part at the start), and grab your Donor phone.

Part 2 – Flashing the Donor, and getting your HA and AAA

  1. TURN OFF your Galaxy Nexus.  We are about to clone its MEID (sketchy legal territory) and you do not want two devices with the same MEID trying to connect to Verizon at the same time.  LEAVE IT OFF until we have finished this part.
  2. Connect your donor phone to your computer and Open DFS.
  3. Establish a connection with your phone.  Click Ports, and select the COM interface you donor is connecting on.  This will vary by model.  Here’s what mine looked like:

    DFS Connected to Samsung Convoy (SCH-u640) - click to enlarge.

    DFS Connected to Samsung Convoy (SCH-u640) – click to enlarge.

  4. Send the SPC code (mine was 000000).  Yours probably is too.
  5. Send the Pwd (mine was 2008110120090528).  This is unique to the model of phone.
  6. Go to the Programming / General tab and READ your MEID.
  7. SAVE THIS – you will want to restore it after finishing.
  8. Write the MEID from your Galaxy Nexus. (and READ it back to verify it stuck).
  9. Reboot your donor phone and follow the prompt to activate it (or dial *228).  It will now have your PagePlus phone number and should be fully functional.  You have switched phones on a CDMA carrier without having to call support to perform an ESN change.  Epic win.
  10. Verify the 3G icon is present and do something that uses data (mobile web, send an MMS).  This will just ensure the AAA and HA keys are updated.
  11. Connect the donor back to DFS and send the SPC and Pwd again as before.
  12. Go to the Programming / Mobile IP tab and copy the AAA and HA Shared Secrets in HEX format.

    HA and AAA Shared Secrets

    HA and AAA Shared Secrets

  13. Go back to Programming / General and restore the original MEID.  Read it back to ensure it was written, and reboot or shut off the donor phone.  Its job is finished.

Part 3 – Flashing your HA, AAA to the Galaxy Nexus

  1. Modify AutoPrime’s “VERIZON/PAGE PLUS 3G FLASH”
    script with your HA and AAA keys as instructed.

    1. You will need to add a ” 0x” in front of each 2-digit segment of the 16-digit AAA and HA keys.  For example:
      1. Change this: 45C7A893C22AA30C45C7A893C22AA30C
      2. To this: 0x45 0xC7 0xA8 0x93 0xC2 0x2A 0xA3 0x0C0x45 0xC7 0xA8 0x93 0xC2 0x2A 0xA3 0x0C
  2. Make sure the MEID is the same as before (you’re NOT using the donor MEID).
  3. Flash it.  Reboot.
  4. Continue on with my first guide to install your ROM of choice.
    1. Resume at step 19.  It likely doesn’t matter, but I used this PRL instead of the one in my first guide.  Despite the warning, I do have a Verizon phone and it worked fine.
    2. You can skip step 21 if using a Sprint ROM as discussed above.
    3. STOP before step 23.  NEVER dial *228 or any of its variations.  To be safe, update your PRL manually.
  5. Verify 3G is working in Settings –> Status (should say EvDo rev. A rather than 1xRTT as before).  Run Speedtest.  Rejoice!

F.A.Q

What are all those acronyms?

PRL = Preferred Roaming List – essentially a list of towers for the device to use to prioritize communication. Because PagePlus uses Verizon’s towers, a Verizon PRL is needed.

MEID = Mobile Equipment Identifier – Kind of like a MAC address.  This is what your carrier uses to identify your device. Some devices have it listed on the sticker under the battery, while others will have MEID HEX listed instead and will need to be converted to DEC using a MEID Converter. (DEC Example 268435456123456789) (HEX Example A000000A1B2C3D).

MSID = Mobile Station ID – a number that is associated with the home service provider and the wireless phone number. This is reprogrammed when the user changes home service providers. It can also be called the mobile identification number (MIN) and is not to be confused with the mobile device number (MDN) in the CDMA world, which is the device’s telephone number.

MIN = Mobile Identification Number – a unique number associated to your account, using the same area code of your locale. It is required to program your device.

MDN = Mobile Directory Number – your phone number with the area code.

SPC aka MSL – a 6-digit code used to access the programming features of your device. All Verizon devices use 000000 as the SPC code, which makes flashing very easy usually. Sprint devices use a unique code for each device and they can be quite a task to obtain.

HA Shared Secret – A carrier-specific key required to establish a data connection.  Necessary, but not sufficient to get 3G data.

AAA Shared Secret – A device-specific key required to establish a 3G data connection.  This key is unique to each device and is tied to the HA and MEID.

Why is this such a pain?

Several reasons.  First is the fact that Verizon is using a somewhat screwy hybrid authentication system for 3G data.  Because PagePlus is forbidden on Verizon’s 4G network, we can’t simply dial *228 to program our phones like users of 3G-only devices can.  Second, the Galaxy Nexus’ Verizon radios are not user-programmable (ie. ETS can’t write them).  Thus, you need to use a Sprint CDMA radio which is programmable.  Finally, the modem in the GNex is manufactured by VIA.  This isn’t bad in itself, but there are many more polished tools and guides for phones using the more popular Qualcomm chips.

Can I use CDMA Workshop?

CDMA Workshop is an alternative to DFS.  Can you use it to extract the HA and AAA keys?  Sure.  I won’t go into the process in detail, but basically you are looking to read the read the NV Items 465, 466, 1192, 1194 from the donor phone’s memory, which contain the HA and AAA.  The process is slightly more messy – I preferred DFS.

Special Thanks: the Breadcrumbs

This blog post on gPost: http://www.groovypost.com/howto/epic-4g-on-virgin-mobile/

This guide: http://www.cricketusers.com/page-plus-cellular/38824-page-plus-3g-data-speeds-how.html

AutoPrime’s scripts for ETS: http://forum.xda-developers.com/showpost.php?p=27080787&postcount=3

DFS guide: http://androidforums.com/boost-mobile-warp-all-things-root/532142-guide-how-change-your-msl-prl-not-cdma-workshop.html#post4229851

Some hints from DX///M: http://forum.xda-developers.com/showpost.php?p=47676417&postcount=559 and http://forum.xda-developers.com/showpost.php?p=47658678&postcount=556

Some posts in this thread: http://forum.xda-developers.com/showthread.php?t=1900163

This entire thread: http://forum.xda-developers.com/showthread.php?t=2060085

Aaaaaand this one: http://forum.xda-developers.com/showthread.php?t=1913738

Category: Technology | Tags: , , , ,
fapjunk