Tag Archives: hacking

Direct DC Power to Smartphone – No Battery

This seems like it should be simple.  Phones of all variety – Android, Apple, “smart” and “dumb” use 3.7-3.85V single cell lithium-ion batteries.  Just attach a 3.7V DC adapter to the (+) and (-) terminals of the phone and you’re good to go, right?  Wrong.  A bit more trickery is required, and some additional finesse is well worth the effort.

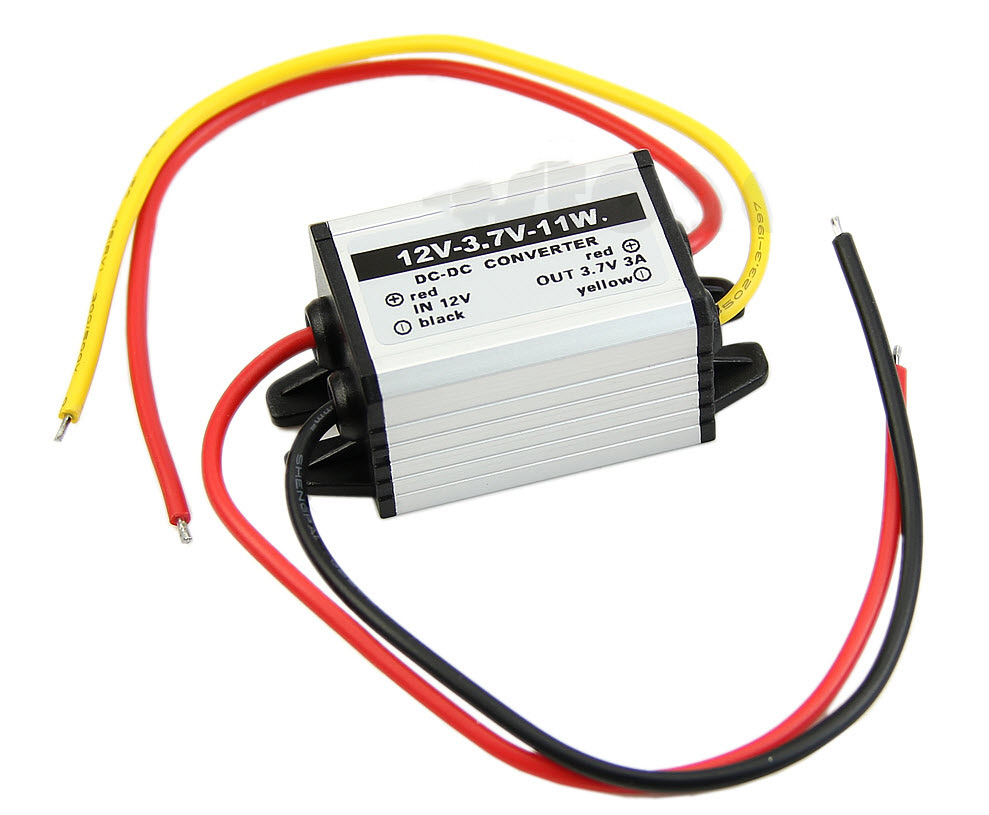
Two things are absolutely essential for this.  First is a DC adapter with 3.7-4.2V output rated at 1.5A or greater.  I used a DC-DC adapter for 12V input and 3A, 3.7V output, available on eBay.  If you don’t mind a bit more work, this step-down converter is fully adjustable by removing the heat shrink and turning a screw (while connected to a multimeter), allowing for 12V input and your choice of <10V output, and is actually what I ended up preferring to use.  An AC adapter may be more convenient, depending on the intended use, though I had a hard time finding an inexpensive option with sufficient output (1.2A was the best I found).  12V AC-DC adapters are cheap and plentiful, so you could always just combine one of those with either of the DC-DC step-down converters from above (which could likely power 2-3 phones in parallel).

2015-07-07_1-40-40

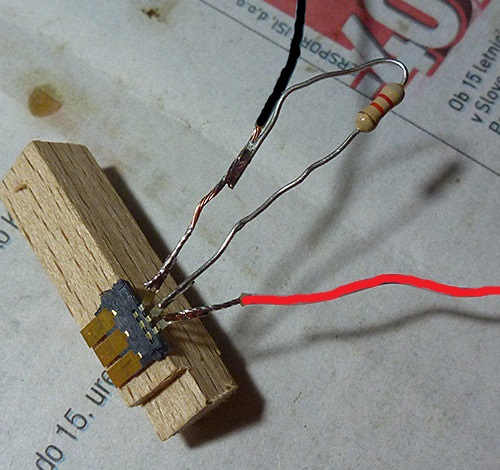
The second item needed is a resistor.  This bridges the ground and BSI (Battery Status Indicator) contact.  If a fourth contact is present, this is likely for NFC, and will be left alone.  For samsung phones, the BSI pin is typically found between the (+) and (-).  The purpose of the resistor is to identify the battery as compatible with the phone and may also assist in reporting the capacity / charge level / temperature.  The 68K resistor I used, plus the 3.7V output from the adapter made my Galaxy Nexus report a battery level of 14%.  I also tried a 100K resistor, which reported a similar, or slightly lower, capacity.  With further testing (using the adjustable step-down converter), it appears that the input voltage of the battery, rather than resistor size, determines the phone’s reported battery level, through a resistor is still necessary for the phone to recognize the battery and power on.  I ended settling on 4.15V, which made the phone report 100%.

FYGRTN8HVC1FEZE.LARGE

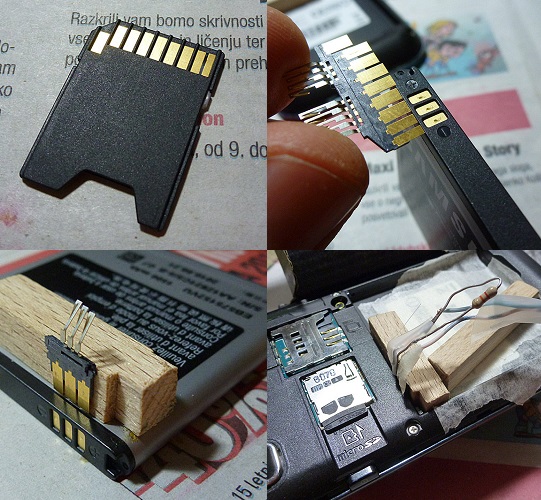
If you want a removable solution, you can construct a “faux battery” using your scrap material of choice and a microSD to SD card adapter – if you’re anything like me, you have an unused one laying around.  There’s a good example of this over on Instructables:

fauxbatt

Of course, you could just solder directly to the contacts on the phone, which may not be a bad idea if the modification will be anything approaching permanent.  The “faux battery” solution can be made quite sturdy, but nothing beats solder for peace of mind.

This solution works great for in-place installations such as home automation remotes, fixed displays and long-endurance photo / video, cellular hotspot and communication uses.  Unfortunately, for a hands-free implementation in a car or similar situation where the phone would ideally boot up when power is connected, additional work will be needed, as simply connecting power – just like inserting a new battery – does not result in the phone turning itself on.  You’d likely need to disassemble the power button and simulate a “momentary press” using capacitors / relays, which is beyond the scope of this post.  I may revisit this topic though, as I constructed such a solution back when I made a CarPC (before Android and cheap tablets were a thing).


Category: Technology | Tags: , , , ,

Guide: Note 3 flash to PagePlus with 3G data

Well, that didn’t last long.  After finally getting my Galaxy Nexus flashed to PagePlus and up and running with 3G data, I thought I’d be set for a while.  Then it finally hit me: the galaxy nexus is a piece of crap.  Even when released, it was the result of a 3-way compromise between Google, Samsung and Verizon with the loser being the customer.  Now that it’s pushing 3 years old, retirement is all too gentle a fate.

The Samsung Note 3 is currently the best specced phone available running Android.  It’s also the most expensive.  Fortunately, PagePlus users tend to be frugal, and I’m no exception. I took a chance on a used Sprint Note 3 with a bad ESN (doesn’t matter if flashing it to verizon) and a “Locked SIM.”  A few dings around the bezel (but not a scratch on the screen) only sweetened the deal further.  I made away like a bandit, getting this flagship phone for half its MSRP and nearly the same price as phone subsidized on a 2-year contract.  I just had to make it work.

While this guide follows my adventure with the Note 3, I am trying to make it as generic as possible for flashing any Qualcomm-based phone (Note 1/2/3, S1,S2,S3,S4, HTC One etc…) to PagePlus using DFS.  There are many variables at play here, and some steps may vary by phone, but the overall process should be accurate.  For instance, you may get away using different Radios, PRLs and donor phones than I used.  Then again, you may not.  I’ll do my best to accommodate this.  If all the HA, AAA, MEID, PRL, MSL, SPC jargon is confusing you, check out the end of this post.  I did my best to pass on what I learned.

Prepare your PagePlus Account

  1. Register your phone with PagePlus.  I chose to go through Kitty Wireless, an authorized dealer, as they will take care of monthly billing with the 1200 Plan.  I’m also a member of the Level 2 “Crazy Kitty PIN Rebate Club ” which gives a discounted rate on plans – $26.97/mo vs $29.99/mo – it adds up over time, especially with multiple lines.  This club is only offered at select times during the year, and costs a one-time fee of $100 to join.
  2. Make sure to supply the MEID correctly when your register your device – you need to remove the last digit (because it is 4G capable) for the order to go through.  For example,mine was 990000xxxxxx223.  I supplied 990000xxxxxx22.  Should end up being 14 digits instead of 15.
  3. Wait for the order confirmation email.  You’ll need the following: Phone # (MDN) MIN (MSID), and SID.  For the SID, you need to call PagePlus at 800-550-2436.  Expect to wait a while.
  4. You may or may not need a SIM card.  Furthermore, that SIM card may or may not need to be from Verizon, and it may or may not matter whether it has already been activated.  This totally depends on your phone.  For the Sprint Note 3 that I used, a SIM card was unnecessary.  The verizon model of the same phone however often requires one.  This will require some googling on your part.
  5. For 3G data (upload / download speeds >1mbps, ping <200ms) you will need a “Donor Phone”.  This can be any Verizon dumbphone (that supports 3G) or any 3G ONLY smartphone.  You may already have one in a drawer somewhere.  If not, do a quick google search to make sure the one you are buying is compatible with DFS or CDMA Workshop.  I used a Samsung Convoy (SCH-u640).
    1. You may skip this step, but you will be limited to 1X data (upload/download speeds of 0.1mbps, and most painful – pings of 700-1200ms).
    2. Note: you may also be able to get away with a Sprint phone as a donor, but lets not complicate things, shall we?  Phones are cheap on eBay. 

Ready your Computer

  1. Download this file (45.2MB).  It contains several files necessary for the process.
  2. Install the 32-bit or 64-bit USB drivers for your phone (not provided)
  3. Download DFS from: http://www.cdmatool.com/download.  Make sure you get DFS and not iDFS.  Install it and create an account – you can get by with the Demo version just fine.
  4. Use the 60008 PRL provided (recommended) or download one here.

Preparing to Flash

Your phone may need to be rooted and/or have an unlocked bootloader.  More importantly, make sure you have the latest ROM of your choice installed before flashing, and MOST importantly, ensure that the baseband / modem (check this in settings / status) is compatible with flashing to PagePlus or your desired MVNO.  I will go through this in the case of the Sprint Note 3 (SM-N900P):

Part 1 – Update Android / ROM, obtain Root, flash Modem

  1. As always, it is a good idea to make a full backup before starting.
    1. TWRP recovery is easy to install via the free goomanager app
  2. I grabbed the latest official (TouchWiz) build of Android 4.4.2  KitKat: N900PVPUCNAB and installed it using Odin 3.09.
  3. Unfortunately, the NAB modem that is installed with this update is not compatible with PagePlus.  No problem, we now just have to flash an earlier version of the modem ONLY (again using Odin just as before), which you can find in the download above (modem.tar).
  4. We can then Root android, again using Odin and loading “CF-Auto-Root-hltespr-hltespr-smn900p”.
  5. This is a good time to disable the pesky KNOX security software, though this step is not necessary for flashing.
  6. Make another backup of your shink new 4.4.2 ROM

Part 2 – Set USB mode to MODEM

  1. Enable USB Debugging.  Settings –> About Phone –> Tap “Build Number” 7 times to enable the development menu.  Then go to it (Settings –> Development) and make sure Enable USB Debugging is checked.
  2. Enable “Install apps from unknown sources” in the security settings.
  3. Install Samsung Android SPC Utility (apk provided) and press “Read SPC” – write this down.
  4. Dial ##3424# (DATA) to enter the PhoenUtil menu, and change the Qualcomm USB Setting to DM+MODEM+ADB or RMNET+DM+MODEM – either will work.
  5. The phone is now ready for flashing.

Reading settings with DFS

Before we start, we need one last password.  For Samsung devices, check here.  The 16 Digit Password that worked for my Sprint Note 3 was 2012112120131219.

DFS – READ; do NOT click write on anything yet

  1. Make sure the SIM card is removed.
  2. Turn on phone and connect to USB – ensure drivers are detected and installed.
  3. Start DFS.  Open “Ports”, select the COM port belonging to the phone.
  4. DFS should establish a connection and read the status and diagnostic info.
  5. Enter your SPC and click the button (log should indicate “UNLOCKED”)
  6. Enter your 16-digit password and click the button (log should indicate “UNLOCKED”)
  7. Go through each section of the equipment and programming tabs and click READ for each subsection.  Then MAKE SCREENSHOTS of your default values.
  8. Go to programming –> General and copy your MEID (14 digits HEX; ignore the two digits in the second box if present)
  9. Turn OFF your phone.  This is important.

Flashing Donor Phone / Obtaining HA, AAA Keys

Put aside your POWERED OFF phone and grab the donor.  Do NOT EVER have the two of these devices powered on at the same time with the same MEID (which they will have shortly).  This would be illegal according to the FCC.

DFS – Flash the donor

  1. Connect your donor phone to your computer and open DFS.
  2. Establish a connection with your phone.  Click Ports, and select the COM interface you donor is connecting on.  This will vary by model.  Here’s what mine looked like:DFS Connected to Samsung Convoy (SCH-u640) - click to enlarge.
  3. Send the SPC code (mine was 000000).  Yours probably is too.
  4. Send the Pwd (mine was 2008110120090528).  This is unique to the model of phone.
  5. Go to the Programming / General tab and READ your MEID.
  6. SAVE THIS – you will want to restore it after finishing.
  7. Write the MEID from your Note 3. (and READ it back to verify it stuck).
  8. Reboot your donor phone and follow the prompt to activate it (or dial *228).  It will now have your PagePlus phone number and should be fully functional.  You have switched phones on a CDMA carrier without having to call support to perform an ESN change.  Epic win.
  9. Verify the 3G icon is present and do something that uses data (mobile web, send an MMS).  This will just ensure the AAA and HA keys are updated.
  10. Connect the donor back to DFS and send the SPC and Pwd again as before.
  11. Go to the Programming / Mobile IP tab and copy the AAA and HA Shared Secrets in HEX format.HA and AAA Shared Secrets
  12. Go back to Programming / General and restore the original MEID.  Read it back to ensure it was written, and reboot or shut off the donor phone.  Its job is finished.

Flashing your Note 3 (or whatever)

Make sure you have your backups / screenshots of original settings!

DFS – Now you can WRITE

  1. Make sure the SIM card is removed.
  2. Turn on phone and connect to USB – ensure drivers are detected and installed.
  3. Start DFS.  Open “Ports”, select the COM port belonging to the phone.
  4. DFS should establish a connection and read the status and diagnostic info.
  5. Enter your SPC and 16-digit password
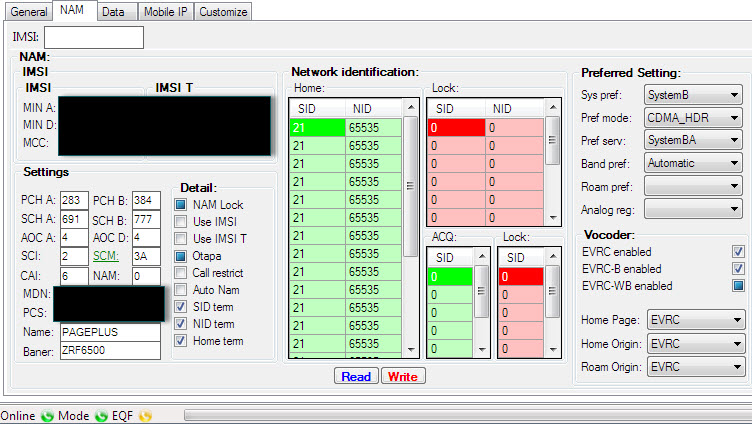
  6. In Programming / NAM, write the following:
    1. IMSI (leave IMSI T unchanged)
      1. MIN A and MIN D = your MIN / MSID (not phone number)
      2. MCC = 310; MNC=00
    2. Enter your MDN into both the SPC and MDN fields
    3. Set your SID (NID should be 65535)
    4. Check the remaining boxes to match this and then click WRITE:
      DFS: Programming / NAM

      DFS: Programming / NAM

  7. In Programming / Data, write the following:
    1. PPP
      1. SIP NAI: “Your MDN”@dun.vzw3g.com
      2. UID: “Your MDN”@vzw3g.com
      3. PWD: vzw (box unchecked)
    2. HDR AN
      1. NAI: “Your MDN”@vzw3g.com
      2. PWD: vzw (box unchecked)
    3. HDR AN Long
      1. UID: “Your MDN”@vzw3g.com
      2. PWD: vzw (box unchecked)
    4. I will make a brief note here to remark that some of these values were erased when changing the baseband on my phone (which I did out of order of this guide) and I ended up with this.  It still worked (and I have learned not to mess with things that are working).
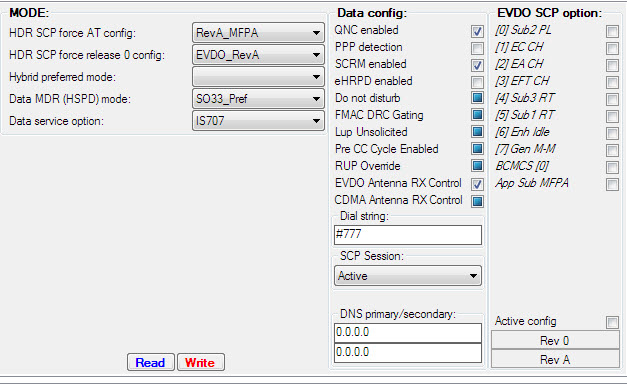
    5. Check the remaining boxes to match this (Hybrid preferred can be Enabled):
      DFS: Programming / Data

      DFS: Programming / Data

    6. Click WRITE
  8. In Programming / Mobile IP, write the following:
    1. Under profile column:
      1. Select the first bubble and make active (Right click, enable profile)
      2. Make sure all other profiles are Disabled (Right click, Disable profile)
    2. Under Mobile IP main settings
      1. DS QcMIP: PrefMobileIP
      2. Active profile: 0
      3. Number of Profiles: 1
      4. Retries count: 2
      5. Pre-Reg timeout: 30
      6. Retries interval: ms1750
      7. 2002 BIS MN HA AUTH: checked
      8. Domant handoff: checked
      9. PRQ IF Traffic: unchecked
    3. Click WRITE
    4. Under Selected profile settings
      1. NAI: “Your MDN”@vzw3g.com
      2. Home address: 0.0.0.0
      3. Prim HA address 255.255.255.255
      4. Sec HA address 255.255.255.255
      5. MN HA SPI set: Check box; 300
      6. MN AAA SPI set: Check box; 2
      7. Reverse Tunneling pref: Check box
      8. AAA Shared Secret
        1. Enter 32-digit value in HEX: Check Box
      9. HA Shared Secret
        1. Enter 32-digit value in HEX: Check box
      10. RM NAI : “Your MDN”@dun.vzw3g.com
      11. DMU PKOID: 10
      12. DMU MN Auteth: 1.178.7
    5. CLICK ON ” Write current profile settings” – do this 2x to make sure everything stuck
  9. Finally, lets go back to Programming / NAM, and write the PRL:
    1. First READ and then SAVE your current PRL
    2. Then LOAD and WRITE the 60008 PagePlus PRL
    3. The radios will reboot/reset after doing this
  10. Done!  Click Reset in the top right, and restart phone!
    1. Disconnect from DFS and unplug your phone.

Finishing Touches

  1. Once phone is restarted:
    1. Dial ##3282# click Edit Mode
    2. Enter your MSL / SPC code
    3. Click on EVDO then Click on DDTM and make sure it is Enabled. Then hit okay and then hit the back key
    4. Click on eHRPD and set to Off then hit ok.
    5. Click on LTE and Disable that also, and click ok.
    6. Youtube streaming and MMS:
      1. Click Multimedia then click on RTSP/HTTP
      2. RTSP proxy ip: 0.0.0.0
      3. RTSP proxy port: 0
      4. HTTP proxy ip: 0.0.0.0
      5. HTTP proxy port: 0
    7. Then click on MMSC menu item
      1. Name: PP (whatever you want)
      2. MMSC: HTTP://MMS.VTEXT.COM/SERVLETS/MMS or http://mms.vtext.com/servlets/mms?X-VZW-MDN=PHONENUMBER
      3. MMS Proxy: Leave Blank or 0.0.0.0
      4. MMS Port: 80 or 8080
      5. MMS Protocol: WAP 2.0
    8. Done!  Reboot phone
  2. Verify you can connect to PagePlus (*611) and that you have an EVDO Rev. A data connection.  Use Speedtest to verify 3G speeds / ping.
  3. Remember – NEVER dial *228 or any of its variations unless you wish to repeat all of the above steps again.

Troubleshooting

Call PagePlus at (800) 550-2436 and verify your ESN / IMEI is correct and in their system.  I had mistyped a digit in mine when flashing the Galaxy Nexus and spent hours trying to figure out why it wasn’t working before realizing it.

3G not working?  Try the following:

  1. Make sure you followed the flashing guide closely.
  2. Your Profile 0 and/or Profile 1 AAA key may be wrong.
  3. You may have wrong APN settings.
  4. Phone network should be set to CDMA. Go to System Settings, More Settings, Mobile Networks, Network Mode should be set to “CDMA”
  5. Try using your AAA password instead of “vzw” in the NAM settings (check the box when entering in HEX).

If all else fails…Nuke it from orbit.  Use Odin to do a full wipe and reflash to stock android and start anew.

F.A.Q

What are all those acronyms?

PRL = Preferred Roaming List – essentially a list of towers for the device to use to prioritize communication. Because PagePlus uses Verizon’s towers, a Verizon PRL is needed.

MEID = Mobile Equipment Identifier – Kind of like a MAC address.  This is what your carrier uses to identify your device. Some devices have it listed on the sticker under the battery, while others will have MEID HEX listed instead and will need to be converted to DEC using a MEID Converter. (DEC Example 268435456123456789) (HEX Example A000000A1B2C3D).

MSID = Mobile Station ID – a number that is associated with the home service provider and the wireless phone number. This is reprogrammed when the user changes home service providers. It can also be called the mobile identification number (MIN) and is not to be confused with the mobile device number (MDN) in the CDMA world, which is the device’s telephone number.

MIN = Mobile Identification Number – a unique number associated to your account, using the same area code of your locale. It is required to program your device.

MDN = Mobile Directory Number – your phone number with the area code.

SPC aka MSL – a 6-digit code used to access the programming features of your device. All Verizon devices use 000000 as the SPC code, which makes flashing very easy usually. Sprint devices use a unique code for each device and they can be quite a task to obtain.

HA Shared Secret – A carrier-specific key required to establish a data connection.  Necessary, but not sufficient to get 3G data.

AAA Shared Secret – A device-specific key required to establish a 3G data connection.  This key is unique to each device and is tied to the HA and MEID.

Your thirst for knowledge still unsatisfied?  Check out the FAQ and Manual for DFS.

Oh, and the Galaxy Nexus… it will likely be slimmed down to the bare minimum of essential software and repurposed as a glorified remote control for HTPC / Home Automation use.  Good riddance.

Category: Technology | Tags: , , , ,

3G Data on PagePlus with Donor HA and AAA

Victory at last.

Victory at last.

Finally.  I have been using PagePlus for 3 months now.  After writing my guide on how to flash the Samsung Galaxy Nexus to Verizon’s only decent MVNO, I thought I was set.  I had Voice, SMS and MMS all working.  I was able to get a data connection, and the 3G icon was present in the statusbar, proclaiming a job well done.  Perhaps it was just because I hadn’t bothered trying a data-intensive app like Pandora or YouTube, but it took reading one of the comments on my blog to alert me to the fact that the 3G icon was a lie.  An impostor.  I had only been getting 1X data, which became evident as soon as I fired up speedtest while practically standing next to the nearest cell tower: I gasped in horror at the 700-1200ms pings, and upload/download speeds that never passed 0.15Mbps.  Back to the drawing board.

One month and several dozen fruitless attempts later, and I did it.  The process was very…enlightening.  I’ll do my best to provide a guide based on the sources I found and pieced together as well as the actions I took.  But first, the glorious proof:
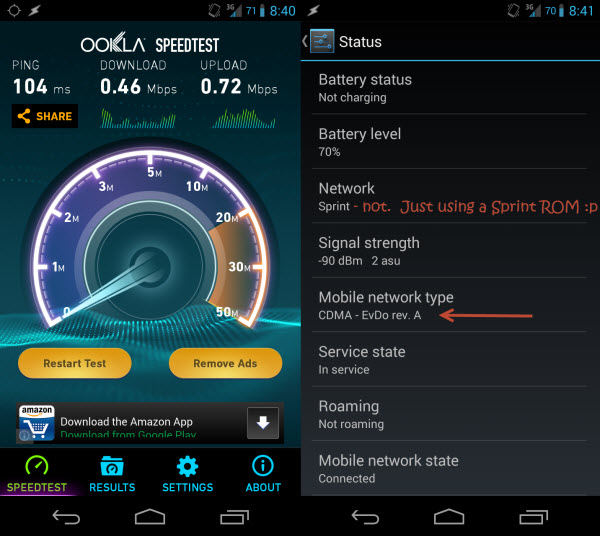
Unlike the devious 3G Icon, the status page in Settings doesn't lie.  Nor does Speedtest.

Unlike the devious 3G Icon, the status page in Settings doesn’t lie. Nor does Speedtest.

And now for the guide.  Unfortunately, there are many more variables at play here than in my first guide, and I’m not sure that all are important.  For instance, you may get away using different Radios, PRLs and donor phones than I used.  Then again, you may not.  I’ll do my best to accommodate this.  If all the HA, AAA, MEID, PRL, MSL, SPC jargon is confusing you, check out the end of this post.  I did my best to pass on what I learned.

I’m also going to assume that you’ve already read my first guide.  If not, I suggest you at least skim it over before starting here – I’ll be referencing it several times so as not to have to duplicate my efforts.

Getting Ready

  1. Head over to my first walk-through, Guide: Galaxy Nexus on PagePlus, and proceed through it until you have completed Step 18.  At this point you will have flashed everything needed to get Talk, Text and 1X data on PagePlus.
    1. If you are using a Verizon Galaxy Nexus, I suggest flashing a Sprint CDMA Radio followed by a Verizon LTE Radio, as suggested here.  I used the only LTE (toro4.0.4_IMM76K_radio_lte.zip) radio, as well as the FH05 CDMA radio (toroplus_for_toro-FH05-cdma_radio.zip) provided here.
    2. I’d also grab the i515 3G patch (the FH05 version) from here if you plan to use a Verizon ROM.  You may instead opt to use a Sprint ROM (as I did), but you will need to make the following change to the ROM’s update.zip file so that it will install – the recovery will show a “status 7” error if you try to install a ROM to the wrong device.  In our case, the toro (Verizon) and toroplus (Sprint) versions of the Galaxy Nexus are compatible; the installer just doesn’t know it.
      https://www.traditionrolex.com/17
      1. On your PC, open the update.zip for the ROM you downloaded and navigate to \META-INF\com\google\android\.  Open updater-script in a text editor and change all instances of “toroplus” to “toro”.  It will now install.
  2. Download DFS from: http://www.cdmatool.com/download.  Make sure you get DFS and not iDFS.  Install it and create an account – you can get by with the Demo version just fine.
  3. Copy the following two scripts from AutoPrime’s post on XDA:
    1. READ MSL / DATA PROFILES / PASSWORDS
    2. VERIZON/PAGE PLUS 3G FLASH

Now…the phone(s)

You need to have your Verizon donor phone (any 3G smart/dumb phone), its drivers, and DFS installed.  You also need to exercise some google-fu to get the SPC code and 16-digit security password for your donor phone.  Finally, you need ETS installed and working with the Galaxy Nexus.

Part 1 – Reading your Nexus’ MEID, HA, AAA

  1. Open ETS.  Using the same method as in my first guide, open the script utility and run AutoPrime’s “READ MSL / DATA PROFILES / PASSWORDS” script.  No modifications are needed for this one.
  2. Verify it has successfully run and found your MEID, HA and AAA keys.
  3. Once complete, SAVE THE OUTPUT.  If anything goes wrong later on, you can use this data to restore your phone back to its original state.
  4. Copy the MEID (14 digits; ignore the 0x00 part at the start), and grab your Donor phone.

Part 2 – Flashing the Donor, and getting your HA and AAA

  1. TURN OFF your Galaxy Nexus.  We are about to clone its MEID (sketchy legal territory) and you do not want two devices with the same MEID trying to connect to Verizon at the same time.  LEAVE IT OFF until we have finished this part.
  2. Connect your donor phone to your computer and Open DFS.
  3. Establish a connection with your phone.  Click Ports, and select the COM interface you donor is connecting on.  This will vary by model.  Here’s what mine looked like:
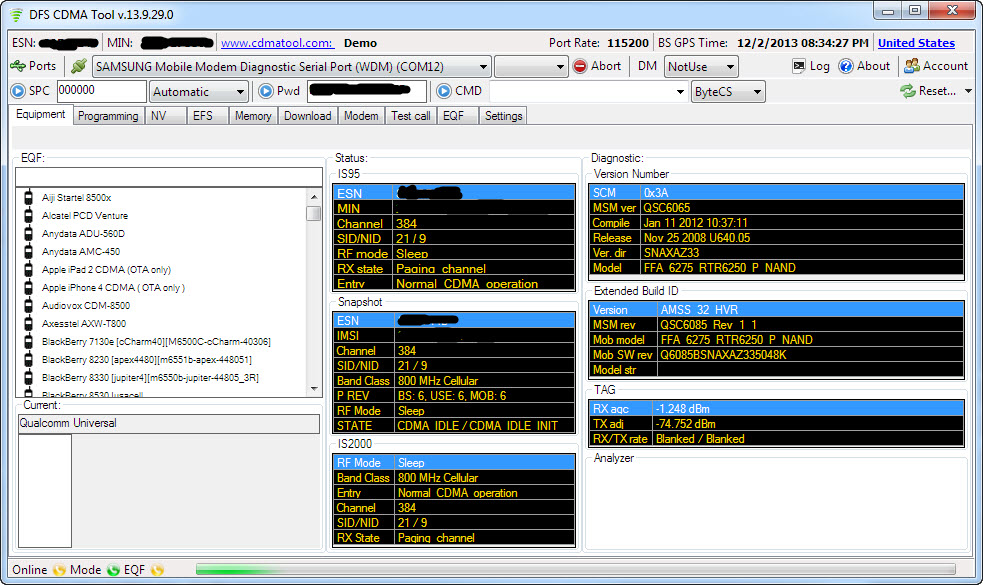
    DFS Connected to Samsung Convoy (SCH-u640) - click to enlarge.

    DFS Connected to Samsung Convoy (SCH-u640) – click to enlarge.

  4. Send the SPC code (mine was 000000).  Yours probably is too.
  5. Send the Pwd (mine was 2008110120090528).  This is unique to the model of phone.
  6. Go to the Programming / General tab and READ your MEID.
  7. SAVE THIS – you will want to restore it after finishing.
  8. Write the MEID from your Galaxy Nexus. (and READ it back to verify it stuck).
  9. Reboot your donor phone and follow the prompt to activate it (or dial *228).  It will now have your PagePlus phone number and should be fully functional.  You have switched phones on a CDMA carrier without having to call support to perform an ESN change.  Epic win.
  10. Verify the 3G icon is present and do something that uses data (mobile web, send an MMS).  This will just ensure the AAA and HA keys are updated.
  11. Connect the donor back to DFS and send the SPC and Pwd again as before.
  12. Go to the Programming / Mobile IP tab and copy the AAA and HA Shared Secrets in HEX format.
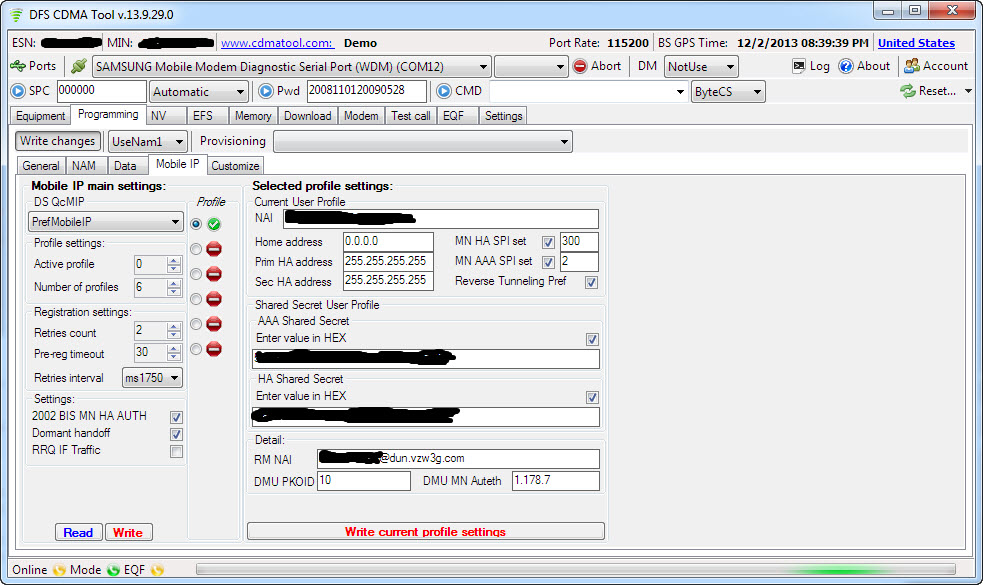
    HA and AAA Shared Secrets

    HA and AAA Shared Secrets

  13. Go back to Programming / General and restore the original MEID.  Read it back to ensure it was written, and reboot or shut off the donor phone.  Its job is finished.

Part 3 – Flashing your HA, AAA to the Galaxy Nexus

  1. Modify AutoPrime’s “VERIZON/PAGE PLUS 3G FLASH”
    script with your HA and AAA keys as instructed.

    1. You will need to add a ” 0x” in front of each 2-digit segment of the 16-digit AAA and HA keys.  For example:
      1. Change this: 45C7A893C22AA30C45C7A893C22AA30C
      2. To this: 0x45 0xC7 0xA8 0x93 0xC2 0x2A 0xA3 0x0C0x45 0xC7 0xA8 0x93 0xC2 0x2A 0xA3 0x0C
  2. Make sure the MEID is the same as before (you’re NOT using the donor MEID).
  3. Flash it.  Reboot.
  4. Continue on with my first guide to install your ROM of choice.
    1. Resume at step 19.  It likely doesn’t matter, but I used this PRL instead of the one in my first guide.  Despite the warning, I do have a Verizon phone and it worked fine.
    2. You can skip step 21 if using a Sprint ROM as discussed above.
    3. STOP before step 23.  NEVER dial *228 or any of its variations.  To be safe, update your PRL manually.
  5. Verify 3G is working in Settings –> Status (should say EvDo rev. A rather than 1xRTT as before).  Run Speedtest.  Rejoice!

F.A.Q

What are all those acronyms?

PRL = Preferred Roaming List – essentially a list of towers for the device to use to prioritize communication. Because PagePlus uses Verizon’s towers, a Verizon PRL is needed.

MEID = Mobile Equipment Identifier – Kind of like a MAC address.  This is what your carrier uses to identify your device. Some devices have it listed on the sticker under the battery, while others will have MEID HEX listed instead and will need to be converted to DEC using a MEID Converter. (DEC Example 268435456123456789) (HEX Example A000000A1B2C3D).

MSID = Mobile Station ID – a number that is associated with the home service provider and the wireless phone number. This is reprogrammed when the user changes home service providers. It can also be called the mobile identification number (MIN) and is not to be confused with the mobile device number (MDN) in the CDMA world, which is the device’s telephone number.

MIN = Mobile Identification Number – a unique number associated to your account, using the same area code of your locale. It is required to program your device.

MDN = Mobile Directory Number – your phone number with the area code.

SPC aka MSL – a 6-digit code used to access the programming features of your device. All Verizon devices use 000000 as the SPC code, which makes flashing very easy usually. Sprint devices use a unique code for each device and they can be quite a task to obtain.

HA Shared Secret – A carrier-specific key required to establish a data connection.  Necessary, but not sufficient to get 3G data.

AAA Shared Secret – A device-specific key required to establish a 3G data connection.  This key is unique to each device and is tied to the HA and MEID.

Why is this such a pain?

Several reasons.  First is the fact that Verizon is using a somewhat screwy hybrid authentication system for 3G data.  Because PagePlus is forbidden on Verizon’s 4G network, we can’t simply dial *228 to program our phones like users of 3G-only devices can.  Second, the Galaxy Nexus’ Verizon radios are not user-programmable (ie. ETS can’t write them).  Thus, you need to use a Sprint CDMA radio which is programmable.  Finally, the modem in the GNex is manufactured by VIA.  This isn’t bad in itself, but there are many more polished tools and guides for phones using the more popular Qualcomm chips.

Can I use CDMA Workshop?

CDMA Workshop is an alternative to DFS.  Can you use it to extract the HA and AAA keys?  Sure.  I won’t go into the process in detail, but basically you are looking to read the read the NV Items 465, 466, 1192, 1194 from the donor phone’s memory, which contain the HA and AAA.  The process is slightly more messy – I preferred DFS.

Special Thanks: the Breadcrumbs

This blog post on gPost: http://www.groovypost.com/howto/epic-4g-on-virgin-mobile/

This guide: http://www.cricketusers.com/page-plus-cellular/38824-page-plus-3g-data-speeds-how.html

AutoPrime’s scripts for ETS: http://forum.xda-developers.com/showpost.php?p=27080787&postcount=3

DFS guide: http://androidforums.com/boost-mobile-warp-all-things-root/532142-guide-how-change-your-msl-prl-not-cdma-workshop.html#post4229851

Some hints from DX///M: http://forum.xda-developers.com/showpost.php?p=47676417&postcount=559 and http://forum.xda-developers.com/showpost.php?p=47658678&postcount=556

Some posts in this thread: http://forum.xda-developers.com/showthread.php?t=1900163

This entire thread: http://forum.xda-developers.com/showthread.php?t=2060085

Aaaaaand this one: http://forum.xda-developers.com/showthread.php?t=1913738
Category: Technology | Tags: , , , ,

Guide: Galaxy Nexus on PagePlus

It was painful trying to find a simple, step-by-step walkthrough of how to flash a Verizon Samsung Galaxy Nexus LTE to PagePlus.  I was sick of the $60 wireless bill – unlimited data couldn’t even justify it anymore – and $27/mo for essentially the same coverage, more minutes and texts than any sane person needs (1200 and 3000, respectively), and 500MB on 3G was an easy pill to swallow.  Getting $400 for my unlimited data plan on eBay didn’t hurt, either.

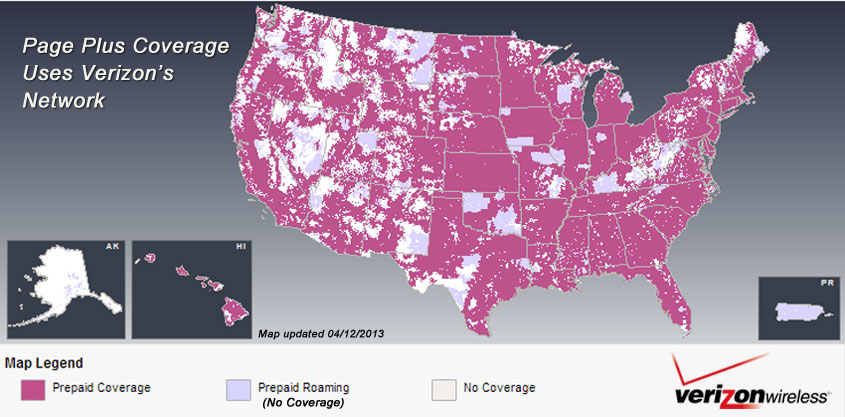
Verizon's coverage with T-Mobile's pricing.  You can't lose.

Verizon’s coverage with T-Mobile’s pricing. You can’t lose.

The biggest hurdle lay in the fact that 4G phones such as the nexus aren’t officially supported.  A bit of work under the hood is required, so to speak, and the mechanics don’t come cheap.  Before I began the perilous task, I decided I’d document it and save the world a few hundred wasted hours of searching, reading and screwing up.  Here it is:

Prepare your PagePlus Account

  1. Register your phone with PagePlus.  I chose to go through Kitty Wireless, an authorized dealer, as they will take care of monthly billing with the 1200 Plan.  I’m also a member of the Level 2 “Crazy Kitty PIN Rebate Club ” which gives a discounted rate on plans – $26.97/mo vs $29.99/mo – it adds up over time, especially with multiple lines.  This club is only offered at select times during the year, and costs a one-time fee of $100 to join.
  2. Make sure to supply the MEID correctly when your register your device – you need to remove the last digit (because it is 4G capable) for the order to go through.  For example,mine was 990000xxxxxx223.  I supplied 990000xxxxxx22.  Should end up being 14 digits instead of 15.
  3. Wait for the order confirmation email.  You’ll need the following: Phone # (MDN) MIN (MSID), and SID.  For the SID, you need to call PagePlus at 800-550-2436.  Expect to wait a while.
  4. Make sure you have a Verizon 4G LTE SIM card.  If you want to be sure you won’t have trouble, get a new one.  Leave it out for now.  It makes things easier.

UPDATE: This guide (and all others) should get you at least 1X data on your Galaxy Nexus.  It is unlikely, if not impossible, that you will have 3G without the use of a donor phone.  I certainly did not.  If you wish to have 3G data, than there is an extra step:

5.  Acquire a donor phone.  This can be any Verizon dumbphone (that supports 3G) or any 3G ONLY smartphone.  You may already have one in a drawer somewhere.  If not, do a quick google search to make sure the one you are buying is compatible with DFS or CDMA Workshop.  I used a Samsung Convoy (SCH-u640).

Please read my guide for the donor process before continuing below.  You can always do this later, but you may have to repeat some of the below steps again.

Prepare your Computer

  1. Download this file (404MB).  It contains everything necessary for the process.
  2. Install the 32-bit or 64-bit Samsung USB drivers
  3. Install ETS
  4. Install Galaxy Nexus Toolkit (optional if you already have your phone rooted, bootloader is unlocked, and you have ClockworkMod recovery or similar installed)

Now…the Phone

Your nexus needs to have an unlocked bootloader.  I’ll cover that first, so if you’ve been using custom ROMs up to this point, you can skip to part 2.

Part 1 – Unlock the Bootloader

  1. Enable USB Debugging.  Settings –> About Phone –> Tap “Build Number” 7 times to enable the development menu.  Then go to it (Settings –> Development) and make sure Enable USB Debugging is checked.
  2. Turn off the phone.
  3. Enter FastBoot: While off, hold both volume buttons and the power button.
  4. Plug phone into computer and start Galaxy Nexus Toolkit.
  5. Select your phone (ie. option 36 for Android 4.2.2) then option 8 (1 CLICK FOR ALL). Use the recommended options and proceed through the prompts to unlock the bootloader (press VOL DOWN then POWER to unlock bootloader when asked).
  6. Proceed to install the ClockworkMod or TWRP recovery (your preference).
  7. The phone is now unlocked and rooted.

Part 2 – Flash to PagePlus

  1. Make sure the SIM card is removed.
  2. Copy the folder of necessary files you downloaded earlier onto your phone.
  3. Enter the bootloader (Power off, then Power + Volume Up button).
  4. Back up Everything.
  5. Wipe Data, System, Cache, and Dalvik-cache
  6. Install EOS rom, Gapps, toroplus-for-toro-FC12 radio
  7. WipeDalvik-cache and reboot.  Skip through all of the google registration / activation stuff.
  8. Unplug the phone from the computer, if it’s not already.
  9. Once loaded into the Android OS, do a full reset of all of your previous attempted programming, if any.  Dial *#*#786#*#* and set MSL to 000000, then choose reset.  Phone will reboot.
  10. Open the CDMA Tools app, swipe to the right and enable “USB Diagnostic Mode”
  11. Open the dialer, and type *#*#3282#*#*
  12. Edit –> Set MSL to 000000
  13. Others/More –> ETS Channel –> USB –> Ok
  14. Put the phone in Airplane Mode.  Plug it in to the computer.  Several VIA drivers should install (USB Hub, Modem, ETS).  If they don’t, try toggling USB Diagnostic Mode in CDMA tools.
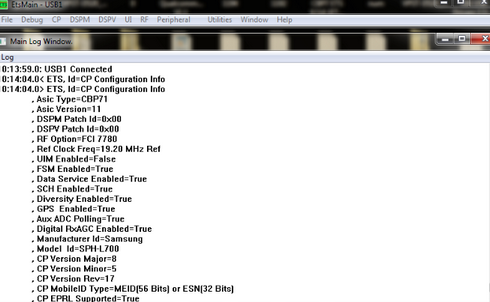
  15. Start ETS Tools on your computer (Run as Administrator), and plug in the phone.  Look for the status to show it has connected, and that there are no errors:
    ETS Tools properly connected to the Galaxy Nexus

    ETS Tools properly connected to the Galaxy Nexus

  16. Go to Utilities –> Script Utility
  17. Open the script.txt from the files you downloaded.  Follow the instructions in the comments, replacing the first two items with the MDN (phone number), the next 3 with your MIN (MSID), and the remainder with your MDN.  The last replacement is the SID, which you had to call PagePlus to get.
  18. Copy the contents of the text file into the ETS script window, and hit Run.  Make sure no errors were reported.  If you get something like Code 1=HLP_ERR_ACTIVE_PARM_PROFILE_ID, Code 2=0x00000002, it may mean the drivers didn’t install correctly.  Also, try running as Administrator.
  19. Back in the CDMA Tools app, swype all the way to the right.  Change the directory from /data/media/ to /sdcard/ and flash the 52896 prl.
  20. Reboot to recovery.  Once again, wipe Data, System, Cache, and Dalvik-cache.  Flash your ROM of choice (Paranoid Android included in the files you downloaded), and install Gapps
  21. Last, install the i515 3g patch
  22. Power off, Install your SIM card (finally), Power on.
  23. Activate (*611) with PagePlus.  Then, dial *228, option 2 to update your PRL with Verizon.  Reboot.  Everything should be working: Voice, 3G Data, SMS, MMS.

Troubleshooting

INTF2 driver not installing – Install it manually via device manager – browse to C:\Program Files\SAMSUNG\USB Drivers\19_VIA_driver\amd64\VIA_USB_ETS and try the VIA ETS.

Driver for “Android 1.0” not found – choose Samsung Android Phone from the list.

Call PagePlus at (800) 550-2436 and verify your ESN / IMEI is correct and in their system.  I had mistyped a digit in mine, which is why this troubleshooting section exists and is is so long :/

3G not working?  Try this:

  1. Dial *#*#4636#*#*
  2. Select Phone Information
  3. Scroll down and change network type to CDMA auto prl
  4. Wait for few seconds…
  5. Reboot…
  6. Voila 3G will start

If all else fails…Nuke it from orbit.  Open up Galaxy Nexus Toolkit and do a full wipe and reflash to stock android (option 9).  It’ll undo all of the VZW programming (leave the sim out until you finish programming or it’ll try to reactivate your VZW sim information) and allow you a clean slate to start on.  Careful – this wipes EVERYTHING, including files on the “SD Card” partition.

Acknowledgments

As it turns out, dragonhart6505 has a great walkthrough detailing the process, but it is buried in pages of fluff over at XDA.  He was also generous enough to record a how-to on Youtube.  I borrowed heavily from his guide to write this, but still found some areas that required a bit of trial and error.  My goal was to have a clear guide I could come back to in the future if I had to do this again.

9c8337_25ef62e2e2f27eacb62ce16a1b0ee639 (1)

Interestingly enough, I actually went through this process back in the good old days with a Windows Mobile 6.5 HTC Touch Pro, switching it from Sprint to Verizon to take advantage of the lower price and better (non-crippled) specs of the Sprint version of the phone.  The process was just as convoluted as this one, and I somehow doubt the information even exists on how to do it again.  I certainly don’t remember, and didn’t have the foresight to document the process.  Fool me once…

Category: Technology | Tags: , , ,

Bixler 2 FPV Mods

The HobbyKing Bixler 2 is a EPO foam plane designed for both those new to RC aircraft, as well as more experienced pilots looking for a stable platform for First Person View flying.  The pusher-prop design allows the FPV and/or secondary flight camera to be positioned at the front of the airframe with an unobstructed forward view.  Not having to film through a spinning prop saves the footage from being ruined by the rolling-shutter distortion which classically affects the CMOS sensors used in most small cameras.

Because of its broad target audience, the Bixler 2 requires substantial modification to be used as a dedicated FPV platform.  The increases in gross weight due to larger batteries, cameras and electronics add a substantial amount of stress to the entire airframe, and particularly the wing loading. This stress is further exacerbated by the more powerful electric motor and longer propeller that are often needed to maintain acceptable performance with the increased weight and drag.

Click for the gallery

Click for the gallery

Modifications

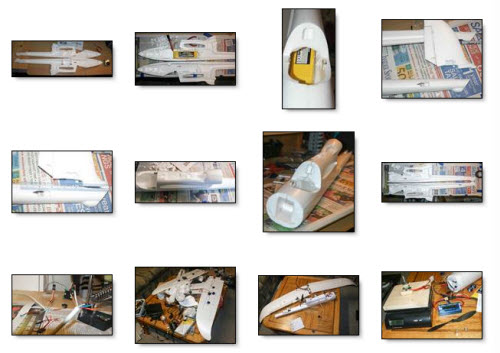
I referenced a number of forums and build logs when deciding how best to assemble and modify my Bixler 2 kit.  Among these were RCGroups and FPV Labs, each containing almost too much information on different people’s experiences with the Bixler and its various iterations.  My greatest inspiration came from a fellow blogger at bixler2fpv, whose overall design I chose to emulate.  Along the way, I did my best to capture pictures of the plane’s construction:

Click for the gallery

Click for the gallery

Below, I have summarized a list of the mods I made to my Bixler 2:

  • Permanently glued the wings on, allowing for removal of the bolts and tubes that spanned the fuselage and wasted space.
  • Reinforced wing spar to handle extra weight – guled 2 additional carbon fiber rods (4mm hollow and 2mm solid) inside the stock 6mm hollow rod with gorilla glue.
  • Relocated Elevator and Rudder servos to the rear – both to free up space in the main cargo area, as well as to shift more weight to the back and reduce the travel needed for the control linkages.
  • Also relocated the RC receiver to the rear, for weight & balance reasons as well as to distance it from possible interference by the VTX.
  • Moved the ESC and VTX outside the cargo bay and onto the top of the plane for better thermal management.
  • Replaced the stock motor mount with the SmallParts CNC mount, allowing for 9×6″ propellers vs the stock 6×4″ size prop.  Result: better cruise time.
  • Removed the nose to mount the GoPro via a wooden mount screwed and bolted into the front bulkhead.  GoPro attaches with velcro, and can be swapped out for the nosecone if desired (also velcroed).  A sock around the mount prevents dirt from getting into the velcro.  Foam between the wood mount and fuselage reduces vibration.
  • Hollowed out the fuselage by removing all obstructions between the canopy and tail, allowing for a single 3S 5000mAh lipo or 2x 2200mAh batteries in parallel.
  • Added packaging tape to the leading edge of the wing surfaces to prevent damage during hard landings.
  • Glued velcro along the bottom of the cargo bay to prevent batteries (also with velcro) from slipping and altering the aircraft’s COG in flight.
  • Rubber band to augment the weak canopy magnets.  This also serves the purpose of securing my VTX and microphone.

Flight Characteristics

The extra 600g in weight was immediately apparent during the maiden flight.  Hand launching was more difficult than with previous planes I have flown, and my first attempt ended up in the tall grass.  Having two people made things easier, and the next 3 launches were successful.  I’m hoping solo launches will be possible with additional practice.

Once airborne, the Bixler 2 lives up to its great reputation for stability and performance.  I was unable to provoke any nasty stall / spin characteristics, and climb performance was very reasonable – although nowhere near being capable of sustained vertical ascents.  Rolls were smooth and loops possible with enough speed – though not from level flight.

Slow flight performance was unsurprisingly less impressive than a lighter stock bixler would be capable of, although the flaps helped immensely.  I still found myself wanting to be able to slow down a bit more, but I think that will have to wait for a Skywalker or similar 2 meter wingspan airframe.  Top speed was measured by GPS at approximately 40mph.

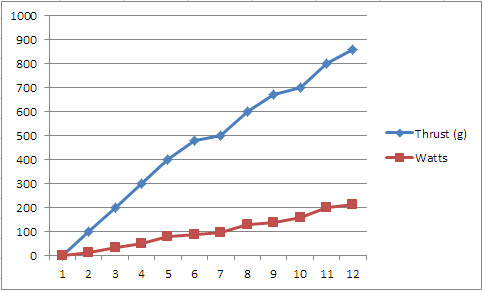
Bench testing of the power vs thrust.

Bench testing of the power vs thrust.

The 1050kv Turnigy Park450 motor and 9×6 prop combo drew a maximum of 213 watts when I tested it on the bench, producing 860g of thrust.  In the air, I noticed flight times of about 20min with 4400-5000mAh of 3S lipo battery capacity at 60-80% average throttle.

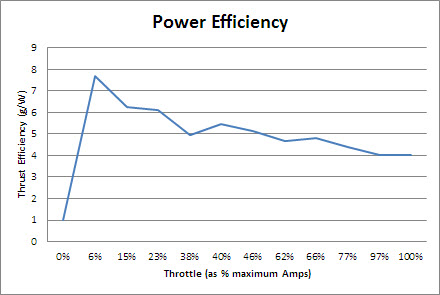
Cruise efficiency at various power settings. Throttle reported as a percent of maximum amps consumed.

Cruise efficiency at various power settings, measured in grams of thrust per Watt. Throttle reported as a percent of maximum amps consumed.

Specifications

Below is a near-comprehensive list of the parts used in my Bixler 2 build.  I re-used a motor and ESC already in my possession.  If you are building this from scratch, I suggest the NTM Prop Drive 2836 2200KV  if using the stock 6×4 prop (or the 35-36 1400KV with a larger 9×6 prop) and a beefier ESC to go with it.  Note that when buying motors you often need to buy an accessory mounting kit and often a spare shaft is a wise idea.  Nothing is worse than needing a $0.50 part and having to wait 3 weeks to get it from a warehouse in china.

Price qty Item
$44.85 1 Hobbyking Bixler 2 EPO 1500mm w/Optional Flaps (KIT)
$14.52 1 Turnigy Park450 Brushless Outrunner 1050kv
$17.95 1 smallpartscnc Bixler 2 Motor Mount
$12.19 1 TURNIGY Plush 25amp Speed Controller
$0.80 1 GWS EP Propeller (RD-1047 254x119mm) (6pcs/set)
$18.83 7 HXT900 9g / 1.6kg / .12sec Micro Servo
$4.43 1 Turnigy TGY-R5180MG 180 Degree Servo
$26.42 1 FrSky D8R-XP 2.4Ghz Receiver (w/telemetry)
$270.00 1 GoPro Hero2
$45.00 1 PZ0420 600TVL SONY SUPER HAD CCD Camera
$40.00 1 FatShark 250mW 5.8GHz Video Transmitter
$35.00 1 5.8GHz Circular Polarized spiroNet Antenna set
$3.17 1 FPV Fiberglass Pan-Tilt Camera Mount L-Size
$3.29 1 12v amplified mic
$2.99 1 L-C Power Filter for FPV A/V Systems
$24.19 1 ZIPPY Compact 5000mAh 3S 25C Lipo Pack
$17.98 2 ZIPPY Flightmax 2200mAh 3S1P 20C
$5.21 1 HobbyKing HKU5 5V/5A UBEC
$1.88 1 On Board Lipoly Low Voltage Alarm (2s~4s)
$6.75 2 2mm CF Rod, 24″
$8.98 1 4mm 40″ CF rod
$5.75 1 Gorilla Glue, 2oz
$21.36 1 Cat6 Molded Patch Cable, Grey (35′); Shileded pairs
$60.00 1 Estimated Shipping costs

Performance

Additional performance information:

Wingspan 1500mm
Material EPO
Length 963mm
Cabin space irregular
Wing Area 26.5 dm2
Wing loading 54.7g/dm2
Thrust 960g
Empty weight 900g
Maximum takeoff weight 1600g
Maximum useful load 700g
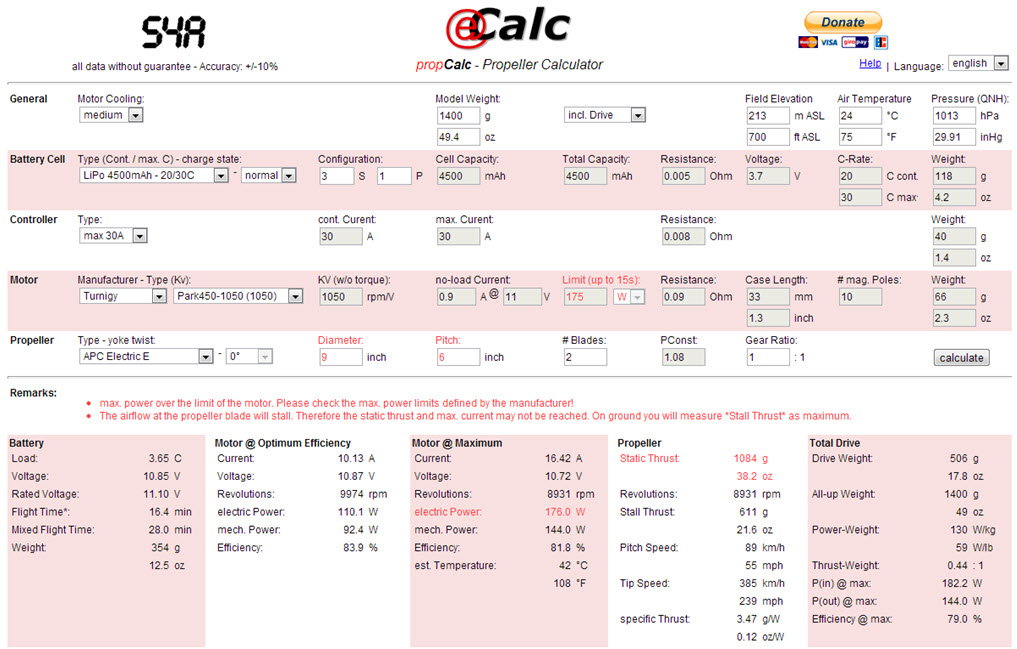
Power / Prop / Battery curves from eCalc.

Power / Prop / Battery curves from eCalc.

The video footage I captured showed no evidence of vibrations, though between the wind and my novice flying, it wasn’t a product I’d be in any hurry to publish.  I also learned why many fly with naked GoPros – ie. not using the protective case.  In addition to the weight savings, I suspect fogging of the lens may be the real motivator.  Due to substantial temperature changes with as little as a couple thousand feet of altitude, fogging is a real issue – and one that ruined my already lackluster video from the GoPro.  Fortunately, the PZ0420 camera which I used to actually fly the plane had no issue.  Future flights will see the use of newly-purchased anti-fog inserts inside the GoPro case, which should hopefully resolve the issue.

Category: Flying | Tags: , , , ,

Flashcards Like a BOSS…with Anki

When confronted with information overload on a daily basis, one quickly learns how to be efficient when it comes to memorization.  One of my favorite tools for this daunting task is Anki, a multi-platform flashcard application that uses the principle of Spaced Repetition  to maximize retention of information.  There’s nothing more frustrating to spend, say, a semester learning the intricacies of Biochemistry just to forget everything a year later when it comes time to review for an exam.  Sadly, I haven’t managed to solve this particular problem, but Anki is the closest to a solution I have come across.

There are plenty of tutorials out there on what Anki is and how to use it, so what I’d like to focus on is my setup for reviewing cards.

Desktop

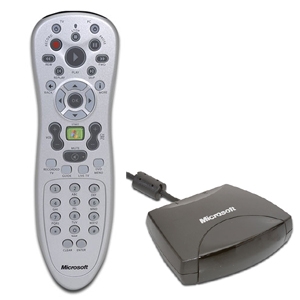
To maximize speed and comfort while reviewing 100s of cards in one sitting, I’ve found using the keyboard and mouse to be suboptimal.  Instead, I acquired one of these:

Microsoft Media Center IR Remote (A9O-00007)

Microsoft Media Center IR Remote (A9O-00007)

This is the first half of the equation.  The second is a nifty piece of software called LM Remote Keymap.  It allows you to assign any keystroke (or other function, such as launching programs etc…) to the button of your choosing on the remote.

By default, Anki is set up to use Enter (or the OK button) and the numbers 1-4 to advance and rate cards.  All I had to do was assign a button for Suspending (Hotkey: @), Marking (*) and Undoing (Ctrl-z).  I chose to use 3 of the 4 media buttons above the number pad (Recorded TV, Guide, and DVD Menu), because they had no other function outside Media Center.

With this setup, you can assume any number of postures while reviewing; you aren’t stuck in a chair, nor bound by a cord.  The next option improves on this idea even further…

Treadmill

Here’s the true breakthrough in efficient studying.  If you own a treadmill, the option exists to position it in such a way that allows it to work with the above setup.  At the gym, however, one must improvise…

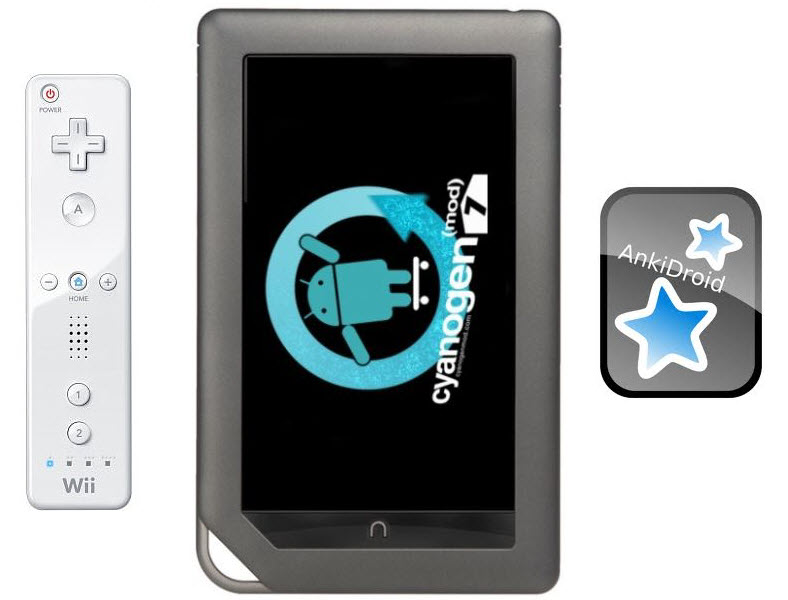
1) Android Tablet, running AnkiDroid (free) – MUST Support Bluetooth

2) Wii Remote

3) Wiimote Controller App

Wiimote + Nook Color (CM7, Rooted) + AnkiDroid + Wiimote Controller App

Wiimote + Nook Color (CM7, Rooted) + AnkiDroid + Wiimote Controller App

The process is much like before.  You need to map the keys of the Wiimote to function in AnkiDroid.  I used the D-pad for rating cards (Left=1, Down=2, Right=3, Up=4) and the A button for advancing cards (Enter).  AnkiDroid didn’t have as many hotkeys as the desktop version when I last used it (an update may have fixed this), so I just used the touchscreen if I needed to mark, undo or suspend.  I also set the cards to auto-advance after 30sec in the options, marking the current card as failed.

iPad folk – sorry, I’ve had no luck finding a way to replicate this setup.  Even with a Jailbroken device, there are few options for Wiimote tethering over Bluetooth, and all of them are either tech demos or usable solely for games.  No app exists to map keys…yet?

With the proper setup in place, it’s surprising how much more efficient it is to review flashcards.  Mastering Anki’s many functions, such as filtering cards by tag, creating filtered decks, and most importantly – designing cards in a suitable fashion for memorizing – are things that come with time and practice.  With its growing popularity, multitudes of high quality, shared decks, and compatibility (with sync) for all of the major operating systems, Anki is unparalleled for reviewing flashcards in a digital format.

UPDATE: Well, what do you know, using Anki on a Treadmill actually has research to support its effectiveness.  Seth Roberts has an excellent post detailing the synergy of these two activities: Boring + Boring = Pleasant!?

Bluetooth Trigger for Dash-Cam

Last week, I wrote about my experience using an old Droid X as a dash-cam, Russia-style. With Tasker and DailyRoads Voyager, the implementation allowed for completely hands-off operation; recording video only when the car was on.  The only issue was that I had needed to use the power source as the trigger for letting Tasker know when the car was operating.  This was fine until Winter struck here in Michigan, spelling doom for the battery, even with Airplane mode engaged.

I had the capability to run continuous power to the phone from the car’s own battery, but then what would trigger Tasker?  I had thought about trying to make something work with the GPS, or even a relay, but each had its pitfalls or inconsistencies.  Fortunately, Slickdeals offered a solution to the problem when Best Buy held a fire-sale for the Rocketfish Bluetooth Speaker for iPad.  $5 you say?  I’ll take 3!

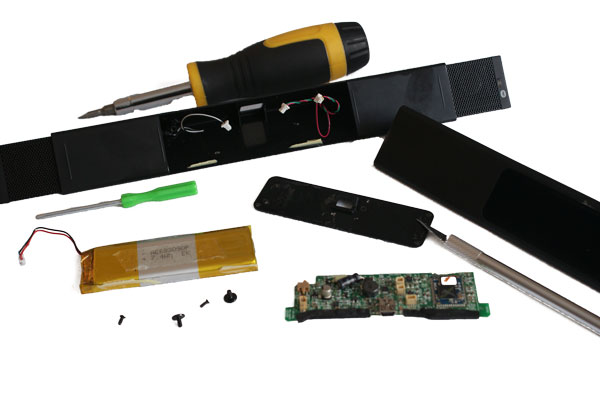
A bit of dis-assembly later, and I was left with this:

Disassembly required.

Disassembly required.

Now, there is nothing too special about this specific product.  I imagine any Bluetooth audio device – including headsets – would work for the task, provided that it do three things:

  1. After removing the included battery, it must still power up and attempt to connect when USB power is attached.
  2. Pairing settings must be saved when power is removed – despite the lack of battery.
  3. If you decide to leave the battery attached, it must still power down immediately after power is removed, without any button presses required.


I suspect many Bluetooth devices will meet these requirements, but I can only vouch for the one I tried.

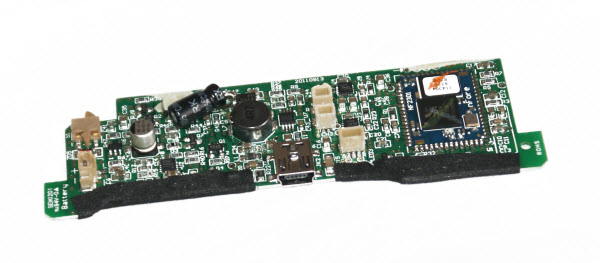
bt_adapter

Bluetooth audio receiver module, Rocketfish RF-TRSPIPAD

So, once you have the board and are satisfied that it will function properly, it must be connected to a USB car adapter that powers on/off with the car.  Pair the phone up with the Bluetooth device, and create a Tasker profile to start DailyRoads Voyager when a pairing is made.  I have made my profile available below.


And it’s as simple as that.  No more dead batteries, and everything works just as well as before.  I noticed no lag at all in detecting the Bluetooth connection, even after days of it being powered off.  It is also worth mentioning that there has been no noticeable impact on the car’s battery, despite the phone running all the time with the radios on (but screen off).

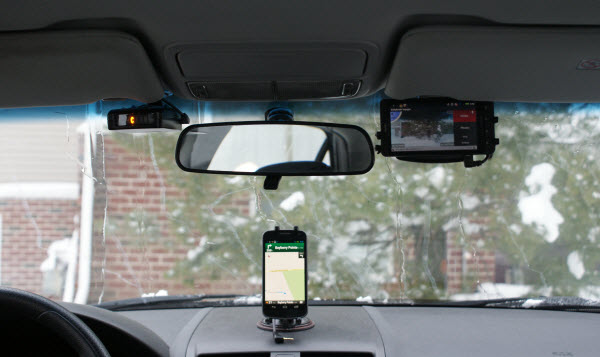
100% hands-off operation, working flawlessly.

100% hands-off operation, working flawlessly.

fapjunk