Tag Archives: diy

Direct DC Power to Smartphone – No Battery

This seems like it should be simple.  Phones of all variety – Android, Apple, “smart” and “dumb” use 3.7-3.85V single cell lithium-ion batteries.  Just attach a 3.7V DC adapter to the (+) and (-) terminals of the phone and you’re good to go, right?  Wrong.  A bit more trickery is required, and some additional finesse is well worth the effort.

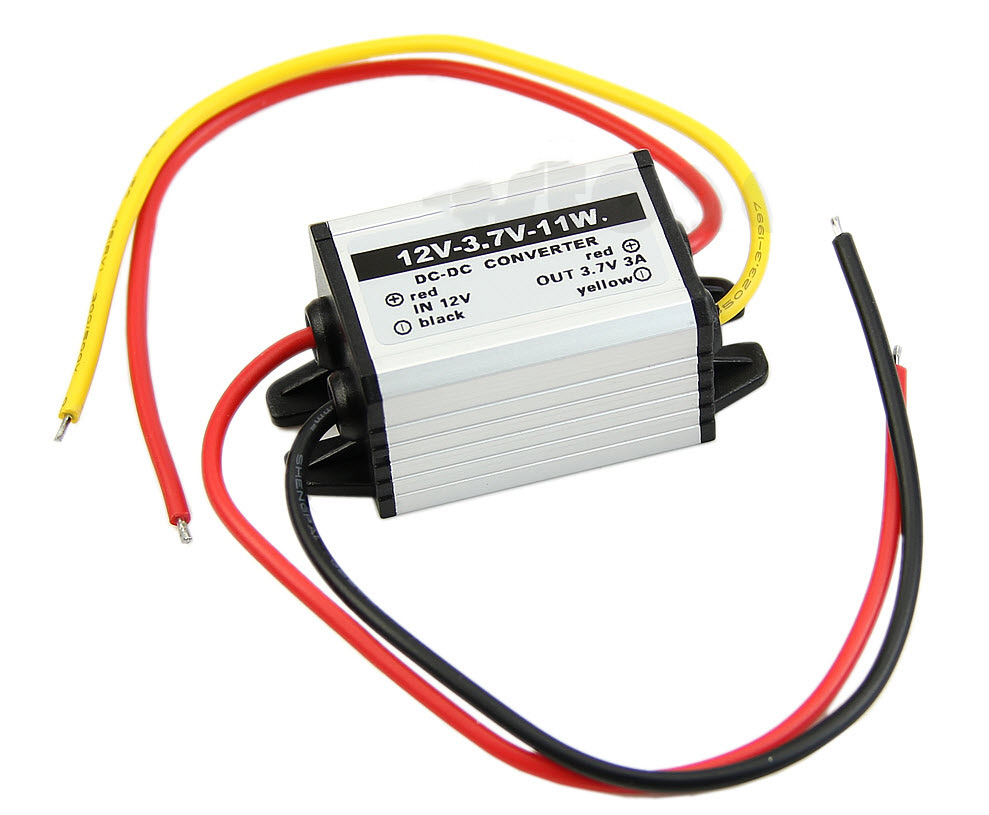
Two things are absolutely essential for this.  First is a DC adapter with 3.7-4.2V output rated at 1.5A or greater.  I used a DC-DC adapter for 12V input and 3A, 3.7V output, available on eBay.  If you don’t mind a bit more work, this step-down converter is fully adjustable by removing the heat shrink and turning a screw (while connected to a multimeter), allowing for 12V input and your choice of <10V output, and is actually what I ended up preferring to use.  An AC adapter may be more convenient, depending on the intended use, though I had a hard time finding an inexpensive option with sufficient output (1.2A was the best I found).  12V AC-DC adapters are cheap and plentiful, so you could always just combine one of those with either of the DC-DC step-down converters from above (which could likely power 2-3 phones in parallel).

2015-07-07_1-40-40

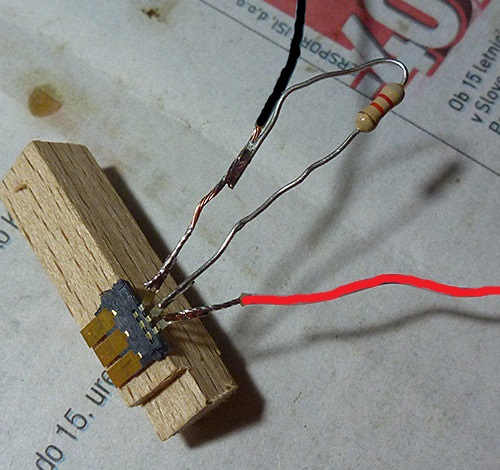
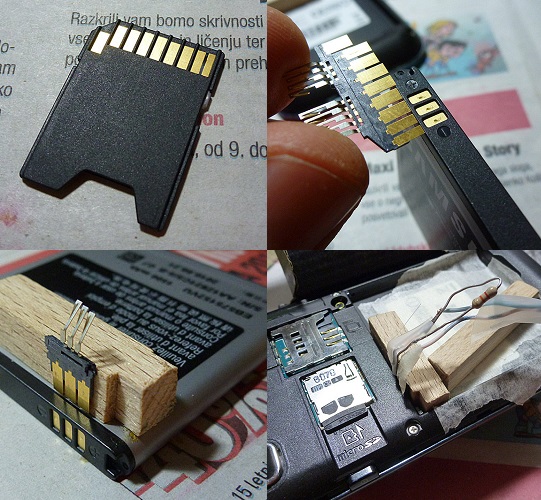
The second item needed is a resistor.  This bridges the ground and BSI (Battery Status Indicator) contact.  If a fourth contact is present, this is likely for NFC, and will be left alone.  For samsung phones, the BSI pin is typically found between the (+) and (-).  The purpose of the resistor is to identify the battery as compatible with the phone and may also assist in reporting the capacity / charge level / temperature.  The 68K resistor I used, plus the 3.7V output from the adapter made my Galaxy Nexus report a battery level of 14%.  I also tried a 100K resistor, which reported a similar, or slightly lower, capacity.  With further testing (using the adjustable step-down converter), it appears that the input voltage of the battery, rather than resistor size, determines the phone’s reported battery level, through a resistor is still necessary for the phone to recognize the battery and power on.  I ended settling on 4.15V, which made the phone report 100%.

FYGRTN8HVC1FEZE.LARGE

If you want a removable solution, you can construct a “faux battery” using your scrap material of choice and a microSD to SD card adapter – if you’re anything like me, you have an unused one laying around.  There’s a good example of this over on Instructables:

fauxbatt

Of course, you could just solder directly to the contacts on the phone, which may not be a bad idea if the modification will be anything approaching permanent.  The “faux battery” solution can be made quite sturdy, but nothing beats solder for peace of mind.

This solution works great for in-place installations such as home automation remotes, fixed displays and long-endurance photo / video, cellular hotspot and communication uses.  Unfortunately, for a hands-free implementation in a car or similar situation where the phone would ideally boot up when power is connected, additional work will be needed, as simply connecting power – just like inserting a new battery – does not result in the phone turning itself on.  You’d likely need to disassemble the power button and simulate a “momentary press” using capacitors / relays, which is beyond the scope of this post.  I may revisit this topic though, as I constructed such a solution back when I made a CarPC (before Android and cheap tablets were a thing).


Category: Technology | Tags: , , , ,

Guide: Note 3 flash to PagePlus with 3G data

Well, that didn’t last long.  After finally getting my Galaxy Nexus flashed to PagePlus and up and running with 3G data, I thought I’d be set for a while.  Then it finally hit me: the galaxy nexus is a piece of crap.  Even when released, it was the result of a 3-way compromise between Google, Samsung and Verizon with the loser being the customer.  Now that it’s pushing 3 years old, retirement is all too gentle a fate.

The Samsung Note 3 is currently the best specced phone available running Android.  It’s also the most expensive.  Fortunately, PagePlus users tend to be frugal, and I’m no exception. I took a chance on a used Sprint Note 3 with a bad ESN (doesn’t matter if flashing it to verizon) and a “Locked SIM.”  A few dings around the bezel (but not a scratch on the screen) only sweetened the deal further.  I made away like a bandit, getting this flagship phone for half its MSRP and nearly the same price as phone subsidized on a 2-year contract.  I just had to make it work.

While this guide follows my adventure with the Note 3, I am trying to make it as generic as possible for flashing any Qualcomm-based phone (Note 1/2/3, S1,S2,S3,S4, HTC One etc…) to PagePlus using DFS.  There are many variables at play here, and some steps may vary by phone, but the overall process should be accurate.  For instance, you may get away using different Radios, PRLs and donor phones than I used.  Then again, you may not.  I’ll do my best to accommodate this.  If all the HA, AAA, MEID, PRL, MSL, SPC jargon is confusing you, check out the end of this post.  I did my best to pass on what I learned.

Prepare your PagePlus Account

  1. Register your phone with PagePlus.  I chose to go through Kitty Wireless, an authorized dealer, as they will take care of monthly billing with the 1200 Plan.  I’m also a member of the Level 2 “Crazy Kitty PIN Rebate Club ” which gives a discounted rate on plans – $26.97/mo vs $29.99/mo – it adds up over time, especially with multiple lines.  This club is only offered at select times during the year, and costs a one-time fee of $100 to join.
  2. Make sure to supply the MEID correctly when your register your device – you need to remove the last digit (because it is 4G capable) for the order to go through.  For example,mine was 990000xxxxxx223.  I supplied 990000xxxxxx22.  Should end up being 14 digits instead of 15.
  3. Wait for the order confirmation email.  You’ll need the following: Phone # (MDN) MIN (MSID), and SID.  For the SID, you need to call PagePlus at 800-550-2436.  Expect to wait a while.
  4. You may or may not need a SIM card.  Furthermore, that SIM card may or may not need to be from Verizon, and it may or may not matter whether it has already been activated.  This totally depends on your phone.  For the Sprint Note 3 that I used, a SIM card was unnecessary.  The verizon model of the same phone however often requires one.  This will require some googling on your part.
  5. For 3G data (upload / download speeds >1mbps, ping <200ms) you will need a “Donor Phone”.  This can be any Verizon dumbphone (that supports 3G) or any 3G ONLY smartphone.  You may already have one in a drawer somewhere.  If not, do a quick google search to make sure the one you are buying is compatible with DFS or CDMA Workshop.  I used a Samsung Convoy (SCH-u640).
    1. You may skip this step, but you will be limited to 1X data (upload/download speeds of 0.1mbps, and most painful – pings of 700-1200ms).
    2. Note: you may also be able to get away with a Sprint phone as a donor, but lets not complicate things, shall we?  Phones are cheap on eBay. 

Ready your Computer

  1. Download this file (45.2MB).  It contains several files necessary for the process.
  2. Install the 32-bit or 64-bit USB drivers for your phone (not provided)
  3. Download DFS from: http://www.cdmatool.com/download.  Make sure you get DFS and not iDFS.  Install it and create an account – you can get by with the Demo version just fine.
  4. Use the 60008 PRL provided (recommended) or download one here.

Preparing to Flash

Your phone may need to be rooted and/or have an unlocked bootloader.  More importantly, make sure you have the latest ROM of your choice installed before flashing, and MOST importantly, ensure that the baseband / modem (check this in settings / status) is compatible with flashing to PagePlus or your desired MVNO.  I will go through this in the case of the Sprint Note 3 (SM-N900P):

Part 1 – Update Android / ROM, obtain Root, flash Modem

  1. As always, it is a good idea to make a full backup before starting.
    1. TWRP recovery is easy to install via the free goomanager app
  2. I grabbed the latest official (TouchWiz) build of Android 4.4.2  KitKat: N900PVPUCNAB and installed it using Odin 3.09.
  3. Unfortunately, the NAB modem that is installed with this update is not compatible with PagePlus.  No problem, we now just have to flash an earlier version of the modem ONLY (again using Odin just as before), which you can find in the download above (modem.tar).
  4. We can then Root android, again using Odin and loading “CF-Auto-Root-hltespr-hltespr-smn900p”.
  5. This is a good time to disable the pesky KNOX security software, though this step is not necessary for flashing.
  6. Make another backup of your shink new 4.4.2 ROM

Part 2 – Set USB mode to MODEM

  1. Enable USB Debugging.  Settings –> About Phone –> Tap “Build Number” 7 times to enable the development menu.  Then go to it (Settings –> Development) and make sure Enable USB Debugging is checked.
  2. Enable “Install apps from unknown sources” in the security settings.
  3. Install Samsung Android SPC Utility (apk provided) and press “Read SPC” – write this down.
  4. Dial ##3424# (DATA) to enter the PhoenUtil menu, and change the Qualcomm USB Setting to DM+MODEM+ADB or RMNET+DM+MODEM – either will work.
  5. The phone is now ready for flashing.

Reading settings with DFS

Before we start, we need one last password.  For Samsung devices, check here.  The 16 Digit Password that worked for my Sprint Note 3 was 2012112120131219.

DFS – READ; do NOT click write on anything yet

  1. Make sure the SIM card is removed.
  2. Turn on phone and connect to USB – ensure drivers are detected and installed.
  3. Start DFS.  Open “Ports”, select the COM port belonging to the phone.
  4. DFS should establish a connection and read the status and diagnostic info.
  5. Enter your SPC and click the button (log should indicate “UNLOCKED”)
  6. Enter your 16-digit password and click the button (log should indicate “UNLOCKED”)
  7. Go through each section of the equipment and programming tabs and click READ for each subsection.  Then MAKE SCREENSHOTS of your default values.
  8. Go to programming –> General and copy your MEID (14 digits HEX; ignore the two digits in the second box if present)
  9. Turn OFF your phone.  This is important.

Flashing Donor Phone / Obtaining HA, AAA Keys

Put aside your POWERED OFF phone and grab the donor.  Do NOT EVER have the two of these devices powered on at the same time with the same MEID (which they will have shortly).  This would be illegal according to the FCC.

DFS – Flash the donor

  1. Connect your donor phone to your computer and open DFS.
  2. Establish a connection with your phone.  Click Ports, and select the COM interface you donor is connecting on.  This will vary by model.  Here’s what mine looked like:DFS Connected to Samsung Convoy (SCH-u640) - click to enlarge.
  3. Send the SPC code (mine was 000000).  Yours probably is too.
  4. Send the Pwd (mine was 2008110120090528).  This is unique to the model of phone.
  5. Go to the Programming / General tab and READ your MEID.
  6. SAVE THIS – you will want to restore it after finishing.
  7. Write the MEID from your Note 3. (and READ it back to verify it stuck).
  8. Reboot your donor phone and follow the prompt to activate it (or dial *228).  It will now have your PagePlus phone number and should be fully functional.  You have switched phones on a CDMA carrier without having to call support to perform an ESN change.  Epic win.
  9. Verify the 3G icon is present and do something that uses data (mobile web, send an MMS).  This will just ensure the AAA and HA keys are updated.
  10. Connect the donor back to DFS and send the SPC and Pwd again as before.
  11. Go to the Programming / Mobile IP tab and copy the AAA and HA Shared Secrets in HEX format.HA and AAA Shared Secrets
  12. Go back to Programming / General and restore the original MEID.  Read it back to ensure it was written, and reboot or shut off the donor phone.  Its job is finished.

Flashing your Note 3 (or whatever)

Make sure you have your backups / screenshots of original settings!

DFS – Now you can WRITE

  1. Make sure the SIM card is removed.
  2. Turn on phone and connect to USB – ensure drivers are detected and installed.
  3. Start DFS.  Open “Ports”, select the COM port belonging to the phone.
  4. DFS should establish a connection and read the status and diagnostic info.
  5. Enter your SPC and 16-digit password
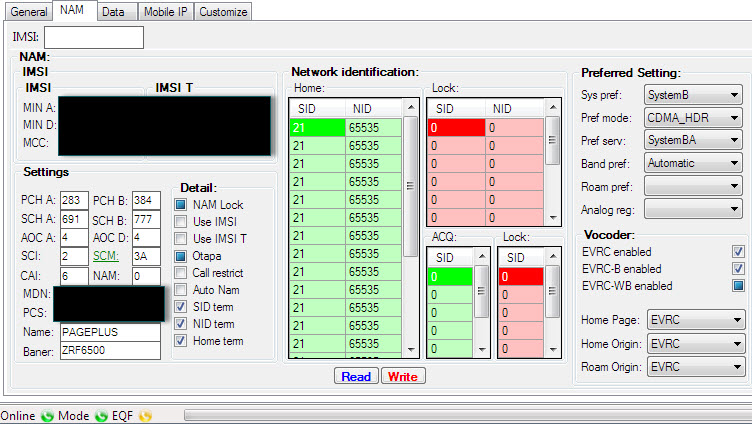
  6. In Programming / NAM, write the following:
    1. IMSI (leave IMSI T unchanged)
      1. MIN A and MIN D = your MIN / MSID (not phone number)
      2. MCC = 310; MNC=00
    2. Enter your MDN into both the SPC and MDN fields
    3. Set your SID (NID should be 65535)
    4. Check the remaining boxes to match this and then click WRITE:
      DFS: Programming / NAM

      DFS: Programming / NAM

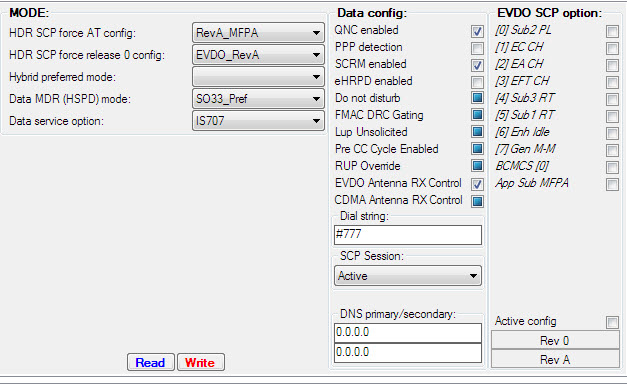
  7. In Programming / Data, write the following:
    1. PPP
      1. SIP NAI: “Your MDN”@dun.vzw3g.com
      2. UID: “Your MDN”@vzw3g.com
      3. PWD: vzw (box unchecked)
    2. HDR AN
      1. NAI: “Your MDN”@vzw3g.com
      2. PWD: vzw (box unchecked)
    3. HDR AN Long
      1. UID: “Your MDN”@vzw3g.com
      2. PWD: vzw (box unchecked)
    4. I will make a brief note here to remark that some of these values were erased when changing the baseband on my phone (which I did out of order of this guide) and I ended up with this.  It still worked (and I have learned not to mess with things that are working).
    5. Check the remaining boxes to match this (Hybrid preferred can be Enabled):
      DFS: Programming / Data

      DFS: Programming / Data

    6. Click WRITE
  8. In Programming / Mobile IP, write the following:
    1. Under profile column:
      1. Select the first bubble and make active (Right click, enable profile)
      2. Make sure all other profiles are Disabled (Right click, Disable profile)
    2. Under Mobile IP main settings
      1. DS QcMIP: PrefMobileIP
      2. Active profile: 0
      3. Number of Profiles: 1
      4. Retries count: 2
      5. Pre-Reg timeout: 30
      6. Retries interval: ms1750
      7. 2002 BIS MN HA AUTH: checked
      8. Domant handoff: checked
      9. PRQ IF Traffic: unchecked
    3. Click WRITE
    4. Under Selected profile settings
      1. NAI: “Your MDN”@vzw3g.com
      2. Home address: 0.0.0.0
      3. Prim HA address 255.255.255.255
      4. Sec HA address 255.255.255.255
      5. MN HA SPI set: Check box; 300
      6. MN AAA SPI set: Check box; 2
      7. Reverse Tunneling pref: Check box
      8. AAA Shared Secret
        1. Enter 32-digit value in HEX: Check Box
      9. HA Shared Secret
        1. Enter 32-digit value in HEX: Check box
      10. RM NAI : “Your MDN”@dun.vzw3g.com
      11. DMU PKOID: 10
      12. DMU MN Auteth: 1.178.7
    5. CLICK ON ” Write current profile settings” – do this 2x to make sure everything stuck
  9. Finally, lets go back to Programming / NAM, and write the PRL:
    1. First READ and then SAVE your current PRL
    2. Then LOAD and WRITE the 60008 PagePlus PRL
    3. The radios will reboot/reset after doing this
  10. Done!  Click Reset in the top right, and restart phone!
    1. Disconnect from DFS and unplug your phone.

Finishing Touches

  1. Once phone is restarted:
    1. Dial ##3282# click Edit Mode
    2. Enter your MSL / SPC code
    3. Click on EVDO then Click on DDTM and make sure it is Enabled. Then hit okay and then hit the back key
    4. Click on eHRPD and set to Off then hit ok.
    5. Click on LTE and Disable that also, and click ok.
    6. Youtube streaming and MMS:
      1. Click Multimedia then click on RTSP/HTTP
      2. RTSP proxy ip: 0.0.0.0
      3. RTSP proxy port: 0
      4. HTTP proxy ip: 0.0.0.0
      5. HTTP proxy port: 0
    7. Then click on MMSC menu item
      1. Name: PP (whatever you want)
      2. MMSC: HTTP://MMS.VTEXT.COM/SERVLETS/MMS or http://mms.vtext.com/servlets/mms?X-VZW-MDN=PHONENUMBER
      3. MMS Proxy: Leave Blank or 0.0.0.0
      4. MMS Port: 80 or 8080
      5. MMS Protocol: WAP 2.0
    8. Done!  Reboot phone
  2. Verify you can connect to PagePlus (*611) and that you have an EVDO Rev. A data connection.  Use Speedtest to verify 3G speeds / ping.
  3. Remember – NEVER dial *228 or any of its variations unless you wish to repeat all of the above steps again.

Troubleshooting

Call PagePlus at (800) 550-2436 and verify your ESN / IMEI is correct and in their system.  I had mistyped a digit in mine when flashing the Galaxy Nexus and spent hours trying to figure out why it wasn’t working before realizing it.

3G not working?  Try the following:

  1. Make sure you followed the flashing guide closely.
  2. Your Profile 0 and/or Profile 1 AAA key may be wrong.
  3. You may have wrong APN settings.
  4. Phone network should be set to CDMA. Go to System Settings, More Settings, Mobile Networks, Network Mode should be set to “CDMA”
  5. Try using your AAA password instead of “vzw” in the NAM settings (check the box when entering in HEX).

If all else fails…Nuke it from orbit.  Use Odin to do a full wipe and reflash to stock android and start anew.

F.A.Q

What are all those acronyms?

PRL = Preferred Roaming List – essentially a list of towers for the device to use to prioritize communication. Because PagePlus uses Verizon’s towers, a Verizon PRL is needed.

MEID = Mobile Equipment Identifier – Kind of like a MAC address.  This is what your carrier uses to identify your device. Some devices have it listed on the sticker under the battery, while others will have MEID HEX listed instead and will need to be converted to DEC using a MEID Converter. (DEC Example 268435456123456789) (HEX Example A000000A1B2C3D).

MSID = Mobile Station ID – a number that is associated with the home service provider and the wireless phone number. This is reprogrammed when the user changes home service providers. It can also be called the mobile identification number (MIN) and is not to be confused with the mobile device number (MDN) in the CDMA world, which is the device’s telephone number.

MIN = Mobile Identification Number – a unique number associated to your account, using the same area code of your locale. It is required to program your device.

MDN = Mobile Directory Number – your phone number with the area code.

SPC aka MSL – a 6-digit code used to access the programming features of your device. All Verizon devices use 000000 as the SPC code, which makes flashing very easy usually. Sprint devices use a unique code for each device and they can be quite a task to obtain.

HA Shared Secret – A carrier-specific key required to establish a data connection.  Necessary, but not sufficient to get 3G data.

AAA Shared Secret – A device-specific key required to establish a 3G data connection.  This key is unique to each device and is tied to the HA and MEID.

Your thirst for knowledge still unsatisfied?  Check out the FAQ and Manual for DFS.

Oh, and the Galaxy Nexus… it will likely be slimmed down to the bare minimum of essential software and repurposed as a glorified remote control for HTPC / Home Automation use.  Good riddance.

Category: Technology | Tags: , , , ,

3G Data on PagePlus with Donor HA and AAA

Victory at last.

Victory at last.

Finally.  I have been using PagePlus for 3 months now.  After writing my guide on how to flash the Samsung Galaxy Nexus to Verizon’s only decent MVNO, I thought I was set.  I had Voice, SMS and MMS all working.  I was able to get a data connection, and the 3G icon was present in the statusbar, proclaiming a job well done.  Perhaps it was just because I hadn’t bothered trying a data-intensive app like Pandora or YouTube, but it took reading one of the comments on my blog to alert me to the fact that the 3G icon was a lie.  An impostor.  I had only been getting 1X data, which became evident as soon as I fired up speedtest while practically standing next to the nearest cell tower: I gasped in horror at the 700-1200ms pings, and upload/download speeds that never passed 0.15Mbps.  Back to the drawing board.

One month and several dozen fruitless attempts later, and I did it.  The process was very…enlightening.  I’ll do my best to provide a guide based on the sources I found and pieced together as well as the actions I took.  But first, the glorious proof:
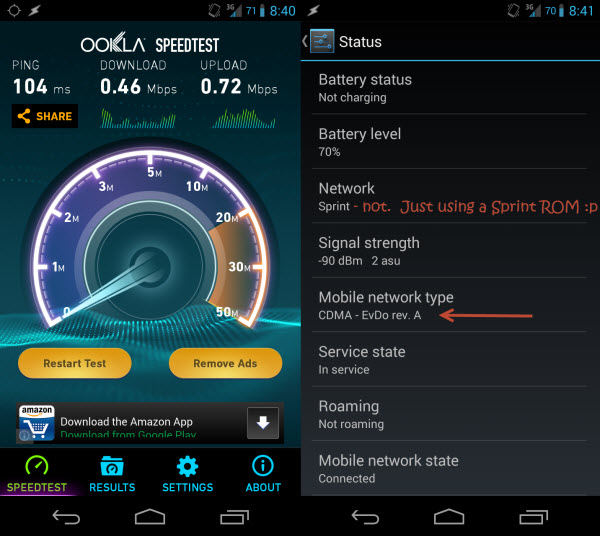
Unlike the devious 3G Icon, the status page in Settings doesn't lie.  Nor does Speedtest.

Unlike the devious 3G Icon, the status page in Settings doesn’t lie. Nor does Speedtest.

And now for the guide.  Unfortunately, there are many more variables at play here than in my first guide, and I’m not sure that all are important.  For instance, you may get away using different Radios, PRLs and donor phones than I used.  Then again, you may not.  I’ll do my best to accommodate this.  If all the HA, AAA, MEID, PRL, MSL, SPC jargon is confusing you, check out the end of this post.  I did my best to pass on what I learned.

I’m also going to assume that you’ve already read my first guide.  If not, I suggest you at least skim it over before starting here – I’ll be referencing it several times so as not to have to duplicate my efforts.

Getting Ready

  1. Head over to my first walk-through, Guide: Galaxy Nexus on PagePlus, and proceed through it until you have completed Step 18.  At this point you will have flashed everything needed to get Talk, Text and 1X data on PagePlus.
    1. If you are using a Verizon Galaxy Nexus, I suggest flashing a Sprint CDMA Radio followed by a Verizon LTE Radio, as suggested here.  I used the only LTE (toro4.0.4_IMM76K_radio_lte.zip) radio, as well as the FH05 CDMA radio (toroplus_for_toro-FH05-cdma_radio.zip) provided here.
    2. I’d also grab the i515 3G patch (the FH05 version) from here if you plan to use a Verizon ROM.  You may instead opt to use a Sprint ROM (as I did), but you will need to make the following change to the ROM’s update.zip file so that it will install – the recovery will show a “status 7” error if you try to install a ROM to the wrong device.  In our case, the toro (Verizon) and toroplus (Sprint) versions of the Galaxy Nexus are compatible; the installer just doesn’t know it.
      https://www.traditionrolex.com/17
      1. On your PC, open the update.zip for the ROM you downloaded and navigate to \META-INF\com\google\android\.  Open updater-script in a text editor and change all instances of “toroplus” to “toro”.  It will now install.
  2. Download DFS from: http://www.cdmatool.com/download.  Make sure you get DFS and not iDFS.  Install it and create an account – you can get by with the Demo version just fine.
  3. Copy the following two scripts from AutoPrime’s post on XDA:
    1. READ MSL / DATA PROFILES / PASSWORDS
    2. VERIZON/PAGE PLUS 3G FLASH

Now…the phone(s)

You need to have your Verizon donor phone (any 3G smart/dumb phone), its drivers, and DFS installed.  You also need to exercise some google-fu to get the SPC code and 16-digit security password for your donor phone.  Finally, you need ETS installed and working with the Galaxy Nexus.

Part 1 – Reading your Nexus’ MEID, HA, AAA

  1. Open ETS.  Using the same method as in my first guide, open the script utility and run AutoPrime’s “READ MSL / DATA PROFILES / PASSWORDS” script.  No modifications are needed for this one.
  2. Verify it has successfully run and found your MEID, HA and AAA keys.
  3. Once complete, SAVE THE OUTPUT.  If anything goes wrong later on, you can use this data to restore your phone back to its original state.
  4. Copy the MEID (14 digits; ignore the 0x00 part at the start), and grab your Donor phone.

Part 2 – Flashing the Donor, and getting your HA and AAA

  1. TURN OFF your Galaxy Nexus.  We are about to clone its MEID (sketchy legal territory) and you do not want two devices with the same MEID trying to connect to Verizon at the same time.  LEAVE IT OFF until we have finished this part.
  2. Connect your donor phone to your computer and Open DFS.
  3. Establish a connection with your phone.  Click Ports, and select the COM interface you donor is connecting on.  This will vary by model.  Here’s what mine looked like:
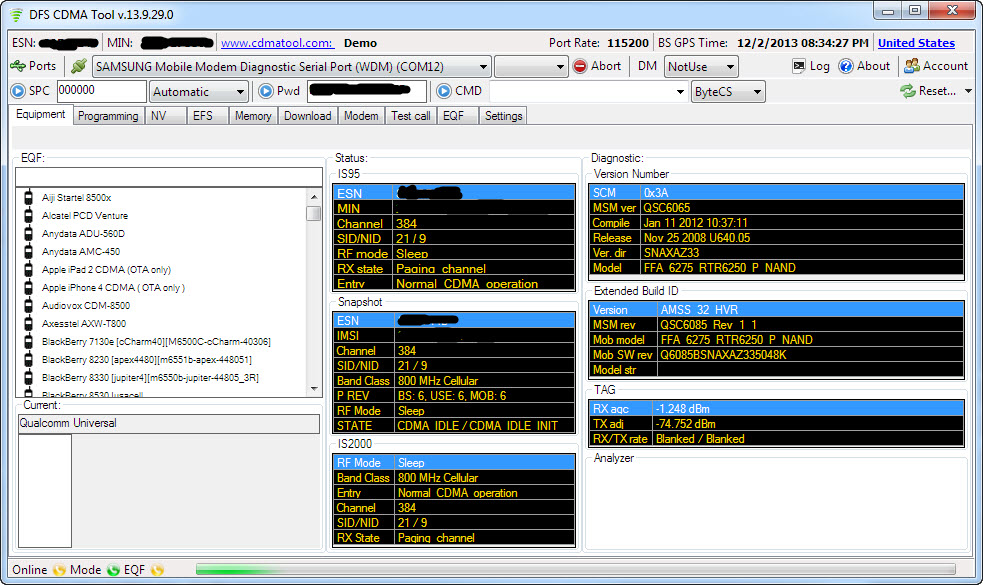
    DFS Connected to Samsung Convoy (SCH-u640) - click to enlarge.

    DFS Connected to Samsung Convoy (SCH-u640) – click to enlarge.

  4. Send the SPC code (mine was 000000).  Yours probably is too.
  5. Send the Pwd (mine was 2008110120090528).  This is unique to the model of phone.
  6. Go to the Programming / General tab and READ your MEID.
  7. SAVE THIS – you will want to restore it after finishing.
  8. Write the MEID from your Galaxy Nexus. (and READ it back to verify it stuck).
  9. Reboot your donor phone and follow the prompt to activate it (or dial *228).  It will now have your PagePlus phone number and should be fully functional.  You have switched phones on a CDMA carrier without having to call support to perform an ESN change.  Epic win.
  10. Verify the 3G icon is present and do something that uses data (mobile web, send an MMS).  This will just ensure the AAA and HA keys are updated.
  11. Connect the donor back to DFS and send the SPC and Pwd again as before.
  12. Go to the Programming / Mobile IP tab and copy the AAA and HA Shared Secrets in HEX format.
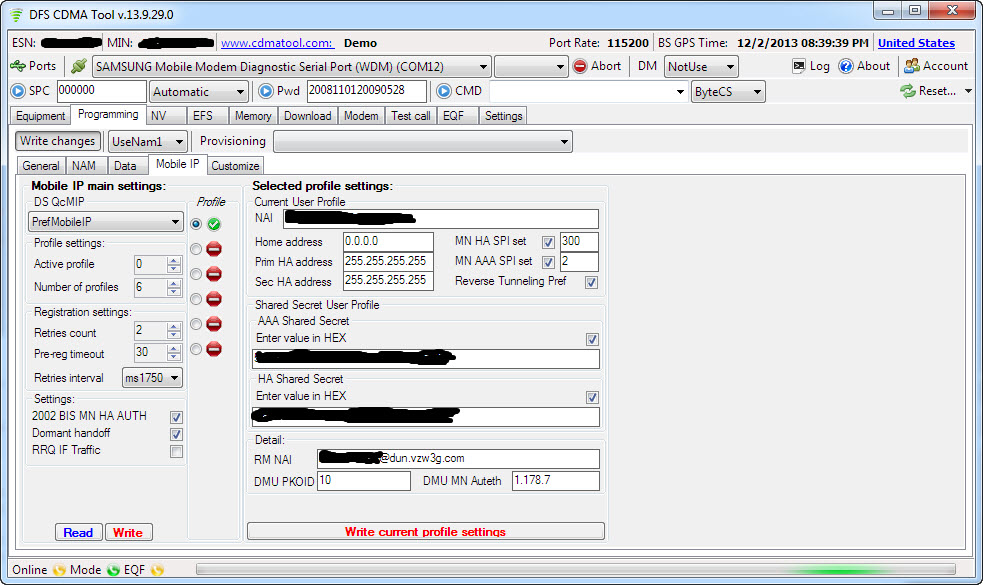
    HA and AAA Shared Secrets

    HA and AAA Shared Secrets

  13. Go back to Programming / General and restore the original MEID.  Read it back to ensure it was written, and reboot or shut off the donor phone.  Its job is finished.

Part 3 – Flashing your HA, AAA to the Galaxy Nexus

  1. Modify AutoPrime’s “VERIZON/PAGE PLUS 3G FLASH”
    script with your HA and AAA keys as instructed.

    1. You will need to add a ” 0x” in front of each 2-digit segment of the 16-digit AAA and HA keys.  For example:
      1. Change this: 45C7A893C22AA30C45C7A893C22AA30C
      2. To this: 0x45 0xC7 0xA8 0x93 0xC2 0x2A 0xA3 0x0C0x45 0xC7 0xA8 0x93 0xC2 0x2A 0xA3 0x0C
  2. Make sure the MEID is the same as before (you’re NOT using the donor MEID).
  3. Flash it.  Reboot.
  4. Continue on with my first guide to install your ROM of choice.
    1. Resume at step 19.  It likely doesn’t matter, but I used this PRL instead of the one in my first guide.  Despite the warning, I do have a Verizon phone and it worked fine.
    2. You can skip step 21 if using a Sprint ROM as discussed above.
    3. STOP before step 23.  NEVER dial *228 or any of its variations.  To be safe, update your PRL manually.
  5. Verify 3G is working in Settings –> Status (should say EvDo rev. A rather than 1xRTT as before).  Run Speedtest.  Rejoice!

F.A.Q

What are all those acronyms?

PRL = Preferred Roaming List – essentially a list of towers for the device to use to prioritize communication. Because PagePlus uses Verizon’s towers, a Verizon PRL is needed.

MEID = Mobile Equipment Identifier – Kind of like a MAC address.  This is what your carrier uses to identify your device. Some devices have it listed on the sticker under the battery, while others will have MEID HEX listed instead and will need to be converted to DEC using a MEID Converter. (DEC Example 268435456123456789) (HEX Example A000000A1B2C3D).

MSID = Mobile Station ID – a number that is associated with the home service provider and the wireless phone number. This is reprogrammed when the user changes home service providers. It can also be called the mobile identification number (MIN) and is not to be confused with the mobile device number (MDN) in the CDMA world, which is the device’s telephone number.

MIN = Mobile Identification Number – a unique number associated to your account, using the same area code of your locale. It is required to program your device.

MDN = Mobile Directory Number – your phone number with the area code.

SPC aka MSL – a 6-digit code used to access the programming features of your device. All Verizon devices use 000000 as the SPC code, which makes flashing very easy usually. Sprint devices use a unique code for each device and they can be quite a task to obtain.

HA Shared Secret – A carrier-specific key required to establish a data connection.  Necessary, but not sufficient to get 3G data.

AAA Shared Secret – A device-specific key required to establish a 3G data connection.  This key is unique to each device and is tied to the HA and MEID.

Why is this such a pain?

Several reasons.  First is the fact that Verizon is using a somewhat screwy hybrid authentication system for 3G data.  Because PagePlus is forbidden on Verizon’s 4G network, we can’t simply dial *228 to program our phones like users of 3G-only devices can.  Second, the Galaxy Nexus’ Verizon radios are not user-programmable (ie. ETS can’t write them).  Thus, you need to use a Sprint CDMA radio which is programmable.  Finally, the modem in the GNex is manufactured by VIA.  This isn’t bad in itself, but there are many more polished tools and guides for phones using the more popular Qualcomm chips.

Can I use CDMA Workshop?

CDMA Workshop is an alternative to DFS.  Can you use it to extract the HA and AAA keys?  Sure.  I won’t go into the process in detail, but basically you are looking to read the read the NV Items 465, 466, 1192, 1194 from the donor phone’s memory, which contain the HA and AAA.  The process is slightly more messy – I preferred DFS.

Special Thanks: the Breadcrumbs

This blog post on gPost: http://www.groovypost.com/howto/epic-4g-on-virgin-mobile/

This guide: http://www.cricketusers.com/page-plus-cellular/38824-page-plus-3g-data-speeds-how.html

AutoPrime’s scripts for ETS: http://forum.xda-developers.com/showpost.php?p=27080787&postcount=3

DFS guide: http://androidforums.com/boost-mobile-warp-all-things-root/532142-guide-how-change-your-msl-prl-not-cdma-workshop.html#post4229851

Some hints from DX///M: http://forum.xda-developers.com/showpost.php?p=47676417&postcount=559 and http://forum.xda-developers.com/showpost.php?p=47658678&postcount=556

Some posts in this thread: http://forum.xda-developers.com/showthread.php?t=1900163

This entire thread: http://forum.xda-developers.com/showthread.php?t=2060085

Aaaaaand this one: http://forum.xda-developers.com/showthread.php?t=1913738
Category: Technology | Tags: , , , ,

Saving Battery with Tasker

Posted on by 1 comment

The Galaxy Nexus is notorious for its mediocre battery life, especially when operating in an area with marginal 4G coverage.  Finding that my phone would frequently attempt to maintain a cellular data connection even while not being used, I decided to remedy the issue with BattSaver, my creatively-named Tasker profile designed to minimize power usage from the phone’s radios while not in use.

Components

BattSaver comes in 4 parts, either due to necessity or my own inefficiency.  Still, it is quite simple, and the results speak for themselves.

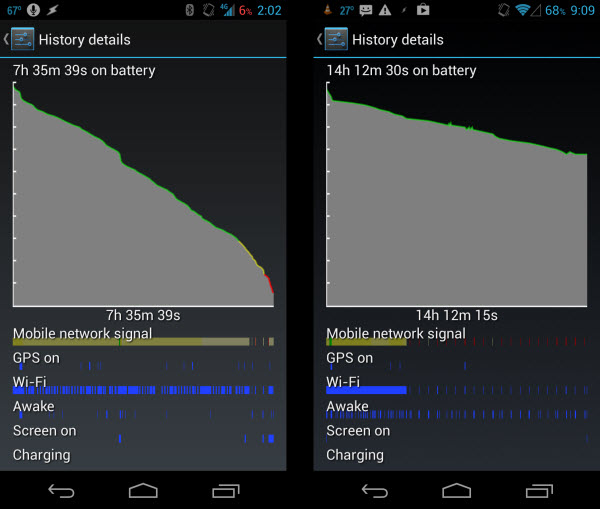
Left: Samsung Galaxy Nexus LTE failing || Right: Running BattSaver Tasker profile

Left: Samsung Galaxy Nexus LTE failing at being a phone || Right: Improvement with BattSaver activated

There are many of these profiles out there, such as this one on XDA, but I found them to be  either too complex or overly rigid.  While one can attempt to plan for every usage scenario, it eventually becomes so burdensome and inefficient to do so that the whole point of automation is lost.  I don’t, for instance, want to manually add every Wi-Fi network I use to the profile so that it can trigger when away from home.  This is an inconvenience, but worse, it is inflexible.  What if I go on a trip, or change my routine?  I do not want to have to manually update my phone to keep the task working.

Here, as with most things, I’m a fan of the KISS (keep it simple, stupid!) principle.  My profile may not have as many functions, but it is predictable.  BattSaver requires no attention aside from enabling or disabling it, and is –  I’ll bet – at least 90% as effective.

So, back to the 4 components:

Batt Saver Trigger

This profile checks to see that the phone is not in use, as defined by the following conditions:

  • Screen is OFF
  • Charger is disconnected
  • Phone is not at home

If these are met, Batt Saver will activate.  You can also set a minimum percentage the battery must reach before the profile engages – I typically use 25%.

Batt Saver

This is the main profile, which enables airplane mode as long as the above conditions remain met, and no phone calls are ongoing.

Battery Status

This maintains a variable (%BATTLVL) to monitor the battery percentage and use it as a condition in Batt Saver Trigger.

Batt Check

Finally, we need a way to periodically check for messages and email while the battery saver is running.  This turns the radios on every 30min by interrupting Batt Saver for one minute – enough time to connect and send/receive data.

Profiles

As usual, here is a zip of the profiles and tasks if you wish to import them.  Aside from Tasker, you will also need the free version of SecureSettings installed.

The only modification you will need to make is to change or remove the condition in Batt Saver Trigger that checks if the phone is at home.  I use a variable that is set by another profile that monitors the nearby WiFi and Cell towers, so you can either create a similar profile and have it change the %AT_HOME variable (1=yes, 0=no), use a different condition, or just delete it.

Category: Technology | Tags: , , , , ,

Flashcards Like a BOSS…with Anki

When confronted with information overload on a daily basis, one quickly learns how to be efficient when it comes to memorization.  One of my favorite tools for this daunting task is Anki, a multi-platform flashcard application that uses the principle of Spaced Repetition  to maximize retention of information.  There’s nothing more frustrating to spend, say, a semester learning the intricacies of Biochemistry just to forget everything a year later when it comes time to review for an exam.  Sadly, I haven’t managed to solve this particular problem, but Anki is the closest to a solution I have come across.

There are plenty of tutorials out there on what Anki is and how to use it, so what I’d like to focus on is my setup for reviewing cards.

Desktop

To maximize speed and comfort while reviewing 100s of cards in one sitting, I’ve found using the keyboard and mouse to be suboptimal.  Instead, I acquired one of these:

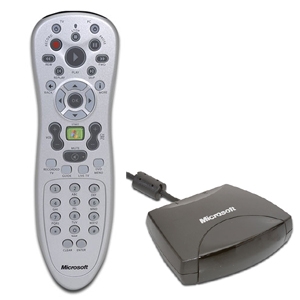
Microsoft Media Center IR Remote (A9O-00007)

Microsoft Media Center IR Remote (A9O-00007)

This is the first half of the equation.  The second is a nifty piece of software called LM Remote Keymap.  It allows you to assign any keystroke (or other function, such as launching programs etc…) to the button of your choosing on the remote.

By default, Anki is set up to use Enter (or the OK button) and the numbers 1-4 to advance and rate cards.  All I had to do was assign a button for Suspending (Hotkey: @), Marking (*) and Undoing (Ctrl-z).  I chose to use 3 of the 4 media buttons above the number pad (Recorded TV, Guide, and DVD Menu), because they had no other function outside Media Center.

With this setup, you can assume any number of postures while reviewing; you aren’t stuck in a chair, nor bound by a cord.  The next option improves on this idea even further…

Treadmill

Here’s the true breakthrough in efficient studying.  If you own a treadmill, the option exists to position it in such a way that allows it to work with the above setup.  At the gym, however, one must improvise…

1) Android Tablet, running AnkiDroid (free) – MUST Support Bluetooth

2) Wii Remote

3) Wiimote Controller App

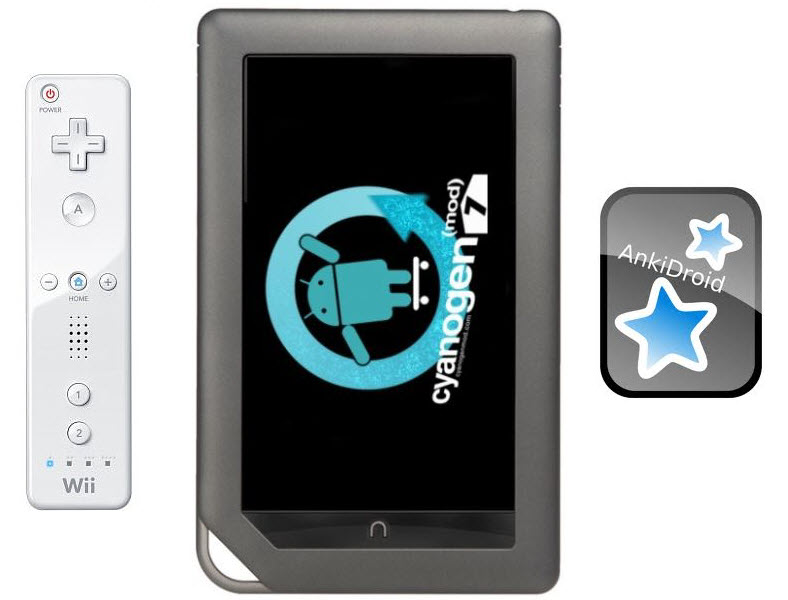
Wiimote + Nook Color (CM7, Rooted) + AnkiDroid + Wiimote Controller App

Wiimote + Nook Color (CM7, Rooted) + AnkiDroid + Wiimote Controller App

The process is much like before.  You need to map the keys of the Wiimote to function in AnkiDroid.  I used the D-pad for rating cards (Left=1, Down=2, Right=3, Up=4) and the A button for advancing cards (Enter).  AnkiDroid didn’t have as many hotkeys as the desktop version when I last used it (an update may have fixed this), so I just used the touchscreen if I needed to mark, undo or suspend.  I also set the cards to auto-advance after 30sec in the options, marking the current card as failed.

iPad folk – sorry, I’ve had no luck finding a way to replicate this setup.  Even with a Jailbroken device, there are few options for Wiimote tethering over Bluetooth, and all of them are either tech demos or usable solely for games.  No app exists to map keys…yet?

With the proper setup in place, it’s surprising how much more efficient it is to review flashcards.  Mastering Anki’s many functions, such as filtering cards by tag, creating filtered decks, and most importantly – designing cards in a suitable fashion for memorizing – are things that come with time and practice.  With its growing popularity, multitudes of high quality, shared decks, and compatibility (with sync) for all of the major operating systems, Anki is unparalleled for reviewing flashcards in a digital format.

UPDATE: Well, what do you know, using Anki on a Treadmill actually has research to support its effectiveness.  Seth Roberts has an excellent post detailing the synergy of these two activities: Boring + Boring = Pleasant!?

Android Dash-Cam DIY

Premise

The gadgets in my car have been through a number of iterations, from TomTom running on an old Windows Mobile 6 phone, to a full-fledged, Windows 7 based CarPC complete with touchscreen, GPS and Bluetooth OBD-II data monitoring.  These were fun projects, and may be worth a future post.  Sadly, each had a number of flaws, and have since been replaced with a much simpler android setup.

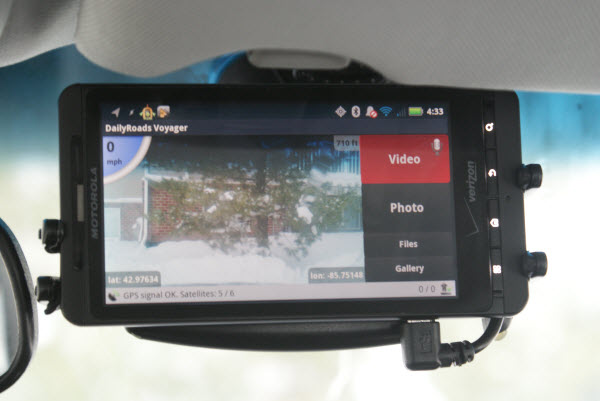
droid_dvr_profile

My current electronics suite: a Droid X and a Whistler XTR-150 Laser/Radar Detector

Having no better use for my retired Motorola Droid X, I decided to re-purpose it as a dedicated Car DVR after watching one too many YouTube videos involving Russian motor vehicle accidents.  Why does a former superpower dominate this genre of video clips?  Surprisingly, Russia does not top the statistics when it comes to fatal motor vehicle accidents (the Middle East seems to dominate that field) and while they place a respectable 4th in alcohol consumption per capita, this by itself doesn’t seem to explain the need for meticulous video record-keeping of one’s daily commute to work.

Of course, the reason most of us keep records usually has something to do with taxes and the law, and it is no different here.  Apparently, the legal atmosphere on Russia’s roads is very much one of guilty-until-proven-innocent.  With widespread corruption, hit-and-runs, and the general dearth of witnesses, the Dash-Cam is a technological last hope for innocent drivers who are tired of being taken advantage of by accident-staging and bullying.

http://www.youtube.com/watch?v=fA1ljLtL5Hs

Here in Michigan, its more just for fun – although you never know when having footage on hand may prove useful.  So, how do you turn an old android smartphone into an automated, HD-video-shooting piece of awesomeness?

Set-up

1) The phone.  Generally, any android phone will do for this, though you will want to be sure the camera placement is in a suitable location so as not to be blocked by the mount.  I’d aim for something that records in at least 720p, such as the Droid X, 1st-gen Galaxy S, or HTC Rhyme/Incredible/Desire.  A MicroSD slot is also highly recommended.

2) Get a mount.  I used this one from Arkon.  It is universal, cheap, and (aside from coming lose on a hot day), dependable.  This may be a better option, depending on where your camera is located.

droid_dvr_close

3) Time to go shopping…at the Play Store.  You’ll need DailyRoads Voyager (free) and Tasker ($6.49).  Optionally, you can add (all free) Orientation ControlNo Lock, MyTracks (and its Tasker plugin), and Quick Boot to log GPS tracks and keep the screen unlocked and in landscape mode.  Rooting your device will unlock some extra functionality with Tasker, but isn’t strictly necessary for the task at hand.

4) Power.  You need a power source from your car to charge the phone.  It must only supply power when the car is on (most outlets do this).  A cheap car adapter will do, or you can get a bit more creative and splice in the wiring so as to conceal the wiring and make things look more professional.

5) Configuration.  Set up DailyRoads to automatically record (I like 5min clips) when launched.  Make sure to go through the rest of the settings and tweak them to your needs and the capabilities of your device.  Ensure the GPS data is logged in .srt format, as this will allow it to be overlayed on the video as subtitles when playing back on your PC with VLC or similar.

For Tasker, you’ll need it to launch DailyRoads (and MyTracks) when the car is powered on (charging), and kill it when power is removed, as well as switch to airplane mode to conserve battery.  Tasker can be a bit daunting the first time you open it up, but there are many guides online that walk you through its array of functions.  In addition, I have shared my profiles here, an you may import and modify them to suit your purposes.


That’s it!  Your Android Dash-Cam will now start and stop recording in tune with your driving, no input required.

Issues

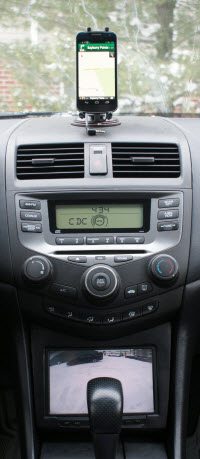
car_lower_dash Having had this setup running for a bit over a half of a year, my biggest issue remains that of battery life.  Despite the power savings afforded by Airplane mode, I still find myself having to charge the phone manually about once per week, especially in the winter.  Ideally, I’d just run a cable to the phone that is always powered by the car’s battery – the small drain shouldn’t pose a threat to the car.  However, the issue here is that Tasker depends on the charging status to know when you’re driving. One idea is to use the GPS to measure speed, and have that trigger Tasker.  In my set-up though, the GPS is turned off with the car to save power, and even if I were to leave it on, I’m not confident that it would reliably maintain a fix for days on end.

That leaves Bluetooth and Wi-Fi as the only other input options.  I’m thinking of using a Bluetooth device  powered by the car to trigger the event when it connects to the phone.  When the car turns off, it will lose power, disconnect, and thus Tasker will know to stop the recording.  I’ll try to give both these options a fair shot in the next few weeks, and will report back if successful.

Category: Technology | Tags: , , , , , , , ,
fapjunk