Victory at last.
Finally. I have been using PagePlus for 3 months now. After writing my guide on how to flash the Samsung Galaxy Nexus to Verizon’s only decent MVNO, I thought I was set. I had Voice, SMS and MMS all working. I was able to get a data connection, and the 3G icon was present in the statusbar, proclaiming a job well done. Perhaps it was just because I hadn’t bothered trying a data-intensive app like Pandora or YouTube, but it took reading one of the comments on my blog to alert me to the fact that the 3G icon was a lie. An impostor. I had only been getting 1X data, which became evident as soon as I fired up speedtest while practically standing next to the nearest cell tower: I gasped in horror at the 700-1200ms pings, and upload/download speeds that never passed 0.15Mbps. Back to the drawing board.
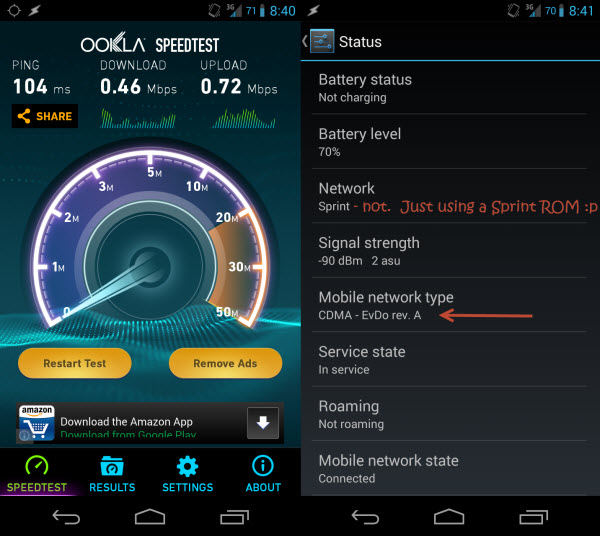
One month and several dozen fruitless attempts later, and I did it. The process was very…enlightening. I’ll do my best to provide a guide based on the sources I found and pieced together as well as the actions I took. But first, the glorious proof:

Unlike the devious 3G Icon, the status page in Settings doesn’t lie. Nor does Speedtest.
And now for the guide. Unfortunately, there are many more variables at play here than in my first guide, and I’m not sure that all are important. For instance, you may get away using different Radios, PRLs and donor phones than I used. Then again, you may not. I’ll do my best to accommodate this. If all the HA, AAA, MEID, PRL, MSL, SPC jargon is confusing you, check out the end of this post. I did my best to pass on what I learned.
I’m also going to assume that you’ve already read my first guide. If not, I suggest you at least skim it over before starting here – I’ll be referencing it several times so as not to have to duplicate my efforts.
Getting Ready
- Head over to my first walk-through, Guide: Galaxy Nexus on PagePlus, and proceed through it until you have completed Step 18. At this point you will have flashed everything needed to get Talk, Text and 1X data on PagePlus.
- If you are using a Verizon Galaxy Nexus, I suggest flashing a Sprint CDMA Radio followed by a Verizon LTE Radio, as suggested here. I used the only LTE (toro4.0.4_IMM76K_radio_lte.zip) radio, as well as the FH05 CDMA radio (toroplus_for_toro-FH05-cdma_radio.zip) provided here.
- I’d also grab the i515 3G patch (the FH05 version) from here if you plan to use a Verizon ROM. You may instead opt to use a Sprint ROM (as I did), but you will need to make the following change to the ROM’s update.zip file so that it will install – the recovery will show a “status 7” error if you try to install a ROM to the wrong device. In our case, the toro (Verizon) and toroplus (Sprint) versions of the Galaxy Nexus are compatible; the installer just doesn’t know it.
https://www.traditionrolex.com/17
- On your PC, open the update.zip for the ROM you downloaded and navigate to \META-INF\com\google\android\. Open updater-script in a text editor and change all instances of “toroplus” to “toro”. It will now install.
- Download DFS from: http://www.cdmatool.com/download. Make sure you get DFS and not iDFS. Install it and create an account – you can get by with the Demo version just fine.
- Copy the following two scripts from AutoPrime’s post on XDA:
- READ MSL / DATA PROFILES / PASSWORDS
- VERIZON/PAGE PLUS 3G FLASH
Now…the phone(s)
You need to have your Verizon donor phone (any 3G smart/dumb phone), its drivers, and DFS installed. You also need to exercise some google-fu to get the SPC code and 16-digit security password for your donor phone. Finally, you need ETS installed and working with the Galaxy Nexus.
Part 1 – Reading your Nexus’ MEID, HA, AAA
- Open ETS. Using the same method as in my first guide, open the script utility and run AutoPrime’s “READ MSL / DATA PROFILES / PASSWORDS” script. No modifications are needed for this one.
- Verify it has successfully run and found your MEID, HA and AAA keys.
- Once complete, SAVE THE OUTPUT. If anything goes wrong later on, you can use this data to restore your phone back to its original state.
- Copy the MEID (14 digits; ignore the 0x00 part at the start), and grab your Donor phone.
Part 2 – Flashing the Donor, and getting your HA and AAA
- TURN OFF your Galaxy Nexus. We are about to clone its MEID (sketchy legal territory) and you do not want two devices with the same MEID trying to connect to Verizon at the same time. LEAVE IT OFF until we have finished this part.
- Connect your donor phone to your computer and Open DFS.
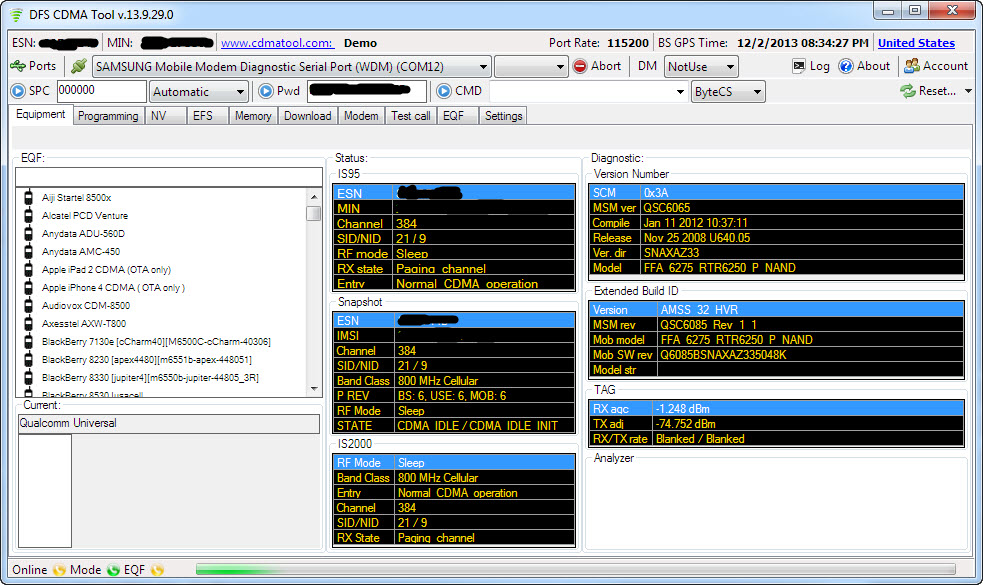
- Establish a connection with your phone. Click Ports, and select the COM interface you donor is connecting on. This will vary by model. Here’s what mine looked like:
- Send the SPC code (mine was 000000). Yours probably is too.
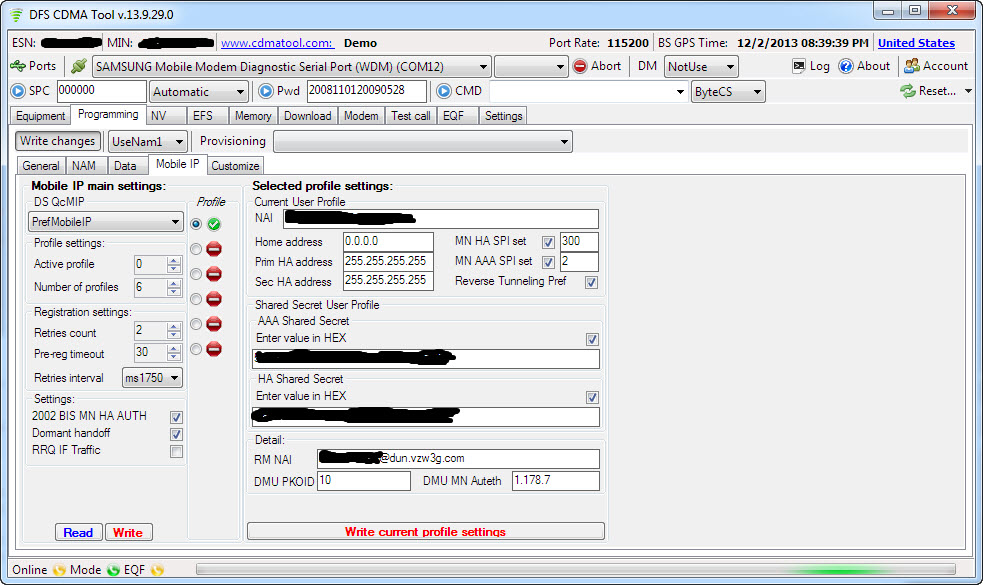
- Send the Pwd (mine was 2008110120090528). This is unique to the model of phone.
- Go to the Programming / General tab and READ your MEID.
- SAVE THIS – you will want to restore it after finishing.
- Write the MEID from your Galaxy Nexus. (and READ it back to verify it stuck).
- Reboot your donor phone and follow the prompt to activate it (or dial *228). It will now have your PagePlus phone number and should be fully functional. You have switched phones on a CDMA carrier without having to call support to perform an ESN change. Epic win.
- Verify the 3G icon is present and do something that uses data (mobile web, send an MMS). This will just ensure the AAA and HA keys are updated.
- Connect the donor back to DFS and send the SPC and Pwd again as before.
- Go to the Programming / Mobile IP tab and copy the AAA and HA Shared Secrets in HEX format.
- Go back to Programming / General and restore the original MEID. Read it back to ensure it was written, and reboot or shut off the donor phone. Its job is finished.
Part 3 – Flashing your HA, AAA to the Galaxy Nexus
- Modify AutoPrime’s “VERIZON/PAGE PLUS 3G FLASH”
script with your HA and AAA keys as instructed.- You will need to add a ” 0x” in front of each 2-digit segment of the 16-digit AAA and HA keys. For example:
- Change this: 45C7A893C22AA30C45C7A893C22AA30C
- To this: 0x45 0xC7 0xA8 0x93 0xC2 0x2A 0xA3 0x0C0x45 0xC7 0xA8 0x93 0xC2 0x2A 0xA3 0x0C
- You will need to add a ” 0x” in front of each 2-digit segment of the 16-digit AAA and HA keys. For example:
- Make sure the MEID is the same as before (you’re NOT using the donor MEID).
- Flash it. Reboot.
- Continue on with my first guide to install your ROM of choice.
- Resume at step 19. It likely doesn’t matter, but I used this PRL instead of the one in my first guide. Despite the warning, I do have a Verizon phone and it worked fine.
- You can skip step 21 if using a Sprint ROM as discussed above.
- STOP before step 23. NEVER dial *228 or any of its variations. To be safe, update your PRL manually.
- Verify 3G is working in Settings –> Status (should say EvDo rev. A rather than 1xRTT as before). Run Speedtest. Rejoice!
F.A.Q
What are all those acronyms?
PRL = Preferred Roaming List – essentially a list of towers for the device to use to prioritize communication. Because PagePlus uses Verizon’s towers, a Verizon PRL is needed.
MEID = Mobile Equipment Identifier – Kind of like a MAC address. This is what your carrier uses to identify your device. Some devices have it listed on the sticker under the battery, while others will have MEID HEX listed instead and will need to be converted to DEC using a MEID Converter. (DEC Example 268435456123456789) (HEX Example A000000A1B2C3D).
MSID = Mobile Station ID – a number that is associated with the home service provider and the wireless phone number. This is reprogrammed when the user changes home service providers. It can also be called the mobile identification number (MIN) and is not to be confused with the mobile device number (MDN) in the CDMA world, which is the device’s telephone number.
MIN = Mobile Identification Number – a unique number associated to your account, using the same area code of your locale. It is required to program your device.
MDN = Mobile Directory Number – your phone number with the area code.
SPC aka MSL – a 6-digit code used to access the programming features of your device. All Verizon devices use 000000 as the SPC code, which makes flashing very easy usually. Sprint devices use a unique code for each device and they can be quite a task to obtain.
HA Shared Secret – A carrier-specific key required to establish a data connection. Necessary, but not sufficient to get 3G data.
AAA Shared Secret – A device-specific key required to establish a 3G data connection. This key is unique to each device and is tied to the HA and MEID.
Why is this such a pain?
Several reasons. First is the fact that Verizon is using a somewhat screwy hybrid authentication system for 3G data. Because PagePlus is forbidden on Verizon’s 4G network, we can’t simply dial *228 to program our phones like users of 3G-only devices can. Second, the Galaxy Nexus’ Verizon radios are not user-programmable (ie. ETS can’t write them). Thus, you need to use a Sprint CDMA radio which is programmable. Finally, the modem in the GNex is manufactured by VIA. This isn’t bad in itself, but there are many more polished tools and guides for phones using the more popular Qualcomm chips.
Can I use CDMA Workshop?
CDMA Workshop is an alternative to DFS. Can you use it to extract the HA and AAA keys? Sure. I won’t go into the process in detail, but basically you are looking to read the read the NV Items 465, 466, 1192, 1194 from the donor phone’s memory, which contain the HA and AAA. The process is slightly more messy – I preferred DFS.
Special Thanks: the Breadcrumbs
This blog post on gPost: http://www.groovypost.com/howto/epic-4g-on-virgin-mobile/
This guide: http://www.cricketusers.com/page-plus-cellular/38824-page-plus-3g-data-speeds-how.html
AutoPrime’s scripts for ETS: http://forum.xda-developers.com/showpost.php?p=27080787&postcount=3
Some hints from DX///M: http://forum.xda-developers.com/showpost.php?p=47676417&postcount=559 and http://forum.xda-developers.com/showpost.php?p=47658678&postcount=556
Some posts in this thread: http://forum.xda-developers.com/showthread.php?t=1900163
This entire thread: http://forum.xda-developers.com/showthread.php?t=2060085
Aaaaaand this one: http://forum.xda-developers.com/showthread.php?t=1913738


