Monthly Archives: August 2013

Guide: Galaxy Nexus on PagePlus

It was painful trying to find a simple, step-by-step walkthrough of how to flash a Verizon Samsung Galaxy Nexus LTE to PagePlus.  I was sick of the $60 wireless bill – unlimited data couldn’t even justify it anymore – and $27/mo for essentially the same coverage, more minutes and texts than any sane person needs (1200 and 3000, respectively), and 500MB on 3G was an easy pill to swallow.  Getting $400 for my unlimited data plan on eBay didn’t hurt, either.

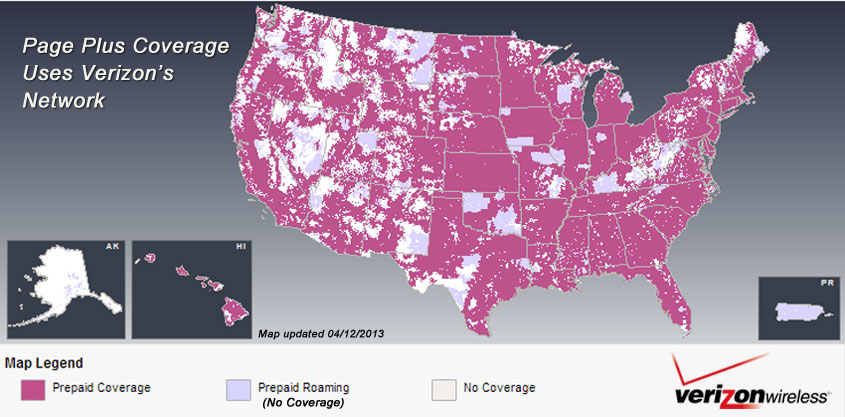
Verizon's coverage with T-Mobile's pricing.  You can't lose.

Verizon’s coverage with T-Mobile’s pricing. You can’t lose.

The biggest hurdle lay in the fact that 4G phones such as the nexus aren’t officially supported.  A bit of work under the hood is required, so to speak, and the mechanics don’t come cheap.  Before I began the perilous task, I decided I’d document it and save the world a few hundred wasted hours of searching, reading and screwing up.  Here it is:

Prepare your PagePlus Account

  1. Register your phone with PagePlus.  I chose to go through Kitty Wireless, an authorized dealer, as they will take care of monthly billing with the 1200 Plan.  I’m also a member of the Level 2 “Crazy Kitty PIN Rebate Club ” which gives a discounted rate on plans – $26.97/mo vs $29.99/mo – it adds up over time, especially with multiple lines.  This club is only offered at select times during the year, and costs a one-time fee of $100 to join.
  2. Make sure to supply the MEID correctly when your register your device – you need to remove the last digit (because it is 4G capable) for the order to go through.  For example,mine was 990000xxxxxx223.  I supplied 990000xxxxxx22.  Should end up being 14 digits instead of 15.
  3. Wait for the order confirmation email.  You’ll need the following: Phone # (MDN) MIN (MSID), and SID.  For the SID, you need to call PagePlus at 800-550-2436.  Expect to wait a while.
  4. Make sure you have a Verizon 4G LTE SIM card.  If you want to be sure you won’t have trouble, get a new one.  Leave it out for now.  It makes things easier.

UPDATE: This guide (and all others) should get you at least 1X data on your Galaxy Nexus.  It is unlikely, if not impossible, that you will have 3G without the use of a donor phone.  I certainly did not.  If you wish to have 3G data, than there is an extra step:

5.  Acquire a donor phone.  This can be any Verizon dumbphone (that supports 3G) or any 3G ONLY smartphone.  You may already have one in a drawer somewhere.  If not, do a quick google search to make sure the one you are buying is compatible with DFS or CDMA Workshop.  I used a Samsung Convoy (SCH-u640).

Please read my guide for the donor process before continuing below.  You can always do this later, but you may have to repeat some of the below steps again.

Prepare your Computer

  1. Download this file (404MB).  It contains everything necessary for the process.
  2. Install the 32-bit or 64-bit Samsung USB drivers
  3. Install ETS
  4. Install Galaxy Nexus Toolkit (optional if you already have your phone rooted, bootloader is unlocked, and you have ClockworkMod recovery or similar installed)

Now…the Phone

Your nexus needs to have an unlocked bootloader.  I’ll cover that first, so if you’ve been using custom ROMs up to this point, you can skip to part 2.

Part 1 – Unlock the Bootloader

  1. Enable USB Debugging.  Settings –> About Phone –> Tap “Build Number” 7 times to enable the development menu.  Then go to it (Settings –> Development) and make sure Enable USB Debugging is checked.
  2. Turn off the phone.
  3. Enter FastBoot: While off, hold both volume buttons and the power button.
  4. Plug phone into computer and start Galaxy Nexus Toolkit.
  5. Select your phone (ie. option 36 for Android 4.2.2) then option 8 (1 CLICK FOR ALL). Use the recommended options and proceed through the prompts to unlock the bootloader (press VOL DOWN then POWER to unlock bootloader when asked).
  6. Proceed to install the ClockworkMod or TWRP recovery (your preference).
  7. The phone is now unlocked and rooted.

Part 2 – Flash to PagePlus

  1. Make sure the SIM card is removed.
  2. Copy the folder of necessary files you downloaded earlier onto your phone.
  3. Enter the bootloader (Power off, then Power + Volume Up button).
  4. Back up Everything.
  5. Wipe Data, System, Cache, and Dalvik-cache
  6. Install EOS rom, Gapps, toroplus-for-toro-FC12 radio
  7. WipeDalvik-cache and reboot.  Skip through all of the google registration / activation stuff.
  8. Unplug the phone from the computer, if it’s not already.
  9. Once loaded into the Android OS, do a full reset of all of your previous attempted programming, if any.  Dial *#*#786#*#* and set MSL to 000000, then choose reset.  Phone will reboot.
  10. Open the CDMA Tools app, swipe to the right and enable “USB Diagnostic Mode”
  11. Open the dialer, and type *#*#3282#*#*
  12. Edit –> Set MSL to 000000
  13. Others/More –> ETS Channel –> USB –> Ok
  14. Put the phone in Airplane Mode.  Plug it in to the computer.  Several VIA drivers should install (USB Hub, Modem, ETS).  If they don’t, try toggling USB Diagnostic Mode in CDMA tools.
  15. Start ETS Tools on your computer (Run as Administrator), and plug in the phone.  Look for the status to show it has connected, and that there are no errors:
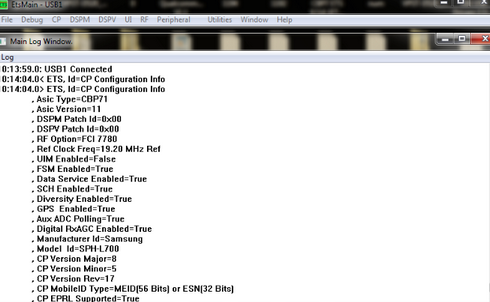
    ETS Tools properly connected to the Galaxy Nexus

    ETS Tools properly connected to the Galaxy Nexus

  16. Go to Utilities –> Script Utility
  17. Open the script.txt from the files you downloaded.  Follow the instructions in the comments, replacing the first two items with the MDN (phone number), the next 3 with your MIN (MSID), and the remainder with your MDN.  The last replacement is the SID, which you had to call PagePlus to get.
  18. Copy the contents of the text file into the ETS script window, and hit Run.  Make sure no errors were reported.  If you get something like Code 1=HLP_ERR_ACTIVE_PARM_PROFILE_ID, Code 2=0x00000002, it may mean the drivers didn’t install correctly.  Also, try running as Administrator.
  19. Back in the CDMA Tools app, swype all the way to the right.  Change the directory from /data/media/ to /sdcard/ and flash the 52896 prl.
  20. Reboot to recovery.  Once again, wipe Data, System, Cache, and Dalvik-cache.  Flash your ROM of choice (Paranoid Android included in the files you downloaded), and install Gapps
  21. Last, install the i515 3g patch
  22. Power off, Install your SIM card (finally), Power on.
  23. Activate (*611) with PagePlus.  Then, dial *228, option 2 to update your PRL with Verizon.  Reboot.  Everything should be working: Voice, 3G Data, SMS, MMS.

Troubleshooting

INTF2 driver not installing – Install it manually via device manager – browse to C:\Program Files\SAMSUNG\USB Drivers\19_VIA_driver\amd64\VIA_USB_ETS and try the VIA ETS.

Driver for “Android 1.0” not found – choose Samsung Android Phone from the list.

Call PagePlus at (800) 550-2436 and verify your ESN / IMEI is correct and in their system.  I had mistyped a digit in mine, which is why this troubleshooting section exists and is is so long :/

3G not working?  Try this:

  1. Dial *#*#4636#*#*
  2. Select Phone Information
  3. Scroll down and change network type to CDMA auto prl
  4. Wait for few seconds…
  5. Reboot…
  6. Voila 3G will start

If all else fails…Nuke it from orbit.  Open up Galaxy Nexus Toolkit and do a full wipe and reflash to stock android (option 9).  It’ll undo all of the VZW programming (leave the sim out until you finish programming or it’ll try to reactivate your VZW sim information) and allow you a clean slate to start on.  Careful – this wipes EVERYTHING, including files on the “SD Card” partition.

Acknowledgments

As it turns out, dragonhart6505 has a great walkthrough detailing the process, but it is buried in pages of fluff over at XDA.  He was also generous enough to record a how-to on Youtube.  I borrowed heavily from his guide to write this, but still found some areas that required a bit of trial and error.  My goal was to have a clear guide I could come back to in the future if I had to do this again.

9c8337_25ef62e2e2f27eacb62ce16a1b0ee639 (1)

Interestingly enough, I actually went through this process back in the good old days with a Windows Mobile 6.5 HTC Touch Pro, switching it from Sprint to Verizon to take advantage of the lower price and better (non-crippled) specs of the Sprint version of the phone.  The process was just as convoluted as this one, and I somehow doubt the information even exists on how to do it again.  I certainly don’t remember, and didn’t have the foresight to document the process.  Fool me once…

Category: Technology | Tags: , , ,

Review: SD_Card_DVR

I was looking for a low cost Digital Video Recorder to save footage in real-time from the FPV camera on my Bixler 2.  I wanted decent video quality at 480p and a device that didn’t display a blue screen during signal loss, which often occurs when pushing range with wireless video.  Two commonly mentioned DVRs specifically for FPV include the FJ-DVR-SD4 from FPV Japan and the SD DVR from Hobbyking, costing $154.95 and $48.49, respectively.  The FPV Japan unit includes a screen to preview footage, but even still, both devices seem overpriced for the low-tech function they provide.  Recording input from a composite video source is very much 20th century.

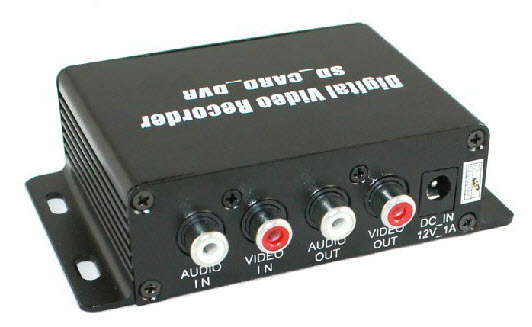
Inputs: Audio and Video in and out; 12V power

Inputs: Audio and Video in and out; 12V power

Enter the SD_Card_DVR, a no-brand device made in china and sold at various outlets under different names, including Dx.com (Mini Digital DVR Video Recorder w/ SD Slot), Amazon (Mini Sd Card Motion Detection Digital Video Recorder) and eBay (1 CH Mini CCTV Camera Audio/Video SD Card DVR).  There is also a blue-cased unit that likely runs the same firmware but uses combined A/V jacks instead of composite and a MicroSD slot instead of a full size.  Price for either is a more palatable $30-40.  Unfortunately, there were no reviews of this particular DVR to be found, so I decided to roll the dice and report my findings.

OSD

A simple on-screen display offers options to toggle between English and Chinese (default is Chinese; it’s the top menu item), NTSC or PAL recording, Recording mode (continuous, motion detection or mixed), and resolution (VGA or QVGA).  Menus are brought up with the function button, navigated with the rocker switch, and selected by pressing the rocker switch in – this took some trial and error to figure out – naturally, the supplied chinglish manual was of no help.

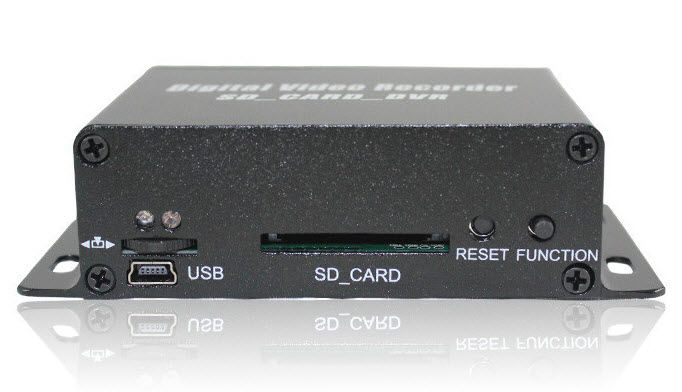
Controls and SD card slot

Controls and SD card slot

Once recording starts, the time is displayed for a few seconds, then there is an audible toggle and the video returns to pass-through mode, sending the signal straight through to the outputs without any change in quality.  Recording is still occurring when this happens, but in the “background” – this also took some figuring out.  The advantage of this is that there is no input lag – a must for FPV flying.

In my testing, I did notice that this DVR is rather sensitive to input voltage.  Specifically, if the voltage gets much below 12V (below about 11.5V, or 30% capacity), it will cease recording – and will even stop passing through video to the outputs.  If powering this with a battery, I’d use a high capacity 3S lipo and try to keep it above 50% capacity, or use a 4S lipo with a 12v step down board.

In continuous recording mode, the DVR will break up the recordings into 30 minute sections.  Once the SD card fills up, it will automatically erase the oldest file and replace it with the current recording – not really needed for my current task, but absolutely mandatory for video surveillance purposes.

Recording

There are two recording settings:VGA or QVGA, both encoded in MJPG.  These settings can be further refined, but you must do so by placing a properly-formatted “system.txt” file on the SD card.  That file should contain only 7 characters, for example: F15V0S9, where F = Framerate (0-30; default 15), V = video system (default 0 for PAL .. change to 1 for NTSC), and  S = sensitivity (0-9; default 9).  On the next boot, the new settings will be loaded and you can then delete the file.

Interestingly, the default 480p settings had the framerate set at 15fps.  Long story short, it is best to keep it there.  While you can increase it up to 30, the bitrate remains the same, resulting in a lower quality recording from attempting to encode twice the data without an increase in file size.  I found no way to adjust the bitrate, other than switching between VGA and QVGA.  Below is the file info for the 3 settings I tested (click to expand):

VGA: 640x480 (30fps)

Type: AVI
Video: MJPG 640×480 30fps [Stream 00] Audio: PCM 8000Hz mono 128kbps [Stream 01]

General
File name : 2013-07-04 00-36-46-C.AVI
Format : AVI
File size : 446 MiB
Duration : 14mn 11s
Overall bit rate : 4388 Kbps
Writing application : ankarec

Video
ID : 0
Format : JPEG
Codec ID : MJPG
Duration : 14mn 11s
Bit rate : 4254 Kbps
Width : 640 pixels
Height : 480 pixels
Display aspect ratio : 4:3
Frame rate : 30.000 fps
Color space : YUV
Chroma subsampling : 4:2:0
Bit depth : 8 bits
Compression mode : Lossy
Bits/(Pixel*Frame) : 0.462
Stream size : 432 MiB (97%)

Audio
ID : 1
Format : PCM
Format settings, Endianness : Little
Format settings, Sign : Signed
Codec ID : 1
Duration : 14mn 11s
Bit rate mode : Constant
Bit rate : 128 Kbps
Channel(s) : 1 channel
Sampling rate : 8 000 Hz
Bit depth : 16 bits
Stream size : 13.0 MiB (3%)
Interleave, duration : 500 ms (15.01 video frames)

VGA: 640x480 (15fps)

Type: AVI
Video: MJPG 640×480 15fps [Stream 00] Audio: PCM 8000Hz mono 128kbps [Stream 01]

General
File name : 2013-07-03 22-47-26-C.AVI
Format : AVI
File size : 492 MiB
Duration : 16mn 36s
Overall bit rate : 4144 Kbps
Writing application : ankarec

Video
ID : 0
Format : JPEG
Codec ID : MJPG
Bit rate : 4013 Kbps
Width : 640 pixels
Height : 480 pixels
Display aspect ratio : 4:3
Frame rate : 15.000 fps
Color space : YUV
Chroma subsampling : 4:2:0
Bit depth : 8 bits
Compression mode : Lossy
Bits/(Pixel*Frame) : 0.871
Stream size : 477 MiB (97%)

Audio
ID : 1
Format : PCM
Format settings, Endianness : Little
Format settings, Sign : Signed
Codec ID : 1
Duration : 16mn 36s
Bit rate mode : Constant
Bit rate : 128 Kbps
Channel(s) : 1 channel
Sampling rate : 8 000 Hz
Bit depth : 16 bits
Stream size : 15.2 MiB (3%)
Interleave, duration : 500 ms (7.50 video frames)

320x240 (15fps)

Type: AVI
Video: MJPG 320×240 15fps [Stream 00] Audio: PCM 8000Hz mono 128kbps [Stream 01]

General
File name : 2013-07-03 23-25-20-Q-C.AVI
Format : AVI
File size : 163 MiB
Duration : 11mn 0s
Overall bit rate : 2071 Kbps
Writing application : ankarec

Video
ID : 0
Format : JPEG
Codec ID : MJPG
Duration : 11mn 0s
Bit rate : 1940 Kbps
Width : 320 pixels
Height : 240 pixels
Display aspect ratio : 4:3
Frame rate : 15.000 fps
Color space : YUV
Chroma subsampling : 4:2:0
Bit depth : 8 bits
Compression mode : Lossy
Bits/(Pixel*Frame) : 1.684
Stream size : 153 MiB (94%)

Audio
ID : 1
Format : PCM
Format settings, Endianness : Little
Format settings, Sign : Signed
Codec ID : 1
Duration : 11mn 0s
Bit rate mode : Constant
Bit rate : 128 Kbps
Channel(s) : 1 channel
Sampling rate : 8 000 Hz
Bit depth : 16 bits
Stream size : 10.1 MiB (6%)
Interleave, duration : 500 ms (7.50 video frames)

I uploaded a short recording to Youtube to exemplify the degraded quality when going from 15 to 30 fps:

Other features

Recording starts as soon as power is supplied to the device, and ends when it is disconnected.  There seems to be a capacitor inside that allows for a safe shutdown after power is removed and thereby avoiding file corruption.  The SD_Card_DVR handled both a generic-brand 8GB microSD card inside an adapter as well as a PNY 16GB SD card, both  formatted to FAT 32.

As I mentioned at the start, there is a blue version of this DVR that appears to be identical in all but the input connectors and microSD slot.  Unlike my unit, some enterprising merchant actually bothered to make a demo video for the blue one:

http://youtu.be/VPN42m3xtmo

Conclusion

The SD_Card_DVR proved itself a worthy addition to my FPV gear, and has faithfully been recording flights ever since:

I’m satisfied with the features and quality (at 15fps) of this DVR.  It certainly works well enough to help me trace down my plane if it should crash out of view.  For $30, I don’t think it can be beat, and the continuous loop recording is a great feature that is often annoyingly absent on similar cheap DVRs.  For $10-20 more, however, I think the HobbyKing DVR might be a better bet if quality is a priority – I’d imagine its performance at 30fps is superior, and it has a remote.

Bixler 2 FPV Mods

The HobbyKing Bixler 2 is a EPO foam plane designed for both those new to RC aircraft, as well as more experienced pilots looking for a stable platform for First Person View flying.  The pusher-prop design allows the FPV and/or secondary flight camera to be positioned at the front of the airframe with an unobstructed forward view.  Not having to film through a spinning prop saves the footage from being ruined by the rolling-shutter distortion which classically affects the CMOS sensors used in most small cameras.

Because of its broad target audience, the Bixler 2 requires substantial modification to be used as a dedicated FPV platform.  The increases in gross weight due to larger batteries, cameras and electronics add a substantial amount of stress to the entire airframe, and particularly the wing loading. This stress is further exacerbated by the more powerful electric motor and longer propeller that are often needed to maintain acceptable performance with the increased weight and drag.

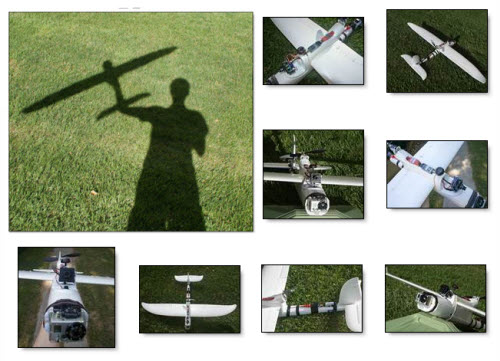
Click for the gallery

Click for the gallery

Modifications

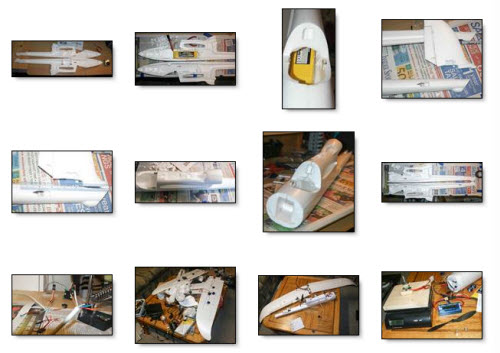
I referenced a number of forums and build logs when deciding how best to assemble and modify my Bixler 2 kit.  Among these were RCGroups and FPV Labs, each containing almost too much information on different people’s experiences with the Bixler and its various iterations.  My greatest inspiration came from a fellow blogger at bixler2fpv, whose overall design I chose to emulate.  Along the way, I did my best to capture pictures of the plane’s construction:

Click for the gallery

Click for the gallery

Below, I have summarized a list of the mods I made to my Bixler 2:

  • Permanently glued the wings on, allowing for removal of the bolts and tubes that spanned the fuselage and wasted space.
  • Reinforced wing spar to handle extra weight – guled 2 additional carbon fiber rods (4mm hollow and 2mm solid) inside the stock 6mm hollow rod with gorilla glue.
  • Relocated Elevator and Rudder servos to the rear – both to free up space in the main cargo area, as well as to shift more weight to the back and reduce the travel needed for the control linkages.
  • Also relocated the RC receiver to the rear, for weight & balance reasons as well as to distance it from possible interference by the VTX.
  • Moved the ESC and VTX outside the cargo bay and onto the top of the plane for better thermal management.
  • Replaced the stock motor mount with the SmallParts CNC mount, allowing for 9×6″ propellers vs the stock 6×4″ size prop.  Result: better cruise time.
  • Removed the nose to mount the GoPro via a wooden mount screwed and bolted into the front bulkhead.  GoPro attaches with velcro, and can be swapped out for the nosecone if desired (also velcroed).  A sock around the mount prevents dirt from getting into the velcro.  Foam between the wood mount and fuselage reduces vibration.
  • Hollowed out the fuselage by removing all obstructions between the canopy and tail, allowing for a single 3S 5000mAh lipo or 2x 2200mAh batteries in parallel.
  • Added packaging tape to the leading edge of the wing surfaces to prevent damage during hard landings.
  • Glued velcro along the bottom of the cargo bay to prevent batteries (also with velcro) from slipping and altering the aircraft’s COG in flight.
  • Rubber band to augment the weak canopy magnets.  This also serves the purpose of securing my VTX and microphone.

Flight Characteristics

The extra 600g in weight was immediately apparent during the maiden flight.  Hand launching was more difficult than with previous planes I have flown, and my first attempt ended up in the tall grass.  Having two people made things easier, and the next 3 launches were successful.  I’m hoping solo launches will be possible with additional practice.

Once airborne, the Bixler 2 lives up to its great reputation for stability and performance.  I was unable to provoke any nasty stall / spin characteristics, and climb performance was very reasonable – although nowhere near being capable of sustained vertical ascents.  Rolls were smooth and loops possible with enough speed – though not from level flight.

Slow flight performance was unsurprisingly less impressive than a lighter stock bixler would be capable of, although the flaps helped immensely.  I still found myself wanting to be able to slow down a bit more, but I think that will have to wait for a Skywalker or similar 2 meter wingspan airframe.  Top speed was measured by GPS at approximately 40mph.

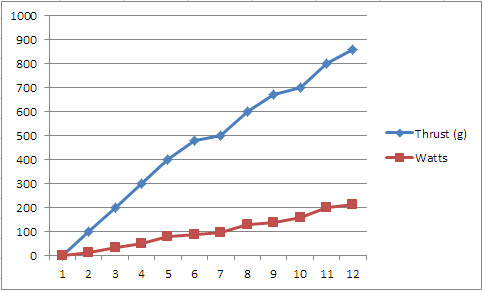
Bench testing of the power vs thrust.

Bench testing of the power vs thrust.

The 1050kv Turnigy Park450 motor and 9×6 prop combo drew a maximum of 213 watts when I tested it on the bench, producing 860g of thrust.  In the air, I noticed flight times of about 20min with 4400-5000mAh of 3S lipo battery capacity at 60-80% average throttle.

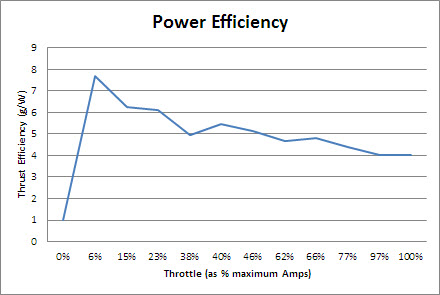
Cruise efficiency at various power settings. Throttle reported as a percent of maximum amps consumed.

Cruise efficiency at various power settings, measured in grams of thrust per Watt. Throttle reported as a percent of maximum amps consumed.

Specifications

Below is a near-comprehensive list of the parts used in my Bixler 2 build.  I re-used a motor and ESC already in my possession.  If you are building this from scratch, I suggest the NTM Prop Drive 2836 2200KV  if using the stock 6×4 prop (or the 35-36 1400KV with a larger 9×6 prop) and a beefier ESC to go with it.  Note that when buying motors you often need to buy an accessory mounting kit and often a spare shaft is a wise idea.  Nothing is worse than needing a $0.50 part and having to wait 3 weeks to get it from a warehouse in china.

Price qty Item
$44.85 1 Hobbyking Bixler 2 EPO 1500mm w/Optional Flaps (KIT)
$14.52 1 Turnigy Park450 Brushless Outrunner 1050kv
$17.95 1 smallpartscnc Bixler 2 Motor Mount
$12.19 1 TURNIGY Plush 25amp Speed Controller
$0.80 1 GWS EP Propeller (RD-1047 254x119mm) (6pcs/set)
$18.83 7 HXT900 9g / 1.6kg / .12sec Micro Servo
$4.43 1 Turnigy TGY-R5180MG 180 Degree Servo
$26.42 1 FrSky D8R-XP 2.4Ghz Receiver (w/telemetry)
$270.00 1 GoPro Hero2
$45.00 1 PZ0420 600TVL SONY SUPER HAD CCD Camera
$40.00 1 FatShark 250mW 5.8GHz Video Transmitter
$35.00 1 5.8GHz Circular Polarized spiroNet Antenna set
$3.17 1 FPV Fiberglass Pan-Tilt Camera Mount L-Size
$3.29 1 12v amplified mic
$2.99 1 L-C Power Filter for FPV A/V Systems
$24.19 1 ZIPPY Compact 5000mAh 3S 25C Lipo Pack
$17.98 2 ZIPPY Flightmax 2200mAh 3S1P 20C
$5.21 1 HobbyKing HKU5 5V/5A UBEC
$1.88 1 On Board Lipoly Low Voltage Alarm (2s~4s)
$6.75 2 2mm CF Rod, 24″
$8.98 1 4mm 40″ CF rod
$5.75 1 Gorilla Glue, 2oz
$21.36 1 Cat6 Molded Patch Cable, Grey (35′); Shileded pairs
$60.00 1 Estimated Shipping costs

Performance

Additional performance information:

Wingspan 1500mm
Material EPO
Length 963mm
Cabin space irregular
Wing Area 26.5 dm2
Wing loading 54.7g/dm2
Thrust 960g
Empty weight 900g
Maximum takeoff weight 1600g
Maximum useful load 700g
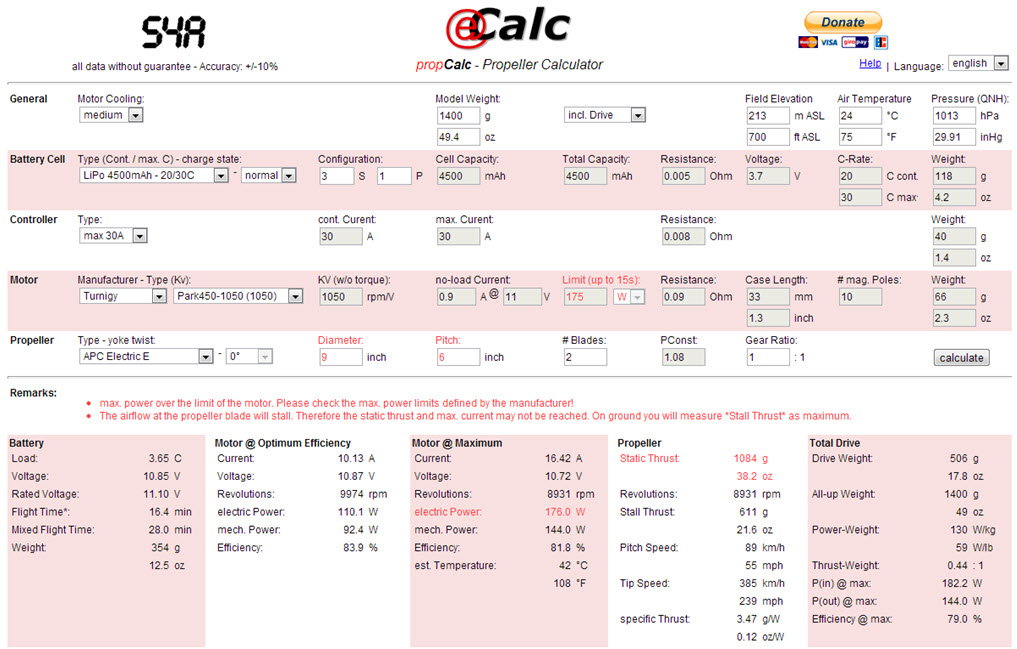
Power / Prop / Battery curves from eCalc.

Power / Prop / Battery curves from eCalc.

The video footage I captured showed no evidence of vibrations, though between the wind and my novice flying, it wasn’t a product I’d be in any hurry to publish.  I also learned why many fly with naked GoPros – ie. not using the protective case.  In addition to the weight savings, I suspect fogging of the lens may be the real motivator.  Due to substantial temperature changes with as little as a couple thousand feet of altitude, fogging is a real issue – and one that ruined my already lackluster video from the GoPro.  Fortunately, the PZ0420 camera which I used to actually fly the plane had no issue.  Future flights will see the use of newly-purchased anti-fog inserts inside the GoPro case, which should hopefully resolve the issue.

Category: Flying | Tags: , , , ,
fapjunk